Panasonic AG-HMX100 Operating Instructions-Advanced - Page 7
Setting the Luminance Key [LUMINANCE KEY] /External Key [EXT KEY - specifications
 |
View all Panasonic AG-HMX100 manuals
Add to My Manuals
Save this manual to your list of manuals |
Page 7 highlights
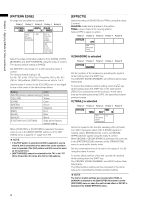
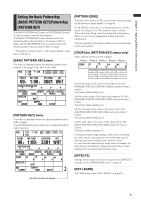
Chapter 1 Applying Effects to Video and Sound Set [C-AREA] (cancel area) in the range of [0] to [3] using the rotary 4 control. Set [MONO L] (mono level) in the range of [0] to [15] using the rotary 5 control. [CROP] Settings can be made in the same way as in the [CROP] submenu of the [PATTERN KEY] menu ( page 5). Bright area is removed as key. [EFFECTS] Settings can be made in the same way as in the [EFFECTS] submenu of the [TRANSITION] menu ( page 4). [BORDER] Use the rotary 2 control to set [COLOR] (color of the edge) to one of the colors in the table shown below. Setting Color [WHITE] (factory default setting) White [YELLOW] Yellow [CYAN] Cyan [GREEN] Green [MAGENTA] Magenta [RED] Red [BLUE] Blue [BLACK] Black [CUSTOM1] or [CUSTOM2] Grey as the factory default setting When [CUSTOM1] or [CUSTOM2] is selected, the same color as set in the [BACK MATTE] submenu of the [INT VIDEO] menu is applied ( page Vol.1-28). If [TRAIL] is selected in the [EFFECTS] submenu, the color set in the [BORDER] submenu is used as the border color when [BODM] or [BODM SPARK] is selected. Setting the Luminance Key [LUMINANCE KEY] /External Key [EXT KEY] Luminance keying is a function for creating a key with the specific brightness (luminance) of one image as the reference and keying to another image. External keying is a function for keying a specified extraneous image. The external keying function enables keying of an image which is not assigned as the input source. The following diagram shows an example of the luminance key. The [LUMINANCE KEY] menu is used to create a luminance key. The [EXT KEY] menu is used to create an external key. [LUMINANCE KEY] menu The menu appears when the LUM KEY button is pressed in the PATTERN area ( page Vol.1-14) or the pattern of No. 61 is selected. POS. X 128 Y 128 Z 196 EVENT ME TIME 00 E 1:00 F LUMINANCE KEY PATTERN INT 0061 WHT KEY SLICE SLOPE K LEVEL 0 15 255 CROP 0 0 0 0 EFFECTS OFF BORDER COLOR WHITE Scroll the screen to display. [EXT KEY] menu The menu appears when the EXT KEY button is pressed in the PATTERN area ( page Vol.1-14) or the pattern of No. 59 is selected. POS. X 128 Y 128 Z 196 EVENT ME TIME 00 E 1:00 F EXT KEY PATTERN INT 0059 WHT KEY CROP KEY SLICE SLOPE K LEVEL SDI1 0 15 255 0 0 0 0 EFFECTS OFF BORDER COLOR WHITE Scroll the screen to display. 7
-
 1
1 -
 2
2 -
 3
3 -
 4
4 -
 5
5 -
 6
6 -
 7
7 -
 8
8 -
 9
9 -
 10
10 -
 11
11 -
 12
12 -
13
-
14
-
15
-
16
-
17
-
18
-
19
-
20
-
21
-
22
-
23
-
24
-
25
-
26
-
27
-
28
-
29
-
30
-
31
-
32
-
33
-
34
-
35
-
36
-
37
 |
 |
