Panasonic AG-HMX100 Operating Instructions-Advanced - Page 26
Operating Environment Setting, Setting the System, Setting [SYSTEM1]
 |
View all Panasonic AG-HMX100 manuals
Add to My Manuals
Save this manual to your list of manuals |
Page 26 highlights
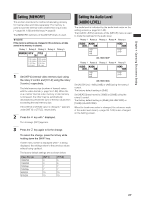
Chapter 4 Operating Environment Setting Chapter 4 Operating Environment Setting This chapter describes the settings for the operating environment of this unit, external synchronization, and external equipment. Setting the System The following describes the settings for the whole system. The [SYSTEM1] and [SYSTEM2] submenus of the [SETUP] menu are used. Setting [SYSTEM1] In one of the following cases, the time counter is reset and immediately restarted. • A button has been operated on the operation panel. • This unit has been externally operated through RS-232C or GPI control. • Video signal is being input to a connector of this unit. Rotary 1 Rotary 2 Rotary 3 Rotary 4 Rotary 5 SYSTEM1 TIME GPI SEC ME SEC FRAME ME DSK FADE To set the time display Set [TIME] to [SEC] (seconds + frames) or [FRAME] (frames only) using the rotary 2 control. The factory default setting is [SEC]. To select the video effect for GPI control The GPI trigger signal can be input to the GPI input connector to externally control one of the video effects: key/ transition, downstream key, and fade. The system goes standby on the trailing edge of the GPI trigger signal, and executes the effect three frames later. Set [GPI] to [ME] (key/transition), [DSK] or [FADE] using the rotary 3 control. The factory default setting is [ME]. Setting [SYSTEM2] To set the time until the screen saver is executed Operate the rotary 3 control to select the time until the screen saver is executed to protect the LCD. The time can be set in the range of 10 to 60 in units of 10 minutes. If [SCRN SAVE] is set to [OFF], the screen saver is not displayed. The factory default setting is [10]. The screen saver is disabled when any part on the operation panel or the external controller is operated. NOTE In 3D mode, unnecessary buttons including those for operating patterns and events are disabled. Even if any of those buttons is pressed, the screen saver is not disabled. To disable the screen saver, operate a button available in 3D mode including source selector buttons. To display the hours meter on a new screen Set [HOURS M.] to [ON] using the rotary 5 control, and press the key. The accumulated value of the energization time is displayed. The screen is closed when the key is pressed again. Rotary 1 Rotary 2 Rotary 3 Rotary 4 Rotary 5 SYSTEM2 P.SAVE SCR SAVE OFF OFF HOURS M. OFF OFF OFF OFF ON 10-60 ON To set the power management mode Set [P.SAVE] to [ON] using the rotary 2 control. If this unit is not operated for more than four hours, the power is automatically turned off. To restart the unit, turn on the POWER button. 26
-
 1
1 -
2
-
3
-
4
-
5
-
6
-
7
-
8
-
9
-
10
-
11
-
12
-
13
-
14
-
15
-
16
-
17
-
18
-
19
-
20
-
 21
21 -
 22
22 -
 23
23 -
 24
24 -
 25
25 -
 26
26 -
 27
27 -
 28
28 -
 29
29 -
 30
30 -
 31
31 -
32
-
33
-
34
-
35
-
36
-
37
 |
 |
