Panasonic AG-HMX100 Operating Instructions-Advanced - Page 24
System Con d with 2 Units of AG-HMX100P/HMX100E and 4 Cameras - video mixer
 |
View all Panasonic AG-HMX100 manuals
Add to My Manuals
Save this manual to your list of manuals |
Page 24 highlights
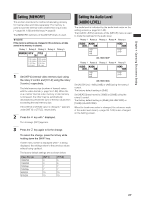
Chapter 3 Switching 3D Video System Configured with 2 Units of AG-HMX100P/HMX100E and 4 Cameras Two units of AG-HMX100P/HMX100E are used and the video from up to four cameras is switched to be used as the input source. SDI inputs 1 to 4 of the first mixer are used as the L-channel input sources, while those of the second mixer are used as the R-channel input sources. Program outputs from the first and second mixers are paired to be used as the L-channel and R-channel outputs, respectively. 3D mode is set to [MODE3-M] on the master unit and [MODE3-S] on the slave unit ( page 25). NOTE • When 3D mode is set to [MODE3-S] on the slave unit, all audio outputs are muted. Make audio output from the master unit. • In order to synchronize two units of AG-HMX100P/HMX100E, be sure to connect a signal generator and input the same synch signal. L R Professional-use 3D-integrated camera L R Professional-use 3D-integrated camera L SDI IN 1 SDI IN 2 SDI IN 3 AG-HMX100P/HMX100E (Set as master unit) SDI output Program output SDI OUT PGM L R Professional-use 3D monitor SDI IN 4 RS-232C DVI-D OUT PGM G/L DVI-D output R Professional-use 3D-integrated camera G/L external sync signal Signal generator Program output SDI (video and audio) input G/L external sync signal L-channel side Professional-use camera RS-232C G/L SDI output SDI IN 1 SDI IN 2 SDI OUT PGM SDI IN 3 SDI IN 4 L DVI-D OUT Professional-use PGM projector AG-HMX100P/HMX100E (Set as slave unit) DVI-D output Program output R-channel side Professional-use camera R Professional-use projector 24
-
 1
1 -
2
-
3
-
4
-
5
-
6
-
7
-
8
-
9
-
10
-
11
-
12
-
13
-
14
-
15
-
16
-
17
-
18
-
 19
19 -
 20
20 -
 21
21 -
 22
22 -
 23
23 -
 24
24 -
 25
25 -
 26
26 -
 27
27 -
 28
28 -
 29
29 -
30
-
31
-
32
-
33
-
34
-
35
-
36
-
37
 |
 |
