Panasonic AG-HMX100 Operating Instructions-Advanced - Page 3
Applying Effects to Video and Sound, Setting of Video Switching and Combining Effects
 |
View all Panasonic AG-HMX100 manuals
Add to My Manuals
Save this manual to your list of manuals |
Page 3 highlights
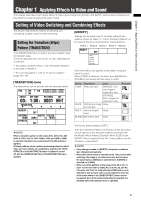
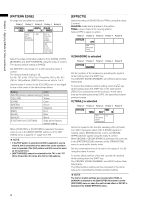
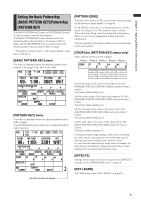
Chapter 1 Applying Effects to Video and Sound Chapter 1 Applying Effects to Video and Sound This chapter describes how to apply effects to video, give changes to transition, and perform various types of keying and title insertion as well as explaining audio mixing. Setting of Video Switching and Combining Effects This section describes the method of selecting and processing a pattern used for video switching. Setting the Transition (Wipe) Pattern [TRANSITION] The [TRANSITION] menu is used to process a pattern used for transition wipe. This menu appears when one of No. 1 to No. 1550 patterns is selected. For pattern numbers, refer to "List of Transition Patterns" at the back of Volume 2. For selecting patterns, refer to "To select a pattern" (page Vol.1-35). [TRANSITION] menu The items which can be set vary with the selected pattern. POS. X 128 Y 128 Z 196 EVENT ME TIME 00 E 1:00 F TRANSITION PATTERN INT 0001 WHT MODIFY PATTERN EDGE EFFECTS OFF WIDTH COLOR HARD 0 WHITE OFF NOTE When a transition pattern in the range of No. 200 to No. 222 (1001 to 1004, 1021 to 1023, 1030 to 1034, and 1059 to 1069) is selected, transition mix is performed. (The MIX button is lighted.) Of these patterns, when a pattern performing effects in which video and color effects are combined is selected, the VIDEO EFFECTS or COLOR EFFECTS button is lighted if turned off, and the [VIDEO EFFECTS] or [COLOR EFFECTS] menu appears. [MODIFY] Settings can be made only for the basic patterns (the patterns shown as "Basic" in "List of Transition Patterns" at the back of this document) and their related patterns. Rotary 1 Rotary 2 Rotary 3 Rotary 4 Rotary 5 MODIFY OFF OFF COMP SLIDE MULTI BLINDS Select the effect to be applied to the pattern using the rotary 2 control. When [COMP] is selected, the effect level ([SINGLE] or [DOUBLE]) can be set with the rotary 3 control. Modify COMP SLIDE Description Level Reduced wipe [SINGLE]: Only one image is reduced in size. [DOUBLE]: Both images are reduced in size. Sliding one image None into another MULTI Vertical-striped wipe None BLINDS Blind-type wipe None Example The factory default setting is [OFF]. The List of Transition Patterns at the back of this document can be used to check the basic patterns and those with the Modify effects added. (Example: When SLIDE as the MODIFY effect is applied to the No. 1 basic pattern, the No. 43 pattern is generated.) NOTE • If any change is made to [MODIFY], the pattern number is also changed automatically. • When the internal video is selected as the video source after switching, the image is not reduced in size, but becomes the same state as [SINGLE] is selected even if [BOTH] is selected for [COMP]. • When one of the patterns in the range of No. 28 to No. 41 (1501 to 1510 and 1521 to 1530), No. 32 to No. 35, and No. 130 to No. 133 (1541 to 1548) with the [COMP] effect set is selected to use an input video source reduced in size, the multi-strobe effect in the [VIDEO EFFECT] menu cannot be applied. Even if the multi-strobe effect is selected, it is disabled when the transition lever is operated. 3
-
 1
1 -
 2
2 -
 3
3 -
 4
4 -
 5
5 -
 6
6 -
 7
7 -
 8
8 -
 9
9 -
10
-
11
-
12
-
13
-
14
-
15
-
16
-
17
-
18
-
19
-
20
-
21
-
22
-
23
-
24
-
25
-
26
-
27
-
28
-
29
-
30
-
31
-
32
-
33
-
34
-
35
-
36
-
37
 |
 |
