Panasonic AG-HMX100 Operating Instructions-Advanced - Page 5
Setting the Basic Pattern Key [BASIC PATTERN KEY]/Pattern Key [PATTERN KEY], WHT
 |
View all Panasonic AG-HMX100 manuals
Add to My Manuals
Save this manual to your list of manuals |
Page 5 highlights
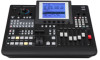
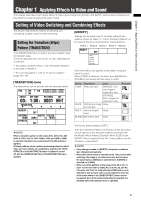
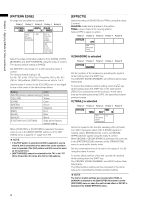
Chapter 1 Applying Effects to Video and Sound Setting the Basic Pattern Key [BASIC PATTERN KEY]/Pattern Key [PATTERN KEY] The [BASIC PATTERN KEY] menu or [PATTERN KEY] menu is used to create a key with key patterns. The [BASIC PATTERN KEY] menu appears when the selected pattern has a number in the range of 3001 to 3046, and the [PATTERN KEY] menu appears when the selected pattern has a number of 3301 or larger. For pattern numbers, refer to "List of Key Patterns" at the back of Volume 2. [BASIC PATTERN KEY] menu This menu is displayed when the selected pattern has a number in the range of No. 3001 to No. 3046. POS. X 128 Y 128 Z 196 EVENT ME TIME 00 E 1:00 F BASIC PATTERN KEY PATTERN INT 3001 WHT PATTERN EDGE EFFECTS KEY LEARN WIDTH COLOR K LEVEL HARD 16 WHITE 255 OFF EMPTY 9000 SETUP [PATTERN KEY] menu This menu is displayed when the selected pattern has No. 3301 or larger. The [PATTERN KEY] menu allows you to make settings for video cropping. POS. X 128 Y 128 Z 196 EVENT ME TIME 00 E 1:00 F PATTERN KEY PATTERN INT 3301 WHT PATTERN EDGE CROP EFFECTS KEY LEARN WIDTH COLOR K LEVEL HARD 16 WHITE 255 0 0 0 0 OFF EMPTY 9000 SETUP Scroll the screen to display. [PATTERN EDGE] The items other than [K LEVEL] can be set in the same way as the transition (wipe) pattern ( page 4). For [K LEVEL], set the key level (transparency level of the key) in the range of 0 to 255 using the rotary 5 control. The smaller the setting value, the higher the transparency. When 0 is set, the key disappears entirely (becomes transparent). The key registered in the direct patterns can be individually set for each pattern. [CROP] (for [PATTERN KEY] menu only) Video used as the key can be cropped. Rotary 1 Rotary 2 Rotary 3 Rotary 4 Rotary 5 CROP 0 0 0 0 0-243(480i) 0-243(480i) 0-720(480i) 0-720(480i) 0-288(576i) 0-288(576i) 0-720(576i) 0-720(576i) 0-720(720p) 0-720(720p) 0-1280(720p) 0-1280(720p) 0-540(1080i) 0-540(1080i) 0-1920(1080i) 0-1920(1080i) Set the top edge of the video in the range of 0 to 243 (480i)/288 (576i)/720 (720P)/540 (1080i) using the rotary 2 control. The factory default setting is 0. Set the bottom edge of the video in the range of 0 to 243 (480i)/288 (576i)/720 (720P)/540 (1080i) using the rotary 3 control. The factory default setting is 0. Set the left edge of the video in the range of 0 to 720 (480i/576i)/1280 (720P)/1920 (1080i) using the rotary 4 control. The factory default setting is 0. Set the right edge of the video in the range of 0 to 720 (480i/576i)/1280 (720P)/1920 (1080i) using the rotary 5 control. The factory default setting is 0. For top and bottom edge settings, when one is increased, the other may be decreased to prevent the total value of both settings from exceeding the maximum value. For right and left edge settings, when one is increased, the other may be decreased to prevent the total value of both settings from exceeding the maximum value. [EFFECTS] Settings can be made in the same way as in the [EFFECTS] submenu of the [TRANSITION] menu ( page 4). [KEY LEARN] See "Setting Key Learn [KEY LEARN]" ( page 9). 5
-
 1
1 -
 2
2 -
 3
3 -
 4
4 -
 5
5 -
 6
6 -
 7
7 -
 8
8 -
 9
9 -
 10
10 -
 11
11 -
12
-
13
-
14
-
15
-
16
-
17
-
18
-
19
-
20
-
21
-
22
-
23
-
24
-
25
-
26
-
27
-
28
-
29
-
30
-
31
-
32
-
33
-
34
-
35
-
36
-
37
 |
 |
