Panasonic HDC-TM20K8 User Manual - Page 36
Touch screen calibration, Changing the picture quality on the LCD monitor, Recording Yourself
 |
View all Panasonic HDC-TM20K8 manuals
Add to My Manuals
Save this manual to your list of manuals |
Page 36 highlights
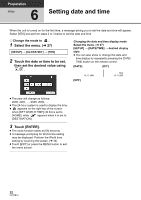
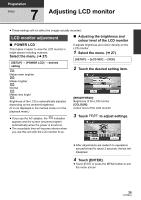
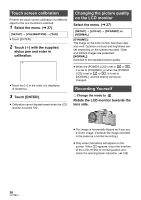
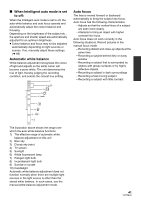
Touch screen calibration Perform the touch screen calibration if a different object to the one touched is selected. 1 Select the menu. (l 27) [SETUP] # [CALIBRATION] # [YES] ≥ Touch [ENTER]. 2 Touch [r] with the supplied stylus pen and enter in calibration. ≥ Touch the [i] in the order it is displayed. (5 locations) 3 Touch [ENTER]. ≥ Calibration cannot be performed when the LCD monitor is turned 180o. Changing the picture quality on the LCD monitor Select the menu. (l 27) [SETUP] # [LCD AI] # [DYNAMIC] or [NORMAL] [DYNAMIC]: The image on the LCD monitor becomes clear and vivid. Optimum contrast and brightness are set depending on the scenes recorded. Clear and brilliant images are presented. [NORMAL]: Switches to the standard picture quality. ≥ When the [POWER LCD] is set to +1 or +2 , it is set to [DYNAMIC], or when the [POWER LCD] is set to -1 or A , it is set to [NORMAL], and the setting cannot be changed. Recording Yourself ¬ Change the mode to . Rotate the LCD monitor towards the lens side. ≥ The image is horizontally flipped as if you see a mirror image. (However the image recorded is the same as a normal recording.) ≥ Only some indications will appear on the screen. When ° appears, return the direction of the LCD monitor to normal position and check the warning/alarm indication. (l 128) 36 VQT2B34
-
 1
1 -
2
-
3
-
4
-
5
-
6
-
7
-
8
-
9
-
10
-
11
-
12
-
13
-
14
-
15
-
16
-
17
-
18
-
19
-
20
-
21
-
22
-
23
-
24
-
25
-
26
-
27
-
28
-
29
-
30
-
 31
31 -
 32
32 -
 33
33 -
 34
34 -
 35
35 -
 36
36 -
 37
37 -
 38
38 -
 39
39 -
 40
40 -
 41
41 -
42
-
43
-
44
-
45
-
46
-
47
-
48
-
49
-
50
-
51
-
52
-
53
-
54
-
55
-
56
-
57
-
58
-
59
-
60
-
61
-
62
-
63
-
64
-
65
-
66
-
67
-
68
-
69
-
70
-
71
-
72
-
73
-
74
-
75
-
76
-
77
-
78
-
79
-
80
-
81
-
82
-
83
-
84
-
85
-
86
-
87
-
88
-
89
-
90
-
91
-
92
-
93
-
94
-
95
-
96
-
97
-
98
-
99
-
100
-
101
-
102
-
103
-
104
-
105
-
106
-
107
-
108
-
109
-
110
-
111
-
112
-
113
-
114
-
115
-
116
-
117
-
118
-
119
-
120
-
121
-
122
-
123
-
124
-
125
-
126
-
127
-
128
-
129
-
130
-
131
-
132
-
133
-
134
-
135
-
136
-
137
-
138
-
139
-
140
-
141
-
142
-
143
-
144
-
145
-
146
-
147
-
148
 |
 |