Panasonic PT-D7700U-K Dlp Projector - English/ French
Panasonic PT-D7700U-K - SXGA+ DLP Projector Manual
 |
UPC - 791871111000
View all Panasonic PT-D7700U-K manuals
Add to My Manuals
Save this manual to your list of manuals |
Panasonic PT-D7700U-K manual content summary:
- Panasonic PT-D7700U-K | Dlp Projector - English/ French - Page 1
Operating Instructions DLPTM Based Projector Commercial Use PT-D7700U Model No. PT-DW7000U ON POWER OFF AUTO SETUP RGB 1 VIDEO RGB 2 S-VIDEO AUX SHUTTER SHUT MENU FREEZE PAGE UP ENTER PAGE DOWN ON SCREEN 1 2 3 STD OSD SYSTEM SEL D.ZOOM 4 FUNC 1 5 6 BRIGHT CONTRAST 7 LENS 8 9 NEXT - Panasonic PT-D7700U-K | Dlp Projector - English/ French - Page 2
you will be pleased with your Panasonic DLPTM based projector. The serial number of your product may be found on its back. You should note it in the space provided below and retain this booklet in case service is required. Model number: PT-D7700U / PT-DW7000U Serial number: IMPORTANT SAFETY NOTICE - Panasonic PT-D7700U-K | Dlp Projector - English/ French - Page 3
digital instructions user's authority to operate. WARNING: Not for use in a computer room as defined in the Standard for the Protection of Electronic Computer/Data Processing Equipment, ANSI/NFPA 75. Declaration of Conformity Model Number: PT-D7700U / PT-DW7000U Trade Name: Panasonic ) lamp that - Panasonic PT-D7700U-K | Dlp Projector - English/ French - Page 4
..97 Indication of monitor lamp 98 Cleaning and replacement of air filter 99 Procedure of cleaning 99 Replacement of lamp unit 100 Timing of lamp unit replacement 100 Procedure of lamp unit replacement 101 Before asking for service 103 Specifications 104 Appendix 106 Outside dimensions - Panasonic PT-D7700U-K | Dlp Projector - English/ French - Page 5
is broken, turn off the power and disconnect the power cord from the wall outlet. • Continued use of the projector in this condition may result in fire or electric shocks. • Contact an Authorized Service Center for repairs. Do not cover the air filter, the air inlet and exhaust vents. • Doing so may - Panasonic PT-D7700U-K | Dlp Projector - English/ French - Page 6
could result. • If any water gets inside the projector, contact an Authorized Service Center. Do not insert any foreign objects into the projector. • Do not insert any metal objects or flammable objects into the projector or drop them onto the projector, as doing so can result in fire or electric - Panasonic PT-D7700U-K | Dlp Projector - English/ French - Page 7
Service Center to clean inside the projector at least once a year. • If dust is left to build up inside the projector without being cleaned out, it can result in fire or problems 6 BRIGHT CONTRAST 7 LENS 8 9 NEXT ASPECT 0 USER LIGHT ID ALL ID SET Computer Numetric LASER ON/OFF Projector 7 - Panasonic PT-D7700U-K | Dlp Projector - English/ French - Page 8
the lens with the supplied lens cap when the projector is not used. Screen If the screen has stains, flaws or discoloration, clear images cannot be viewed. When handling the screen, be careful not to apply volatile substances or leave flaws or stains on the screen. Lamp A mercury lamp with high - Panasonic PT-D7700U-K | Dlp Projector - English/ French - Page 9
viewing (Realization of high-resolution picture.) System 4 Connection of a signal selector enables to feed a variety of video sources to the projector. Digital broadcasting tuner or DVD player Control PC Video deck Signal selector (Option) POWER ON OFF INPUT SELECT OFF 1 2 3 4 5 6 VP - Panasonic PT-D7700U-K | Dlp Projector - English/ French - Page 10
LENS 8 9 NEXT ASPECT 0 USER LIGHT ID ALL ID SET Computer Numetric LASER ON/OFF Projector < When the operation mode selector is set to Projector > Remote control operation indicator lamp The lamp on the screen. While the auto setup feature is active, a message "PROGRESS..." appears - Panasonic PT-D7700U-K | Dlp Projector - English/ French - Page 11
CONTRAST 7 LENS 8 9 NEXT ASPECT 0 USER LIGHT ID ALL ID SET Computer Numetric LASER ON/OFF Projector 1RGB POWEROFF service personnel needs to be entered. Operation mode selector (Computer/Numeric, Projector) switch (page 17) Put this selector to the right position to control the projector - Panasonic PT-D7700U-K | Dlp Projector - English/ French - Page 12
commercial line power applied to the projector. Burglar lock Attach a commercial lamp lights up when the time to replace lamp unit 1 is reached. It also blinks if something unusual occurs in the lamp circuit. Projection lens (optional) Lens for projecting images on the screen. Projection lens - Panasonic PT-D7700U-K | Dlp Projector - English/ French - Page 13
RGB 1 RGB 2 VIDEO S-VIDEO AUTO SETUP AUX SHUTTER LENS MENU ENTER Lamp unit cover The lamp unit is housed. Remote control receiver window (rear) (page corrects the picture positioning on the screen. While the auto setup feature is active, a message "EXECUTING..." appears on the screen. RGB1 - Panasonic PT-D7700U-K | Dlp Projector - English/ French - Page 14
main units are used in the system, they can be connected and controlled with a wired remote control cable (M3 jack). REMOTE2 terminal (page 84) The user can remotely control the main unit by using an external control circuit to this terminal (D-SUB 9-pin female). SERIAL IN terminal (pages 25-27, 74 - Panasonic PT-D7700U-K | Dlp Projector - English/ French - Page 15
15˚ 15˚ 15˚ Remote control [Side view] 15˚ Figure 1 Screen Projector Remote control receiver window (front) Remote control Figure 2 Remote control receiver window intense ambient light such as fluorescent lamps. Carefully site the projector so its remote control receiver windows will not - Panasonic PT-D7700U-K | Dlp Projector - English/ French - Page 16
user can operate the remote control. The ID number of the projector is set to "ALL" on shipping, and use the ID ALL button of the remote control when using only a single projector to set the number of the tens digit in the ID number, which is already set in the projector, and then use one of the - Panasonic PT-D7700U-K | Dlp Projector - English/ French - Page 17
UP ENTER PAGE DOWN ON SCREEN 1 2 3 STD OSD SYSTEM SEL D.ZOOM 4 FUNC 1 5 6 BRIGHT CONTRAST 7 LENS 8 9 NEXT ASPECT 0 USER LIGHT ID ALL ID SET Computer Numetric LASER ON/OFF Projector PAGE UP button ENTER button Right click ( ) button PAGE DOWN button Operation mode selector switch - Panasonic PT-D7700U-K | Dlp Projector - English/ French - Page 18
reference. After the projector is roughly positioned, picture size and vertical picture positioning can be finely adjusted with the powered zoom lens and lens shifting mechanism. Side SW 86 (3.4") 140 (5.5") 314 (12.3") For PT-D7700U: H = 0 to SH 18 For PT-DW7000U: H = -0.18 x SH to 1.18 x SH - Panasonic PT-D7700U-K | Dlp Projector - English/ French - Page 19
screen height SH L Projection distances by the type of projection lenses (for PT-D7700U) • For the screen aspect ratio of 4:3 Units: m (feet/inches) Screen Projection distance (L) Screen dimensions Zoom lens Fixed- size Effective Effective ET-D75LE1 ET-D75LE2 ET-D75LE3 ET-D75LE4 ET - Panasonic PT-D7700U-K | Dlp Projector - English/ French - Page 20
(optional) (continuing) Projection distances by the type of projection lenses (for PT-D7700U) • For the screen aspect ratio of 16:9 Units: m (feet/inches) Screen Projection distance (L) Screen dimensions Zoom lens Fixed- size Effective Effective ET-D75LE1 ET-D75LE2 ET-D75LE3 ET-D75LE4 - Panasonic PT-D7700U-K | Dlp Projector - English/ French - Page 21
by the type of projection lenses (for PT-DW7000U) • For the screen aspect ratio of 16:9 Units: m (feet/inches) Screen Projection distance (L) Screen dimensions Zoom lens Fixed- size Effective Effective ET-D75LE1 ET-D75LE2 ET-D75LE3 ET-D75LE4 ET-D75LE8 focus lens (inch) height width - Panasonic PT-D7700U-K | Dlp Projector - English/ French - Page 22
Installation If the projector is used with a screen size not listed in this manual, check the diagonal dimension (inch) of your screen and calculate the projection distance using the following formulas. Calculation formulas for projection distance by lens types (for PT-D7700U) Model number of - Panasonic PT-D7700U-K | Dlp Projector - English/ French - Page 23
formulas for projection distance by lens types (for PT-DW7000U) Model number of projection lens Aspect ratio Projection distance (L) 0.0795 Maximal distance: L=0.0689 x Screen diagonal (inch) - 0.1064 Zoom lens ET-D75LE3 (3.0-5.0 :1) 16:9 Minimal distance: L=0.0689 x Screen diagonal (inch - Panasonic PT-D7700U-K | Dlp Projector - English/ French - Page 24
connection Before connection, read carefully the instruction manual for the device to be connected. must be connected. The projector accepts the following signals: video, S-Video, analog RGB and digital signals from the PC. Some PC models cannot be connected to the projector. The pin-out and - Panasonic PT-D7700U-K | Dlp Projector - English/ French - Page 25
deck Attention • When connecting with a video deck, be sure to use the one with a built-in time base corrector (TBC) or use a TBC between the projector and the video deck. • If nonstandard burst signals are connected, the image may be distorted. If this is the case, connect a TBC between the - Panasonic PT-D7700U-K | Dlp Projector - English/ French - Page 26
RGB 2 IN Attention • When the main power of the main unit is turned off, also turn off the power of the PC. Note • For the specifications of the RGB signals that can be applied from the PC, see the data sheet on page 106. • If your PC has the resume - Panasonic PT-D7700U-K | Dlp Projector - English/ French - Page 27
deck (TBC built-in) Notebook computer Control PC Signal selector Digital broadcasting tuner POWER ON OFF INPUT SELECT OFF 1 2 3 projector with a RS-232C cable, signals can be used separately according to the input terminal on the signal selector. • Carefully read also the instruction manual - Panasonic PT-D7700U-K | Dlp Projector - English/ French - Page 28
Dot clock frequency: 20 MHz -162 MHz Signals supporting color-difference input Types Supported: 480i, 576i, 480p, 576p, 720/60p, digital signal ET-MD95SD1 SMPTE259M compliant Serial digital signal ET-MD95SD2 SMPTE259M/294M compliant HD serial digital signal ET-MD95SD3 VGA, SVGA, XGA, SXGA - Panasonic PT-D7700U-K | Dlp Projector - English/ French - Page 29
slot cover. Remove 2 screws. Insert the input module. Input module Slot Tighten the two screws. Fix the input module. Register the input signal. This projector needs to register the type of input signal after the installation of the input module. (For details on the registration of the input - Panasonic PT-D7700U-K | Dlp Projector - English/ French - Page 30
. Refer to the following diagram to establish proper signal connection. PC RGB signal I/F Projector High-vision video deck Component signal RGB signal input module ET-MD95RGB DVD player / Component signal BS digital HD tuner Video signal input module ET-MD95VM2 Video deck (TBC built-in - Panasonic PT-D7700U-K | Dlp Projector - English/ French - Page 31
input module An interface (D-SUB BNC) is necessary to connect the projector with a PC using an analog RGB signal input module. 1. Connecting (conversion connector) PC Attention • The module does not support the three value synchronizing input to the H/H•V and V DVD player / BS digital HD tuner 31 - Panasonic PT-D7700U-K | Dlp Projector - English/ French - Page 32
terminal Monitor TV DVD player Video deck (TBC built-in) BS digital HD tuner • An optional slot selector (AUX) button toggles between the in TBC (time base corrector) or use the time base corrector between the projector and the video deck. • If burst signals are connected to the nonstandard - Panasonic PT-D7700U-K | Dlp Projector - English/ French - Page 33
2. Connecting the component signals Video signal input module (optional) ET-MD95VM2 LINE/Cr IN Video Module ET-MD95VM2 LINE OUT Y IN C/Cb IN Luminance signals Y Color-difference signals Cr Color-difference signals Cb DVD player Video deck (TBC built-in) • For details on switching between - Panasonic PT-D7700U-K | Dlp Projector - English/ French - Page 34
SD signal output (active through) Business digital video deck • Insert the input module suitable for the input signal specifications. • Use the SYSTEM SELECTOR button to toggle the systems of the input module that supports two types of signal specifications. Upon toggling, the input signals are - Panasonic PT-D7700U-K | Dlp Projector - English/ French - Page 35
SUB IN SERIAL SD signal SUB OUT Connect nothing to SUB IN/OUT terminals. Business-use digital video deck SD signal output (active through) • Insert the input module that meets the input signal specifications. • Use the SYSTEM SELECTOR button to select the input module that meets desired one of - Panasonic PT-D7700U-K | Dlp Projector - English/ French - Page 36
720p Module ET-MD95SD3 IN OUT HD SERIAL HD SD signal HD SD signal output (active through) Business-use digital video deck • Insert the input module that meets the input signal specifications. • Use the SYSTEM SELECTOR button to select the input module that meets desired one of the eight types - Panasonic PT-D7700U-K | Dlp Projector - English/ French - Page 37
of DVI-D input terminal are listed in the table at right (terminal for TMDS-equipped PC). External view • The DVI-D signal input module supports only a single link. Pin No. Signal TMDS data 2- TMDS data 2+ TMDS data 2 / 4 shield (T.M.D.S data 4-) (T.M.D.S data 4+) DDC clock DDC data T.M.D.S data - Panasonic PT-D7700U-K | Dlp Projector - English/ French - Page 38
the dustproof sheet on the back of the projection lens cover. Align the mark (orange) on the projection lens with the mark on the projector ( ), and then insert the lens and turn it clockwise until it clicks into place. Mark (orange) Lens cover's lock button While holding down the lock button - Panasonic PT-D7700U-K | Dlp Projector - English/ French - Page 39
BRIGHT CONTRAST 7 LENS 8 9 NEXT ASPECT 0 USER LIGHT ID ALL ID SET Computer Numetric LASER ON/OFF Projector Powering up the projector Connect the The power indicator lamp on the projector will flash in red. After a short period, the indicator will illuminate and the projector will enter - Panasonic PT-D7700U-K | Dlp Projector - English/ French - Page 40
BRIGHT CONTRAST 7 LENS 8 9 NEXT ASPECT 0 USER LIGHT ID ALL ID SET Computer Numetric LASER ON/OFF Projector Powering off the projector Press the fan stops. (Power indicator lamp lit in red) • If you re-power the projector after shutting off the main power inadvertently, the projection lamp - Panasonic PT-D7700U-K | Dlp Projector - English/ French - Page 41
is to protect the parts of the projector. Using the standard projection position as the reference, the optical axis shift function makes it possible to adjust the projection position in the ranges shown in the figures below. PT-D7700U PT-DW7000U Projected screen height,V 0.1V 0.1V ; ;Standard - Panasonic PT-D7700U-K | Dlp Projector - English/ French - Page 42
counterclockwise. • Tool to be used : Allen hex socket driver or Allen wrench (2.5-mm diagonal hexagon) c Adjust the screws installing the lens. b , , and after The instructions within parentheses apply to ceiling mount installation. V up is out of focus V bottom is out of focus H right is out - Panasonic PT-D7700U-K | Dlp Projector - English/ French - Page 43
image is supplied, a message "INCOMPLETE" appears, indicating the automatic adjustment was unsuccessful. In this case, manually adjust the items of "INPUT RESOLUTION", "CLOCK PHASE" and "SHIFT". • For specific signals and long-sideways (or landscape) signals such as 16:9, adjustment should be made - Panasonic PT-D7700U-K | Dlp Projector - English/ French - Page 44
be registered because it is not registered on shipment of the projector. Registration of new data When a new signal is supplied, press Note • The data of 96 input signals can be registered. • The signals supporting the installed input module are input and their data registered. • The memories are - Panasonic PT-D7700U-K | Dlp Projector - English/ French - Page 45
RENAME NAME: SVGA72-A2 MEMORY NO: A2 S.S.NO: - - INPUT NO: RGB1 fH: 48.08kHz fV: 72.17Hz SYNC. STATE: H(POS) V(POS) :NEXT FIGURE :FONT SELECT ENTER:SET MENU:ESC Press the "ENTER" button. The RENAME screen will be displayed. Select each character with the and buttons, and set the - Panasonic PT-D7700U-K | Dlp Projector - English/ French - Page 46
signal data Sub memory The projector is provided with a sub memory function to register plural pieces of image adjustment data even they are determined to be the same signal by the frequency and form of the synchronization signal source. Use this function when the user needs adjustment of picture - Panasonic PT-D7700U-K | Dlp Projector - English/ French - Page 47
in which address code (A1, A2, ..., H7 and H8) signals are registered Note Restrictions The maximum sub memory items that can be registered for the projector are 96 including the basic signal. 47 - Panasonic PT-D7700U-K | Dlp Projector - English/ French - Page 48
that allows the user to hide images of the remote control. It is useful for highlighting a specific object during the presentation. E 18 5% D 47 13% digital zoomed state cannot be stored in memory. • If the input signal format is changed while in digital zoom mode, the projector will exit digital - Panasonic PT-D7700U-K | Dlp Projector - English/ French - Page 49
PROJECTOR ID SETTING LAMP SELECT LAMP POWER RS232C SETTING OSD POSITION SYSTEM INFORMATION COLOR MATCHING VIDEO SETTING AUTO SETUP 2 FRONT-F DUAL HIGH 2 OFF :MENU SELECT :CHANGE OPTION OUTPUT RESOLUTION AUTO SIGNAL FAN CONTROL P IN P FUNC1 PASSWORD SXGA MENU DIGITAL CINEMA - Panasonic PT-D7700U-K | Dlp Projector - English/ French - Page 50
all menus from the screen. Menu items shown in gray characters • Some menu items may not be valid for certain signal formats applied to the projector. The menu items that cannot be adjusted or used are shown in gray characters, and they cannot be selected. Menu items setting The bottom prompt - Panasonic PT-D7700U-K | Dlp Projector - English/ French - Page 51
Adjusting the picture Switching the picture mode The user can switch to the desired picture mode suitable for the image source and the environment in which this projector is used. MAIN MENU PICTURE POSITION ADVANCED MENU LANGUAGE OPTION TEST PATTERN SIGNAL LIST SECURITY Press the "MENU" button. - Panasonic PT-D7700U-K | Dlp Projector - English/ French - Page 52
Adjusting the picture The desired picture can be obtained by following the procedure below. Adjusting Contrast / Bright / Color / Tint Adjustment procedure - to adjust picture (color intensity) MAIN MENU PICTURE POSITION ADVANCED MENU LANGUAGE OPTION TEST PATTERN SIGNAL LIST SECURITY Press the " - Panasonic PT-D7700U-K | Dlp Projector - English/ French - Page 53
Registering the picture mode settings as presettings The screen settings which have been adjusted by following the adjustment procedure (on the previous page) can be registered. MAIN MENU PICTURE POSITION ADVANCED MENU LANGUAGE OPTION TEST PATTERN SIGNAL LIST SECURITY Press the "MENU" button. The - Panasonic PT-D7700U-K | Dlp Projector - English/ French - Page 54
IRIS" setting with the buttons. Aperture compensation and signal compensation amounts 1: Low, 2: (Intermediate), 3: High USER: (See below), OFF: No compensation DYNAMIC IRIS AUTO IRIS MANUAL IRIS DYNAMIC GAMMA 2 OFF 1 :MENU SELECT :CHANGE To further adjust the selected compensation amount - Panasonic PT-D7700U-K | Dlp Projector - English/ French - Page 55
been selected for color matching, the COLOR TEMP. setting is fixed at "USER1" • "DEFAULT" cannot be selected when the picture mode has been set to "USER" 55 - Panasonic PT-D7700U-K | Dlp Projector - English/ French - Page 56
Adjusting the picture Sharpness / Gamma / Noise reduction Procedure of adjustment MAIN MENU PICTURE POSITION ADVANCED MENU LANGUAGE OPTION TEST PATTERN SIGNAL LIST SECURITY Press the "MENU" button. The MAIN MENU screen will be displayed. Select "PICTURE" with the buttons. PICTURE PICTURE MODE - Panasonic PT-D7700U-K | Dlp Projector - English/ French - Page 57
by following the procedure below. Shift adjustment This function allows the user to adjust the picture position vertically or horizontally if the position of the image projected on the screen is displaced when the projector is properly positioned against the screen. Procedure of adjustment MAIN - Panasonic PT-D7700U-K | Dlp Projector - English/ French - Page 58
Adjusting the position Size adjustment Procedure of adjustment MAIN MENU PICTURE POSITION ADVANCED MENU LANGUAGE OPTION TEST PATTERN SIGNAL LIST SECURITY :MENU SELECT ENTER:SUB MENU POSITION SHIFT SIZE CLOCK PHASE KEYSTONE DEFAULT 0 :MENU SELECT :CHANGE ENTER:SUB MENU ZOOM INTERLOCKED: V: H: - Panasonic PT-D7700U-K | Dlp Projector - English/ French - Page 59
input signals. • ZOOM: Pictures can be displayed in various magnifications. The user can magnify the pictures with the magnification ranging from 50% to 999%, into the panels aspect ratio (4:3 for PT-D7700U and 16:9 for PT-DW7000U). • VID AUTO: The projector identifies the video ID (VID) embedded - Panasonic PT-D7700U-K | Dlp Projector - English/ French - Page 60
adjusted value is reflected in other input signals. • Keystone distortion can be corrected to ±40° of the angle of tilt for the projector against the screen. (The range for the angle of elevation is within ±19° when using a lens with a fixed focal point, and it is within ±34° when using an LE1 - Panasonic PT-D7700U-K | Dlp Projector - English/ French - Page 61
(2:2 pulldown) is performed when a 576i signal is input. Note • In DIGITAL CINEMA REALITY mode, the image quality will be deteriorated if 30p FIXED or analog RGB input module (ET-MD95RGB). RGB1, RGB2 inputs do not support BETACAM signals. • This function can be switched only when receiving the - Panasonic PT-D7700U-K | Dlp Projector - English/ French - Page 62
. The MAIN MENU screen will be displayed. Select the "ADVANCED MENU" with the buttons. :MENU SELECT ENTER:SUB MENU ADVANCED MENU DIGITAL CINEMA REALITY AUTO FORMAT SMPTE BLANKING INPUT RESOLUTION CLAMP POSITION EDGE BLENDING OFF SYNC.TERM 75 RASTER POSITION Press the "ENTER" button - Panasonic PT-D7700U-K | Dlp Projector - English/ French - Page 63
. The MAIN MENU screen will be displayed. Select the "ADVANCED MENU" with the buttons. :MENU SELECT ENTER:SUB MENU ADVANCED MENU DIGITAL CINEMA REALITY AUTO FORMAT SMPTE BLANKING INPUT RESOLUTION CLAMP POSITION EDGE BLENDING OFF SYNC.TERM 75 RASTER POSITION Press the "ENTER" button - Panasonic PT-D7700U-K | Dlp Projector - English/ French - Page 64
" button. The MAIN MENU screen will be displayed. Select "ADVANCED MENU" with the buttons. :MENU SELECT ENTER:SUB MENU ADVANCED MENU DIGITAL CINEMA REALITY AUTO FORMAT SMPTE BLANKING INPUT RESOLUTION CLAMP POSITION EDGE BLENDING OFF SYNC.TERM 75 RASTER POSITION Press the "ENTER" button - Panasonic PT-D7700U-K | Dlp Projector - English/ French - Page 65
This projector has the "ADVANCED MENU" with the buttons. ADVANCED MENU DIGITAL CINEMA REALITY AUTO FORMAT SMPTE BLANKING INPUT RESOLUTION CLAMP POSITION is to be used for the tilting of the edge blending area. USER: When a specific tilting is to be used for the tilting of the edge blending - Panasonic PT-D7700U-K | Dlp Projector - English/ French - Page 66
How to switch the input impedance (signal level) of the synchronization signal When the ET-MD95RGB input module (sold separately) is mounted, the user can switch the input impedance (signal level) of the synchronization signal with the analog RGB input. Choose 75 Ω when connecting with the equipment - Panasonic PT-D7700U-K | Dlp Projector - English/ French - Page 67
LIST SECURITY Press the "MENU" button. The MAIN MENU screen will be displayed. Select "ADVANCED MENU" with the buttons. ADVANCED MENU DIGITAL CINEMA REALITY AUTO FORMAT SMPTE BLANKING INPUT RESOLUTION CLAMP POSITION EDGE BLENDING OFF SYNC.TERM 75 RASTER POSITION Press "ENTER" button - Panasonic PT-D7700U-K | Dlp Projector - English/ French - Page 68
continuing) PT-D7700U - Panasonic PT-D7700U-K | Dlp Projector - English/ French - Page 69
menu screen operation (page 89) enables the user to make the following changes depending on S For the setting of ET-MD95VM2 YCbCr Serial digital input module ET-MD95SD1 : RGB RGB REALITY the system mode (with the SYSTEM SELECTOR), the projector automatically returns to AUTO1, AUTO2, or AUTO. ET - Panasonic PT-D7700U-K | Dlp Projector - English/ French - Page 70
highquality playback by motion-image-specific picture conversion process. This supported Note • The automatic picture adjustment (page 43) and the adjustment of the input resolution (page 63) cannot be performed because the optimal adjustment value is preset in the RGB REALITY mode. • The projector - Panasonic PT-D7700U-K | Dlp Projector - English/ French - Page 71
user to control two or more projectors either simultaneously or separately with a single remote control. The ID number is set to "ALL" by default. Hence the ID number need not be set when only one projector SELECT ENTER:SUB MENU OPTION PROJECTOR ID SETTING LAMP SELECT LAMP POWER RS232C SETTING OSD - Panasonic PT-D7700U-K | Dlp Projector - English/ French - Page 72
" button. The MAIN MENU screen will be displayed. Select "OPTION" with the buttons. :MENU SELECT ENTER:SUB MENU OPTION PROJECTOR ID SETTING LAMP SELECT LAMP POWER RS232C SETTING OSD POSITION SYSTEM INFORMATION COLOR MATCHING VIDEO SETTING AUTO SETUP 2 FRONT-F DUAL HIGH 2 OFF :MENU SELECT :CHANGE - Panasonic PT-D7700U-K | Dlp Projector - English/ French - Page 73
or "SINGLE" mode depending on user's needs or viewing conditions. In the "SINGLE" mode, the projector may automatically switches between one lamp and the other, or one of the lamps can be specified. LAMP SELECT LAMP1 LAMP2 SINGLE DUAL "LAMP 1": One lamp illuminates. (Lamp Unit 1 is always used - Panasonic PT-D7700U-K | Dlp Projector - English/ French - Page 74
and buttons to select "RS232C SETTING". OPTION PROJECTOR ID SETTING LAMP SELECT LAMP POWER RS232C SETTING OSD POSITION SYSTEM INFORMATION COLOR system returns to the normal screen. 74 Position of on-screen indications The user can specify the position of the on-screen indications OSD POSITION 1 2 - Panasonic PT-D7700U-K | Dlp Projector - English/ French - Page 75
simultaneously, this projector allows the user to correct "OPTION" with the buttons. OPTION PROJECTOR ID SETTING LAMP SELECT LAMP POWER RS232C SETTING OSD POSITION SYSTEM INFORMATION out by a person who is familiar with the projector or by a service person because a high level of skill is required - Panasonic PT-D7700U-K | Dlp Projector - English/ French - Page 76
Option settings Adjusting the color matching using a colorimeter The "R", "G", "B", "Cy", "Mg", "Ye" and "Wh" colors can be changed to the desired hues using a colorimeter which is capable of measuring the chromaticity coordinates and luminance. - Panasonic PT-D7700U-K | Dlp Projector - English/ French - Page 77
Video setting This feature allows the user to select the signaling system according to the "WIDE": to receive signals of which image aspect is 16:9 (oblong) "USER": to receive signals of specific horizontal resolution (number of horizontally displayed dots) MODE Applicable resolution 640 x 400, - Panasonic PT-D7700U-K | Dlp Projector - English/ French - Page 78
D7700U only) Pictures projected onto a screen (for SXGA) with a 5:4 aspect ratio can be displayed with the SXGA . OPTION OUTPUT RESOLUTION AUTO SIGNAL FAN CONTROL P IN P FUNC1 PASSWORD SXGA+ ON NORMAL OFF P IN . Fan control When using the projector over 1 400 m (4605.3') above sea - Panasonic PT-D7700U-K | Dlp Projector - English/ French - Page 79
condition of the Picture-InPicture. OPTION OUTPUT RESOLUTION AUTO SIGNAL FAN CONTROL P IN P FUNC1 PASSWORD SXGA+ ON NORMAL USER1 P IN P :MENU SELECT :CHANGE for the input signals specified for the subwindow. • Type: The user can select the window that is displayed by priority when two windows - Panasonic PT-D7700U-K | Dlp Projector - English/ French - Page 80
P IN P to OFF, USER 1, USER 2, or USER 3. (refer to page 79). "LAMP POWER": Enables the lamp power to be switched between high and low (refer to page 73). "SIZE": Enables the picture size to be selected (refer to page 58). 80 Password This function is used when a service person. Input the - Panasonic PT-D7700U-K | Dlp Projector - English/ French - Page 81
" button. The MAIN MENU screen will be displayed. Select "OPTION" with the buttons. :MENU SELECT ENTER:SUB MENU OPTION PROJECTOR ID SETTING LAMP SELECT LAMP POWER RS232C SETTING OSD POSITION SYSTEM INFORMATION COLOR MATCHING VIDEO SETTING AUTO SETUP 2 FRONT-F DUAL HIGH 2 OFF :MENU SELECT ENTER - Panasonic PT-D7700U-K | Dlp Projector - English/ French - Page 82
rate the lamp starts Projector ID supported on the RS-232C interface is ZZ (ALL) and a group of 1 to 64 and 0A to 0Z. • If a command is sent with a projector ID specified, the projector will return answer back only in the following cases: If it coincides with the projector ID, ID specification - Panasonic PT-D7700U-K | Dlp Projector - English/ French - Page 83
= Only LAMP 1 is on 3 = Only LAMP 2 is on Parameter Lamp power setting 0 = HIGH, 1= LOW "SINGLE" will use the lamp (LAMP 1 or LAMP 2) with shorter operating hours. Note • If you need a detailed command list, please contact your dealer. Cable specifications Projector 1 NC - Panasonic PT-D7700U-K | Dlp Projector - English/ French - Page 84
cannot be received. Example of a control panel layout Remote terminal External control Remote terminal/External control STANDBY ON LAMP RGB1 VIDEO RGB2 S-VIDEO Projector set up in a meeting room Pin assignments and control Be sure to short-circuit Pins and when controlling. Control - Panasonic PT-D7700U-K | Dlp Projector - English/ French - Page 85
Displaying the internal test pattern The projector has eight types of internal test patterns to check the screen + Flag (inversion) RS-422 control functions The RS-232C terminal of the projector is available as a RS-422 control terminal. RS-232C control terminal is selected on shipping. CAUTION - Panasonic PT-D7700U-K | Dlp Projector - English/ French - Page 86
displayed when the power has been turned on. Unless the correct password is entered, the user will be prohibited from performing any operations apart from the power off ( ) button and lens adjustments. SECURITY PASSWORD PASSWORD CHANGE TEXT DISPLAY TEXT CHANGE OFF OFF Select "PASSWORD" with the - Panasonic PT-D7700U-K | Dlp Projector - English/ French - Page 87
Changing the password The password can be changed. SECURITY PASSWORD PASSWORD CHANGE TEXT DISPLAY TEXT CHANGE OFF OFF Select "PASSWORD CHANGE" with the buttons. PASSWORD NEW CONFIRM :INPUT ENTER:SET Press the "ENTER" button. The PASSWORD screen will be displayed. Set the password with the , , - Panasonic PT-D7700U-K | Dlp Projector - English/ French - Page 88
How to use CP OPTION The on-screen indication can be turned "ON" or "OFF" and the system selector setting can be changed using the rear panel operating section of the main unit. Setting the on-screen indication function Procedure of setting MAIN MENU PICTURE POSITION ADVANCED MENU LANGUAGE OPTION - Panasonic PT-D7700U-K | Dlp Projector - English/ French - Page 89
Setting the system format Procedure of setting MAIN MENU PICTURE POSITION ADVANCED MENU LANGUAGE OPTION TEST PATTERN SIGNAL LIST SECURITY CP OPTION :MENU SELECT ENTER:SUB MENU CP OPTION OSD ON SYSTEM SELECTOR Hold down the "MENU" button for 3 or so seconds. If the on-screen function is "OFF", - Panasonic PT-D7700U-K | Dlp Projector - English/ French - Page 90
lamp used hours reaches the set value. Example of connection A LAN cable is required to use the network module. PC Projector mail server must be established. Make sure that E-mail feature is available in your system. • Use a LAN terminal A special terminal for service person. Connect nothing here. - Panasonic PT-D7700U-K | Dlp Projector - English/ French - Page 91
button. The MAIN MENU screen will be displayed. Select "OPTION" with the buttons. :MENU SELECT ENTER:SUB MENU OPTION PROJECTOR ID SETTING LAMP SELECT LAMP POWER RS232C SETTING OSD POSITION SYSTEM INFORMATION COLOR MATCHING VIDEO SETTING NETWORK SETTING 2 FRONT-F DUAL HIGH 2 3COLORS :MENU SELECT - Panasonic PT-D7700U-K | Dlp Projector - English/ French - Page 92
"user1" in the user name field and enter "panasonic" (lower case) in the password field. Press OK and the top page will appear. Note • Avoid activating two or more Web browser simultaneously to work out setting or control actions. • This feature is effective when the on-line lamp of network module - Panasonic PT-D7700U-K | Dlp Projector - English/ French - Page 93
E-mail setting button Click this item, and an E-mail setting page appears. Monitor information button Click this item, and the status of the projector is displayed. Link button to network setting Link button to time setting If time setting goes wrong immediately after setting time, the battery must - Panasonic PT-D7700U-K | Dlp Projector - English/ French - Page 94
. Enter the net mask if DHCP server is not used. Advanced control page Enter the gateway address if DHCP server is not used. Enter the projector name. Enter this field when the host name is required such as when to use the DHCP server. On-screen status is displayed, even if - Panasonic PT-D7700U-K | Dlp Projector - English/ French - Page 95
's intake air. Displays temperature inside the projector. Displays temperature of projector exhaust. Displays the lamp lit hours. Displays used hours of the projector. Displays self-diagnosis information. E-mail setting page • This page allows the user to send mail to up to two mail addresses - Panasonic PT-D7700U-K | Dlp Projector - English/ French - Page 96
has reached the value set in the field on the right. Warning LAMP2: remaining lamp service time has reached the value set in the field on the right. Warning input air Temperature: temperature inside the projector has reached the value set in the above field. Warning output air Temperature - Panasonic PT-D7700U-K | Dlp Projector - English/ French - Page 97
setting back to the factory setting Using the following procedure, the user can return all settings of network module such as IP address, supply of the projector to standby state. Using something with a thin tip, press and hold the FUNCTION switch for three seconds. The ON-LINE lamp blinks and - Panasonic PT-D7700U-K | Dlp Projector - English/ French - Page 98
in red (3 times) Cooling fan has been stopped. Indicates the time for replacing the lamp unit. Error is detected in the lamp circuit. • Turn off the a "REPLACE THE LAMP" message on the screen when turning on the projector power supply. • This lamp monitor lights up when the lamp unit used hours - Panasonic PT-D7700U-K | Dlp Projector - English/ French - Page 99
without the air filter fitted inside, dirt and dust are sucked into the projector, causing failure. Note • If cleaning cannot remove the dust completely, then it is a sign to replace the air filter. Consult the dealer. In addition, when the lamp unit is replaced, also replace the air filter. 99 - Panasonic PT-D7700U-K | Dlp Projector - English/ French - Page 100
and the intervals between previous lighting and next lighting). Therefore, it is strongly recommended for the user to keep a spare bulb. If your lamp unit is not replaced after 1 300 hours 2 (with the lamp output set at "HIGH"), power supply will be turned off automatically at the time of 1 500 - Panasonic PT-D7700U-K | Dlp Projector - English/ French - Page 101
from the main unit. 4. Use a Phillips screwdriver to loosen each of the two lamp unit fixing screws until the screws turn freely. Then hold the handle of the lamp unit and gently pull it out from the projector. Caution The lamp unit will be hot after it has been used. You might get burned - Panasonic PT-D7700U-K | Dlp Projector - English/ French - Page 102
press the "ENTER" button. The used hours of the specified lamp unit will be reset to zero. When more than one lamp has been replaced, repeat the procedure from step 14. 102 OPTION PROJECTOR ID SETTING LAMP SELECT LAMP POWER RS232C SETTING OSD POSITION SYSTEM INFORMATION COLOR MATCHING VIDEO SETTING - Panasonic PT-D7700U-K | Dlp Projector - English/ French - Page 103
that is not compatible with the projector? (Refer to page 106.) Images from PC are not projected • Is the cable too long? • Is the correct signal destination set for notebook computer screen image? Use Fn and F3 keys for setting. (For details, refer to the instruction manual of the computer.) 103 - Panasonic PT-D7700U-K | Dlp Projector - English/ French - Page 104
Specifications Model No. Power supply Power consumption DLPTM panel Panel size Display system Number of pixels Lens Powered zoom Powered focus control Projection lamp slot RGB1 input terminal PT-D7700U PT-DW7000U AC 120 V, 50 Hz/60 Hz 800 W (about 12 W in standby without fan running) 0.95 inch - Panasonic PT-D7700U-K | Dlp Projector - English/ French - Page 105
: ET-HAD75 Projection lens : ET-D75LE1, ET digital input module (HD) : ET-MD95SD3 Replacement Lamp Unit : ET-LAD7700 (single bulb), ET-LAD7700W (double bulbs) Long Life Lamp Unit : ET-LAD7700L (single bulb), ET-LAD7700LW (double bulbs) Wireless mouse receiver : ET-RMRC2 1.If the projector - Panasonic PT-D7700U-K | Dlp Projector - English/ French - Page 106
signals compatible with the projector. RGB signals can also 20 MHz-162 MHz. Display mode VGA400 VGA480 SVGA XGA MXGA SXGA SXGA+ UXGA MAC16 MAC21 1080 / 60i 720 / 60p 480i .0 59.9 50.0 Note 106 • The number of display dots of the PT-D7700U is 1 400 x 1 050. If signals with a number of display - Panasonic PT-D7700U-K | Dlp Projector - English/ French - Page 107
modify the software. The guarantee will not be valid for any malfunctions caused by such actions. Trademark Acknowledgement • Digital Light Processing, DLP, and Digital Micromirror Device, DMD are registered trademarks of the Texas Instruments. • VGA and XGA are trademarks of International Business - Panasonic PT-D7700U-K | Dlp Projector - English/ French - Page 108
constituer un risque de choc éIectrique aux personnes. Le point d'exclamation dans un triangle avertit l'usager de la présence d'instructions importantes concernant l'utilisation et l'entretien (réparation) dans la littérature accompagnant le produit. ATTENTION: Cet appareil est équipé d'une fiche - Panasonic PT-D7700U-K | Dlp Projector - English/ French - Page 109
-même est très dangereux, et ne doit jamais être fait. Ne pas installer ce projecteur dans un endroit qui n'est pas assez résistant pour supporter le poids du projecteur. • Si I'emplacement d'installation n'est pas assez résistant, le projecteur risque de tomber et causer de graves blessures et (ou - Panasonic PT-D7700U-K | Dlp Projector - English/ French - Page 110
quel liqui de s'infiltre à l'intérieur du projecteur, entrer en contact avec un centre commercial autorisé. Ne démontez pas le bloc lampe. • Une rupture de la lampe peut provoquer une blessure corporelle. Ne pas mettre d'objets étrangers dans le projecteur. • Ne pas insérer d'objets métalliques ou - Panasonic PT-D7700U-K | Dlp Projector - English/ French - Page 111
chaleur près de cette sortie d'air, sinon cela peut causer des blessures ou des dommages. N'utilisez pas un bloc lampe usagé. • Cela peut entraîner une rupture de la lampe. Débrancher la fiche du cordon d'alimentation de la prise de courant comme mesure de sécurité avant d'effectuer tout nettoyage - Panasonic PT-D7700U-K | Dlp Projector - English/ French - Page 112
rioration due aux heures d'utilisation. • La vie de service d'une lampe au mercure varie individuellement et selon les conditions d'utilisation. chiffon sec. En cas d'utilisation d'un produit chimique, suivez ses instructions. Ne nettoyez pas la surface de l'objectif avec un chiffon pelucheux ou - Panasonic PT-D7700U-K | Dlp Projector - English/ French - Page 113
heures 1 (quand la sortie de la lampe est HAUT et la sélection de lampe DOUBLE). Il peut arriver que la lampe soit épuisée (ne s'allume pas) à 1 500 heures 1 selon les caractéristiques des lampes individuelles et les conditions de travail (la vie de service des lampes peut être réduite par le nombre - Panasonic PT-D7700U-K | Dlp Projector - English/ French - Page 114
ée. Vous risquez de vous brûler si vous la touchez alors qu'elle est encore chaude. Cache de la lampe Lampe 2 Poignée Lampe 1 Vis de fixation de la lampe Vis de fixation de la lampe 5. Installez la nouvelle lampe. 6. Utilisez un tournevis Phillips pour bien serrer les deux vis de fixation de - Panasonic PT-D7700U-K | Dlp Projector - English/ French - Page 115
I ", replacez l'interrupteur principal sur " O ", vérifiez que la lampe et son cache sont correctemrnt installés et effectuez une nouvelle fois la 1.00 1433h LAD7700 0h 1433h 1433h LAD7700 0h 1100h 1100h RÉINIT.LAMPE LAMPE1 LAD7700 LAD7700L LAMPE2 LAD7700 LAD7700L 1433h 0h 1100h 0h :SÉLECTIONNER - Panasonic PT-D7700U-K | Dlp Projector - English/ French - Page 116
, NJ 07094 (201) 392-4443 3330 Cahuenga Blvd West Los Angels, CA 90068 (323) 436-3500 Technical Support: (800) 524-1448 (800) 526-6610 FAX: (201) 392-6514 E-Mail: [email protected] Panasonic Canada Inc. 5770 Ambler Drive, Mississauga, Ontario L4W 2T3 (905) 624-5010 © 2004 Matsushita Electric
-
 1
1 -
 2
2 -
 3
3 -
 4
4 -
 5
5 -
 6
6 -
 7
7 -
8
-
9
-
10
-
11
-
12
-
13
-
14
-
15
-
16
-
17
-
18
-
19
-
20
-
21
-
22
-
23
-
24
-
25
-
26
-
27
-
28
-
29
-
30
-
31
-
32
-
33
-
34
-
35
-
36
-
37
-
38
-
39
-
40
-
41
-
42
-
43
-
44
-
45
-
46
-
47
-
48
-
49
-
50
-
51
-
52
-
53
-
54
-
55
-
56
-
57
-
58
-
59
-
60
-
61
-
62
-
63
-
64
-
65
-
66
-
67
-
68
-
69
-
70
-
71
-
72
-
73
-
74
-
75
-
76
-
77
-
78
-
79
-
80
-
81
-
82
-
83
-
84
-
85
-
86
-
87
-
88
-
89
-
90
-
91
-
92
-
93
-
94
-
95
-
96
-
97
-
98
-
99
-
100
-
101
-
102
-
103
-
104
-
105
-
106
-
107
-
108
-
109
-
110
-
111
-
112
-
113
-
114
-
115
-
116
 |
 |
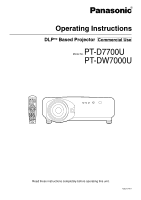
DLP
TM
Based Projector
Commercial Use
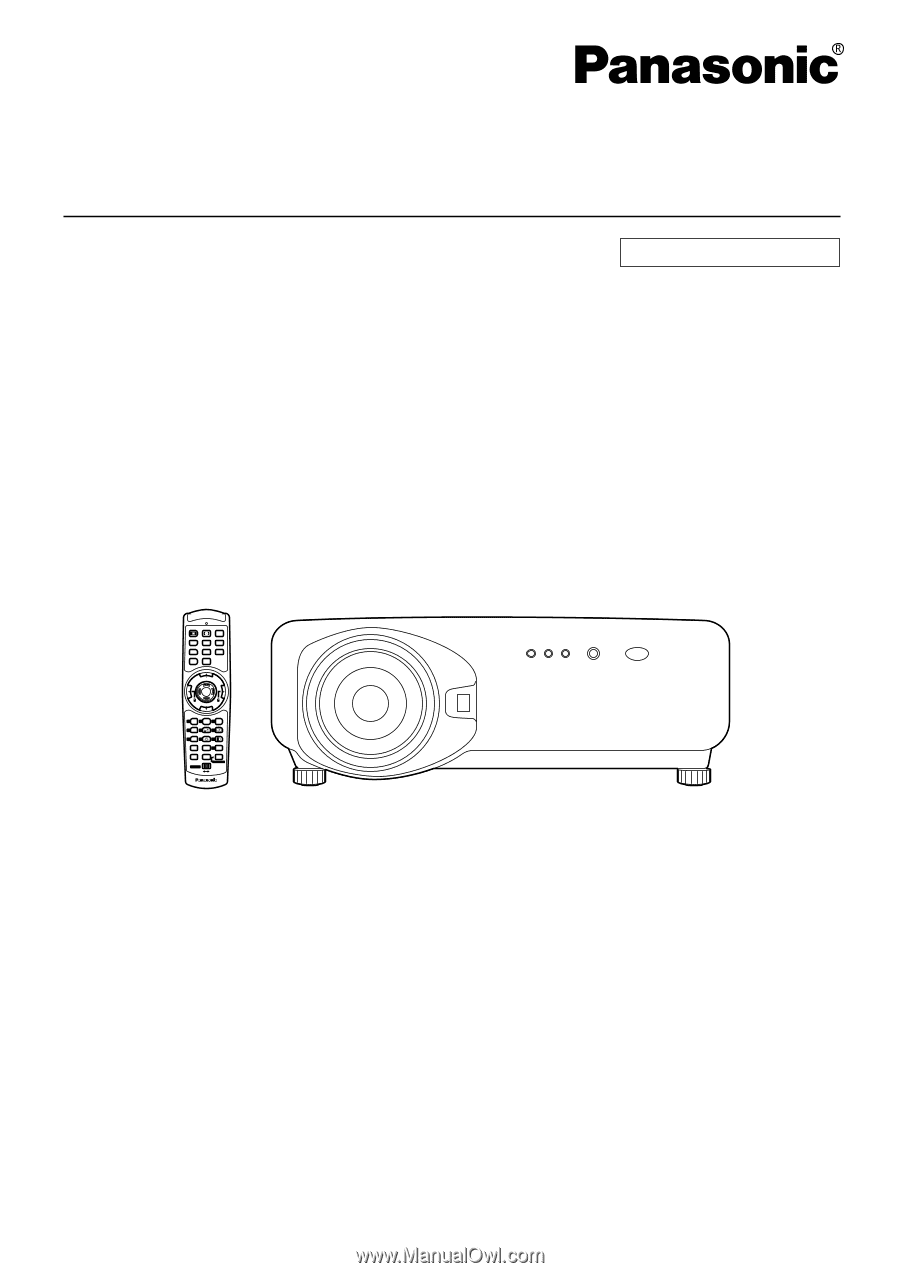
Operating Instructions
Read these instructions completely before operating this unit.
TQBJ 0146-1
POWER
ON
OFF
RGB
1
RGB
2
AUX
MENU
STD
LENS
OSD
1
4
7
2
5
8
3
6
9
0
NEXT
USER
LIGHT
ID ALL
ASPECT
ID SET
Projector
Computer
Numetric
BRIGHT
CONTRAST
ON SCREEN
SYSTEM
SEL
FUNC
1
D.ZOOM
ENTER
PAGE
UP
PAGE
DOWN
VIDEO
SHUT
S-
VIDEO
FREEZE
SHUTTER
AUTO
SETUP
LASER ON/OFF
Model No.
PT-D7700U
PT-DW7000U