Panasonic PT-D7700U-K Dlp Projector - English/ French - Page 67
Raster Position
 |
UPC - 791871111000
View all Panasonic PT-D7700U-K manuals
Add to My Manuals
Save this manual to your list of manuals |
Page 67 highlights
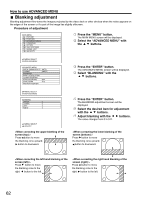
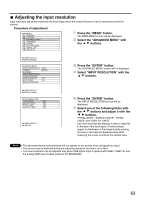
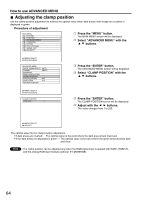
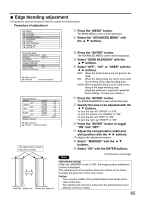
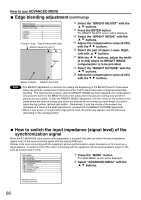
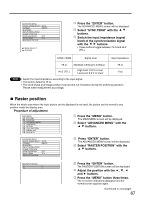
ADVANCED MENU DIGITAL CINEMA REALITY AUTO FORMAT SMPTE BLANKING INPUT RESOLUTION CLAMP POSITION EDGE BLENDING OFF SYNC.TERM 75 RASTER POSITION :MENU SELECT :CHANGE Press the "ENTER" button. The ADVANCED MENU screen will be displayed. Select "SYNC.TERM" with the buttons. Switch the input impedance (signal level) of the synchronization signal with the buttons. • These buttons toggle between 75 Ω and HI-Z (TTL). SYNC.TERM Signal level Input impedance 75 Ω HI-Z (TTL) Amplitude: 0.6V[p-p] to 4.0V[p-p] High level: 2.0 V or over Low level: 0.8 V or lower 75 Ω 1 kΩ Note • Switch the input impedance according to the input signal. • The factory default is 75 Ω. • The clock phase and image position may become out of balance during this switching operation. Please make readjustment accordingly. Raster position When the whole area where the input picture can be displayed is not used, the picture can be moved to any position inside the display area. Procedure of adjustment MAIN MENU PICTURE POSITION ADVANCED MENU LANGUAGE OPTION TEST PATTERN SIGNAL LIST SECURITY Press the "MENU" button. The MAIN MENU screen will be displayed. Select "ADVANCED MENU" with the buttons. ADVANCED MENU DIGITAL CINEMA REALITY AUTO FORMAT SMPTE BLANKING INPUT RESOLUTION CLAMP POSITION EDGE BLENDING OFF SYNC.TERM 75 RASTER POSITION Press "ENTER" button. The ADVANCED MENU screen will be displayed. Select "RASTER POSITION" with the buttons. RASTER POSITION V: 0 H: 0 Press the "ENTER" button. The RASTER POSITION screen will be displayed. Adjust the position with the , , and buttons. Press the "MENU" button three times. The on-screen indications disappear and the normal screen appears again. (Continued on next page) 67
-
 1
1 -
2
-
3
-
4
-
5
-
6
-
7
-
8
-
9
-
10
-
11
-
12
-
13
-
14
-
15
-
16
-
17
-
18
-
19
-
20
-
21
-
22
-
23
-
24
-
25
-
26
-
27
-
28
-
29
-
30
-
31
-
32
-
33
-
34
-
35
-
36
-
37
-
38
-
39
-
40
-
41
-
42
-
43
-
44
-
45
-
46
-
47
-
48
-
49
-
50
-
51
-
52
-
53
-
54
-
55
-
56
-
57
-
58
-
59
-
60
-
61
-
 62
62 -
 63
63 -
 64
64 -
 65
65 -
 66
66 -
 67
67 -
 68
68 -
 69
69 -
 70
70 -
 71
71 -
 72
72 -
73
-
74
-
75
-
76
-
77
-
78
-
79
-
80
-
81
-
82
-
83
-
84
-
85
-
86
-
87
-
88
-
89
-
90
-
91
-
92
-
93
-
94
-
95
-
96
-
97
-
98
-
99
-
100
-
101
-
102
-
103
-
104
-
105
-
106
-
107
-
108
-
109
-
110
-
111
-
112
-
113
-
114
-
115
-
116
 |
 |
