Panasonic PT-D7700U-K Dlp Projector - English/ French - Page 45
CLEARING THE DATA OF REGISTERED SIGNALS, button to clear
 |
UPC - 791871111000
View all Panasonic PT-D7700U-K manuals
Add to My Manuals
Save this manual to your list of manuals |
Page 45 highlights
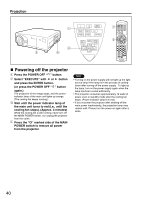
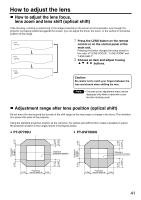
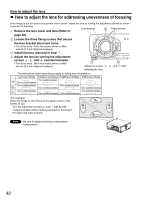
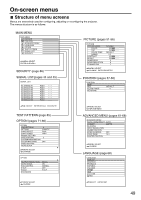
RENAME NAME: SVGA72-A2 MEMORY NO: A2 S.S.NO: - - INPUT NO: RGB1 fH: 48.08kHz fV: 72.17Hz SYNC. STATE: H(POS) V(POS) :NEXT FIGURE :FONT SELECT ENTER:SET MENU:ESC Press the "ENTER" button. The RENAME screen will be displayed. Select each character with the and buttons, and set the character or number with the and buttons (press the "STD" button to clear the name which is automatically displayed). After the signal has been renamed, press the "ENTER" button. After registration, the REGISTERED SIGNAL STATUS screen is restored. Note • When the "MENU" button is pressed instead of the "ENTER" button, the new signal name will not be registered, and the automatically displayed signal name will be retained. Clearing the data of registered signals MAIN MENU PICTURE POSITION ADVANCED MENU LANGUAGE OPTION TEST PATTERN SIGNAL LIST SECURITY Press the "MENU" button. The MAIN MENU screen will be displayed. Select "SIGNAL LIST" with the and buttons. :MENU SELECT ENTER:SUB MENU REGISTERED SIGNAL LIST A1:SVGA72-A1 A2:SVGA72-A2 A3:SVGA72-A3 A4:SVGA72-A4 A5:SVGA72-A5 A6:SVGA72-A6 A7:SVGA72-A7 A8:SVGA72-A8 RGB1 RGB1 RGB1 RGB1 RGB1 RGB1 RGB1 RGB1 :SELECT ENTER:DETAILS STD:DELETE ENTRY SIGNAL CLEAR NAME: MEMORY NO: S.S.NO: INPUT NO: fH: fV: SYNC. STATE: SVGA72-A2 A2 - - - RGB1 48.08kHz 72.17Hz H(POS) V(POS) OK? ENTER:EXECUTE MENU:ESC Press the "ENTER" button. The REGISTERED SIGNAL LIST screen will be displayed. The memories extend over 12 pages (A to L with 8 data items each, giving total of 96 memories). Select the signal whose data is to be cleared with the , , and buttons. Press the "STD" button. The ENTRY SIGNAL CLEAR screen will be displayed. If the data is not to be cleared, press the MENU button to return to the SIGNAL LIST screen. Press the "ENTER" button. The data of the signal selected in step is cleared. 45
-
 1
1 -
2
-
3
-
4
-
5
-
6
-
7
-
8
-
9
-
10
-
11
-
12
-
13
-
14
-
15
-
16
-
17
-
18
-
19
-
20
-
21
-
22
-
23
-
24
-
25
-
26
-
27
-
28
-
29
-
30
-
31
-
32
-
33
-
34
-
35
-
36
-
37
-
38
-
39
-
 40
40 -
 41
41 -
 42
42 -
 43
43 -
 44
44 -
 45
45 -
 46
46 -
 47
47 -
 48
48 -
 49
49 -
 50
50 -
51
-
52
-
53
-
54
-
55
-
56
-
57
-
58
-
59
-
60
-
61
-
62
-
63
-
64
-
65
-
66
-
67
-
68
-
69
-
70
-
71
-
72
-
73
-
74
-
75
-
76
-
77
-
78
-
79
-
80
-
81
-
82
-
83
-
84
-
85
-
86
-
87
-
88
-
89
-
90
-
91
-
92
-
93
-
94
-
95
-
96
-
97
-
98
-
99
-
100
-
101
-
102
-
103
-
104
-
105
-
106
-
107
-
108
-
109
-
110
-
111
-
112
-
113
-
114
-
115
-
116
 |
 |
