Panasonic PT-D7700U-K Dlp Projector - English/ French - Page 81
How To Change The Signal For The Et-md95vm2 (optional
 |
UPC - 791871111000
View all Panasonic PT-D7700U-K manuals
Add to My Manuals
Save this manual to your list of manuals |
Page 81 highlights
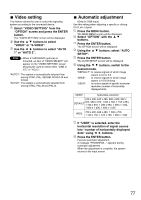
How to change the signal for the ET-MD95VM2 (optional) When ET-MD95VM2 (optional) is installed with the projector, select the signaling system according to the connected device. Procedure of setting MAIN MENU PICTURE POSITION ADVANCED MENU LANGUAGE OPTION TEST PATTERN SIGNAL LIST SECURITY Press the "MENU" button. The MAIN MENU screen will be displayed. Select "OPTION" with the buttons. :MENU SELECT ENTER:SUB MENU OPTION PROJECTOR ID SETTING LAMP SELECT LAMP POWER RS232C SETTING OSD POSITION SYSTEM INFORMATION COLOR MATCHING VIDEO SETTING AUTO SETUP 2 FRONT-F DUAL HIGH 2 OFF :MENU SELECT ENTER:SUB MENU VIDEO SETTING VIDEO SELECT VIDEO SYSTEM VIDEO S VIDEO AUX (LINE) AUX (Y/C) LINE or Y/C AUTO 1 AUTO 1 AUTO 1 AUTO 1 :MENU SELECT :CHANGE Press the "ENTER" button. The OPTION screen will be displayed. Select "VIDEO SETTING" with the buttons. Press the "ENTER" button. The VIDEO SETTING screen will be displayed. Choose an input signaling system with the buttons and switch to "LINE or Y/C" or "YCbCr" with the buttons. The selected signaling system appears. (The picture may be distorted during the switching operation.) If "LINE or Y/C" is selected, use buttons to choose "AUX (LINE)" or "AUX (Y/C)", and then use the buttons to switch to "AUTO1" or "AUTO2". The selected signaling system appears. (The picture may be distorted during the switching operation.) Press the "MENU" button three times. The on-screen indications disappear and the set screen appears. 81
-
 1
1 -
2
-
3
-
4
-
5
-
6
-
7
-
8
-
9
-
10
-
11
-
12
-
13
-
14
-
15
-
16
-
17
-
18
-
19
-
20
-
21
-
22
-
23
-
24
-
25
-
26
-
27
-
28
-
29
-
30
-
31
-
32
-
33
-
34
-
35
-
36
-
37
-
38
-
39
-
40
-
41
-
42
-
43
-
44
-
45
-
46
-
47
-
48
-
49
-
50
-
51
-
52
-
53
-
54
-
55
-
56
-
57
-
58
-
59
-
60
-
61
-
62
-
63
-
64
-
65
-
66
-
67
-
68
-
69
-
70
-
71
-
72
-
73
-
74
-
75
-
 76
76 -
 77
77 -
 78
78 -
 79
79 -
 80
80 -
 81
81 -
 82
82 -
 83
83 -
 84
84 -
 85
85 -
 86
86 -
87
-
88
-
89
-
90
-
91
-
92
-
93
-
94
-
95
-
96
-
97
-
98
-
99
-
100
-
101
-
102
-
103
-
104
-
105
-
106
-
107
-
108
-
109
-
110
-
111
-
112
-
113
-
114
-
115
-
116
 |
 |
