Panasonic PT-D7700U-K Dlp Projector - English/ French - Page 42
How To Adjust The Lens For Addressing Unevenness Of Focusing
 |
UPC - 791871111000
View all Panasonic PT-D7700U-K manuals
Add to My Manuals
Save this manual to your list of manuals |
Page 42 highlights
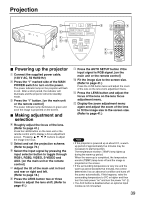
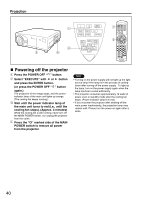
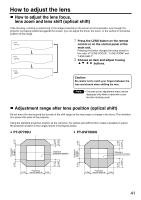
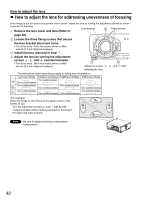
How to adjust the lens How to adjust the lens for addressing unevenness of focusing If the image is out of focus in any portion of the screen, adjust the lens by turning the adjustment screws to obtain evenness of focusing. Remove the lens cover and lens (Refer to Lens bracket a Fixing screws page 38). Loosen the three fixing screws that secure the lens bracket about two turns. • Tool to be used : Allen hex socket driver or Allen wrench (2.5-mm diagonal hexagon) Install the lens removed in step . Adjust the lens by turning the adjustment screws , , and counterclockwise. • Tool to be used : Allen hex socket driver or Allen wrench (2.5-mm diagonal hexagon) c Adjust the screws installing the lens. b , , and after The instructions within parentheses apply to ceiling mount installation. V up is out of focus V bottom is out of focus H right is out of focus H left is out of focus Turn counterclockwise (Turn counterclockwise) ( ) ( ) ( ) Turn counterclockwise Turn counterclockwise ( ) (Turn counterclockwise) ( ) (Turn counterclockwise) Turn counterclockwise Turn counterclockwise ( ) (Turn counterclockwise) (Turn counterclockwise) ( ) (For example) When the image is out of focus in the upper portion of the screen (V up): Turn the adjustment screws and little by little counterclockwise while checking evenness of focusing in the upper and lower portions. Vup H H left right Vbottom Note • Be sure to tighten the fixing screws before transportation. 42
-
 1
1 -
2
-
3
-
4
-
5
-
6
-
7
-
8
-
9
-
10
-
11
-
12
-
13
-
14
-
15
-
16
-
17
-
18
-
19
-
20
-
21
-
22
-
23
-
24
-
25
-
26
-
27
-
28
-
29
-
30
-
31
-
32
-
33
-
34
-
35
-
36
-
 37
37 -
 38
38 -
 39
39 -
 40
40 -
 41
41 -
 42
42 -
 43
43 -
 44
44 -
 45
45 -
 46
46 -
 47
47 -
48
-
49
-
50
-
51
-
52
-
53
-
54
-
55
-
56
-
57
-
58
-
59
-
60
-
61
-
62
-
63
-
64
-
65
-
66
-
67
-
68
-
69
-
70
-
71
-
72
-
73
-
74
-
75
-
76
-
77
-
78
-
79
-
80
-
81
-
82
-
83
-
84
-
85
-
86
-
87
-
88
-
89
-
90
-
91
-
92
-
93
-
94
-
95
-
96
-
97
-
98
-
99
-
100
-
101
-
102
-
103
-
104
-
105
-
106
-
107
-
108
-
109
-
110
-
111
-
112
-
113
-
114
-
115
-
116
 |
 |
