Panasonic PT-D7700U-K Dlp Projector - English/ French - Page 77
Video Setting, Automatic Adjustment, Video Or S-video.
 |
UPC - 791871111000
View all Panasonic PT-D7700U-K manuals
Add to My Manuals
Save this manual to your list of manuals |
Page 77 highlights
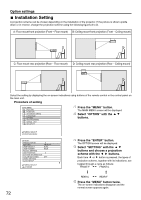
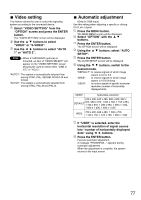
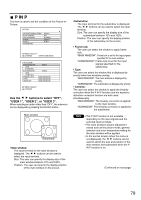
Video setting This feature allows the user to select the signaling system according to the connected device. Select "VIDEO SETTING" from the "OPTION" screen and press the ENTER button. The "VIDEO SETTING" screen will be displayed. Use the buttons to select "VIDEO" or "S-VIDEO". Use the buttons to select "AUTO 1" or "AUTO 2". Note • When ET-MD95VM2 (optional) is mounted, an item of "VIDEO SELECT" will appear on the "VIDEO SETTING" screen allowing the used to select either "LINE or Y/C" or "YCbCr". "AUTO1": The system is automatically selected from among NTSC, PAL, SECAM, NTSC4.43 and PAL60. "AUTO2": The system is automatically selected from among NTSC, PAL-M and PAL-N. Automatic adjustment (Only for RGB input) Use this setting when adjusting a specific or oblong (16:9, etc.) signal. Press the MENU button. The MAIN MENU screen will be displayed. Select "OPTION" with the buttons. Press the ENTER button. The OPTION screen will be displayed. Using the SETUP". buttons, select "AUTO Press the ENTER button. The AUTO SETUP screen will be displayed. Using the buttons, switch to the desired mode. "DEFAULT": to receive signals of which image aspect is 4:3 or 5:4 "WIDE": to receive signals of which image aspect is 16:9 (oblong) "USER": to receive signals of specific horizontal resolution (number of horizontally displayed dots) MODE Applicable resolution 640 x 400, 640 x 480, 800 x 600, 832 x DEFAULT 624, 960 x 720, 1 024 x 768, 1 152 x 864, 1 152 x 870, 1 280 x 960, 1 280 x 1 024, 1 600 x 1 200, 1 400 x 1 050 WIDE 720 x 400, 848 x 480, 1 280 x 720, 1 120 x 750, 1 376 x 768, 1 600 x 1 024 If "USER" is selected, enter the horizontal resolution of signal source into "number of horizontally displayed dots" using buttons. Press the ENTER button. Execute automatic adjustment. A message "PROGRESS..." appears during automatic adjustment. When the adjustment is complete, the system returns to the input screen. 77
-
 1
1 -
2
-
3
-
4
-
5
-
6
-
7
-
8
-
9
-
10
-
11
-
12
-
13
-
14
-
15
-
16
-
17
-
18
-
19
-
20
-
21
-
22
-
23
-
24
-
25
-
26
-
27
-
28
-
29
-
30
-
31
-
32
-
33
-
34
-
35
-
36
-
37
-
38
-
39
-
40
-
41
-
42
-
43
-
44
-
45
-
46
-
47
-
48
-
49
-
50
-
51
-
52
-
53
-
54
-
55
-
56
-
57
-
58
-
59
-
60
-
61
-
62
-
63
-
64
-
65
-
66
-
67
-
68
-
69
-
70
-
71
-
 72
72 -
 73
73 -
 74
74 -
 75
75 -
 76
76 -
 77
77 -
 78
78 -
 79
79 -
 80
80 -
 81
81 -
 82
82 -
83
-
84
-
85
-
86
-
87
-
88
-
89
-
90
-
91
-
92
-
93
-
94
-
95
-
96
-
97
-
98
-
99
-
100
-
101
-
102
-
103
-
104
-
105
-
106
-
107
-
108
-
109
-
110
-
111
-
112
-
113
-
114
-
115
-
116
 |
 |
