Panasonic PT-D7700U-K Dlp Projector - English/ French - Page 52
Adjusting Contrast / Bright / Color / Tint, Repeat Steps
 |
UPC - 791871111000
View all Panasonic PT-D7700U-K manuals
Add to My Manuals
Save this manual to your list of manuals |
Page 52 highlights
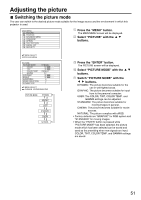
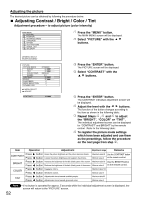
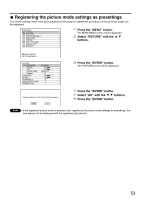
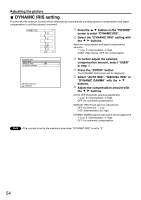
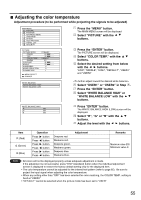
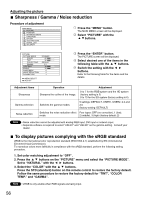
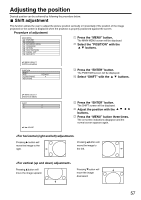
Adjusting the picture The desired picture can be obtained by following the procedure below. Adjusting Contrast / Bright / Color / Tint Adjustment procedure - to adjust picture (color intensity) MAIN MENU PICTURE POSITION ADVANCED MENU LANGUAGE OPTION TEST PATTERN SIGNAL LIST SECURITY Press the "MENU" button. The MAIN MENU screen will be displayed. Select "PICTURE" with the buttons. :MENU SELECT ENTER:SUB MENU PICTURE PICTURE MODE COLOR TINT COLOR TEMP. GAMMA CONTRAST BRIGHT SHARPNESS NOISE REDUCTION DYNAMIC IRIS :MENU SELECT :ADJUST DYNAMIC 50 30 DEFAULT 2.2 32 32 6 2 1 CONTRAST 32 Press the "ENTER" button. The PICTURE screen will be displayed. Select "CONTRAST" with the buttons. Press the "ENTER" button. The CONTRAST individual adjustment screen will be displayed. Adjust the level with the buttons. Thu function of the button changes according to the item as shown in the following table: Repeat Steps , and to adjust the "BRIGHT", "COLOR" or "TINT". The individual adjustment screen can be displayed for "CONTRAST" and BRIGHT" by the remote control. Refer to the following table: To register the picture mode settings which have been adjusted and use them as the presettings, follow the procedure on the next page from step . Item Operation Adjustment Adjustment range Remarks Press CONTRAST Press button Raises the picture brightness and the picture becomes clearer. Maximum value 63 Use the CONTRAST button button Lowers the picture brightness and weakens the picture. Minimum value 0 on the remote control. Press BRIGHT Press button Increases the brightness of the dark (black) parts of the screen. Maximum value 63 Use the BRIGHT button button Reduces the brightness of the dark (black) parts of the screen. Minimum value 0 on the remote control. Press COLOR Press button Deepens colors. button Weakens colors. Maximum value 100 Minimum value 0 TINT Press Press button Adjusts skin tone toward reddish-purple. button Adjusts skin tone toward greenish color. Maximum value 60 Minimum value 0 Note 52 • If no button is operated for approx. 5 seconds while the individual adjustment screen is displayed, the screen will return to the "PICTURE" screen.
-
 1
1 -
2
-
3
-
4
-
5
-
6
-
7
-
8
-
9
-
10
-
11
-
12
-
13
-
14
-
15
-
16
-
17
-
18
-
19
-
20
-
21
-
22
-
23
-
24
-
25
-
26
-
27
-
28
-
29
-
30
-
31
-
32
-
33
-
34
-
35
-
36
-
37
-
38
-
39
-
40
-
41
-
42
-
43
-
44
-
45
-
46
-
 47
47 -
 48
48 -
 49
49 -
 50
50 -
 51
51 -
 52
52 -
 53
53 -
 54
54 -
 55
55 -
 56
56 -
 57
57 -
58
-
59
-
60
-
61
-
62
-
63
-
64
-
65
-
66
-
67
-
68
-
69
-
70
-
71
-
72
-
73
-
74
-
75
-
76
-
77
-
78
-
79
-
80
-
81
-
82
-
83
-
84
-
85
-
86
-
87
-
88
-
89
-
90
-
91
-
92
-
93
-
94
-
95
-
96
-
97
-
98
-
99
-
100
-
101
-
102
-
103
-
104
-
105
-
106
-
107
-
108
-
109
-
110
-
111
-
112
-
113
-
114
-
115
-
116
 |
 |