Pfaff Tipmatic 1119 Owner's Manual
Pfaff Tipmatic 1119 Manual
 |
View all Pfaff Tipmatic 1119 manuals
Add to My Manuals
Save this manual to your list of manuals |
Pfaff Tipmatic 1119 manual content summary:
- Pfaff Tipmatic 1119 | Owner's Manual - Page 1
tipmatic 1119 Bedienungsanleitung Instruction Book Mode d'emploi Libretto istruzioni - Pfaff Tipmatic 1119 | Owner's Manual - Page 2
the power cord whenever you leave the machine or wish to clean it, oil it or change mechanical and accessory parts. c) Be sure to use only a 15-watt light bulb in the sewing lamp. d) The drive belt must never be adjusted by anyone but an authorized Pfaff agent. For safety rules applicable to - Pfaff Tipmatic 1119 | Owner's Manual - Page 3
90[ 901- 1-1-1- 0I[0[ 001- - Pfaff Tipmatic 1119 | Owner's Manual - Page 4
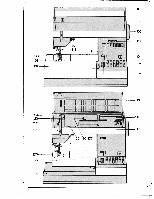
Stoffdruckerstange mit Fadenabschneider Parts of your sewing machine 100 Carrying handle 101 Hinged top cover 1 02 Hand wheel 103 Stop motion knob 1 04 Master switch 1 05 Finger-tip stitch buttons 1 06 Stitch length control 1 07 Detachable work support with accessory box and compartment 108 Needle - Pfaff Tipmatic 1119 | Owner's Manual - Page 5
ces de Ia machine 100 Poignée 101 Couvercle supérieur 102 Volant 103 Disque de débrayage 104 Interrupteur general 105 Touches de réglage 106 Réglage de Ia longueur de point 107 BoIte de rangement formant plan de travail avec compartiments a accessoires 108 Plaque a aiguille 109 Support de semelle du - Pfaff Tipmatic 1119 | Owner's Manual - Page 6
Den Anlasser und die Bedienungs anleitung aus dem Each N nehmen. So wie die Abbildung oben zeigt, beides wieder einräumen. Take foot control and instruction book out of compartment N. Put back again as shown in the illustration above. Retirer le rheostat a pédale et Ia notice d'emploi de Ia case - Pfaff Tipmatic 1119 | Owner's Manual - Page 7
die Pfaff. Electronic-Anlasser (Schalter Q) Stellung = halbe Endgeschwindigkeit Stellung 41 = voile Endgeschwindigkeit Push master switch P; the sewing light goes on. Operating the foot control: The farther you press the pedal down the faster the machine runs. Electronic - Pfaff Tipmatic 1119 | Owner's Manual - Page 8
/ juIen vorbereiten: Unter die Nähfläche greifen und diese nach links schwenken. Bobbin winding preparations: Reach under the work support and swing it out toward the left. Preparer le bobinage: Passer Ia main sous Ia bolte de rangement et faire pivoter celle-ci vers Ia - Pfaff Tipmatic 1119 | Owner's Manual - Page 9
e girarla finchè il perno N si inserisce nella fessura 0. \ 4 N Nähwerk ausschalten: Handrad festhal ten und Scheibe 103 nach vorn drehen. Disengaging the sewing mechanism: Hold the hand wheel steady and turn knob 103 toward you. Débrayer le mécanisme: Retenir le volant et tourner le disque - Pfaff Tipmatic 1119 | Owner's Manual - Page 10
sein. Winding the bobbin from a second spool: tilt spool pin 1 25 forward. Pull the thread into guide 1 23 and into guide 1 25 as shown in the drawing, rnaking sure that the thread passes between the guide and tension spring N. Now wind the thread a few turns around the bobbin. Push the bobbin to - Pfaff Tipmatic 1119 | Owner's Manual - Page 11
Basculer te guide-fit 125 vers l'avant. Pas ser le fit par te guide fit 123 puis, seton te dessin, dans te guide-fit 125, entre ce guide et le hinten drehen. Dann Hancirad nach vorne drehen, bis es einrastet. Engaging the sewing mechanism: Hotd the hand wheel firmty and turn disk 1 03 toward the - Pfaff Tipmatic 1119 | Owner's Manual - Page 12
.te.PTnlaheceeednaleeebdoelbyebemin(u0o)snt spindle 117. Disengage the sewing mechanism. Draw the under the sewing foot, needle thread up and into guide 1taftPhao2ruokeo5suethb(ncsoidttoebhnoebteuthirdtnefo.rulalCtblwopouwbeibtnodbatgbahri.lndbeW iantatnhhidftenroeedwwwraitdgiahnthriedtdmi>nt - Pfaff Tipmatic 1119 | Owner's Manual - Page 13
tagliafibo "N". \ r Nähwerk einschalten: Handrad festhal ten und Scheibe 103 nach hinten drehen. Dann Handrad nach vorne drehen, bis es ei n rastet. Engaging the sewing mechanism: Hold the hand wheel firmly and turn disc 1 03 toward the back, then turn the hand wheel forward again until it snaps in - Pfaff Tipmatic 1119 | Owner's Manual - Page 14
Spule einlegen N (Faden nach hinten). Den Faden in den Schlitz 0 und bis zur Offnung P ziehen. Inserting the bobbin (N), with the thread unreeling toward the back. Draw the thread into slot 0 and into eye P. Mise en place de Ia canette (N), le fil se déroulant vers l'arrière. Tirer le fil par Ia - Pfaff Tipmatic 1119 | Owner's Manual - Page 15
4 Spulenkapsel einsetzen: • Hauptscha/ter 104 ausschalten. Kiappe N anheben und die Kapsel bis zum Ansch lag auf Stift 0 schieben. Ausschnitt P mu1 dabei nach oben zeigen. Inserting the bobbin case: • Switch off master switch 104. Raise latch N and push the bobbin case onto stud 0 as far as it will - Pfaff Tipmatic 1119 | Owner's Manual - Page 16
Taste B tippen (Seite 20). Upper threading: • Switch off master switch 104. With the needle positioned at the top, raise the sewing foot. Draw the thread into slot N to the left past guide P. from below into slot 0 and take-up lever 1 24 (see arrows), then back into slot 0 and into the right thread - Pfaff Tipmatic 1119 | Owner's Manual - Page 17
supérieur. Tourner le volant vers l'avant et coudre tin point. Arréter Ia machine, l'aiguille et le releveur de fil en haut. A l'aide du fil supérieur rechts unter den NähfuB legen. Place both threads toward the right under the sewing foot. Coucher les deux fils vers l'arrière a droite sous be pied - Pfaff Tipmatic 1119 | Owner's Manual - Page 18
an die Maschine schwen ken. Swing work support 1 07 back against the free arm. Remettre en place Ia bolte de rangement 107 contre le bras. Awicinare ii piano variabile 107 alla macchina. 4 N Stoff unter den Nähful legen. Place fabric under the sewing foot. Placer du tissu sous le pied presseur - Pfaff Tipmatic 1119 | Owner's Manual - Page 19
drückt, um so schneller näht die Pfaff. Operating the foot control: The more you press down the pedal, the faster the machine runs. Abaisser Ia pédale du rheostat. Pius To check the tension, set the machine at the zigzag stitch. Sew a short seam. The threads should interlock in the middle of the material. - Pfaff Tipmatic 1119 | Owner's Manual - Page 20
Tensions des fits: Position de réglage normale dans Ia plage blanche, entre 3 et 5. Tension d'autant plus forte que le chiffre est élevé. Contrder a l'aide du point zigzag. Coudre quelques points. Les fits doivent se nouer dans I'épaisseur des tissus. Controllo delta tensione del fib: La - Pfaff Tipmatic 1119 | Owner's Manual - Page 21
length range is 0 to 6 mm. Turn the desired stitch length to the indicating mark "N". Fig. 0 (bottom) shows how to set the stitch length control for sewing stretch stitches (red stitch symbols on push but tons). Réglage de Ia Iongueur du point: Les chiffres sur le disque 106 indiquent Ia longueur du - Pfaff Tipmatic 1119 | Owner's Manual - Page 22
ücken. Solange die Taste gedrückt wird, nâht die Maschine rückwärts. Reverse sewing Press button 114. As long as you hold this button the machine sews backwards. Couture en marche arrière: Abaisser Ia touche 114. La machine coud en arrière aussi longtemps que Ia touche est maintenue en bas. La - Pfaff Tipmatic 1119 | Owner's Manual - Page 23
Pulloverstich B Ii ndstich I Geschlossener Overlockstich Verbi nd u ngsstich K Overlockstich Muschelkantenstich L Federstich Zierelastikstich M Wabenstich Elastikstich Bei Modefl 1119 mu1, zum Nähen der Stiche auf den Tipptasten das Zierstich Einstellrad ausgeschaltet werden. Dazu den wei1.en Punkt - Pfaff Tipmatic 1119 | Owner's Manual - Page 24
M Honeycomb stitch Elastic stitch On Model 1119 the fancy-stitch thumb wheel has to be disengaged in order to sew the stitches on the finger-tip buttons with their possible applications. The letters of the buttons on your machine determine the programs and combinations that can be sewn. Touches: Le - Pfaff Tipmatic 1119 | Owner's Manual - Page 25
overlock orb a conchiglia L punto piuma punto elastico ornamentale M punto nido d'ape punto elastico Per cucire i punti dei tasti automatici nel Modelbo 1119 bisogna disinnestare prima lb regolatore punto ornamentale ruotando ii punto bianco sotto Ia marca di registra zione (vedi pag. 27). Nel - Pfaff Tipmatic 1119 | Owner's Manual - Page 26
Nutzstiche einstellen: (weiRe Symbole) Taste tippen und die gewunschte Stich lange zwischen 1 und 6 einstellen. Alle Zickzack- und Nutzstiche werden durch zusätzliches Tippen der Taste G in der Breite halbiert. 4 Selecting utility stitches (white symbols) Push the button required and set the stitch - Pfaff Tipmatic 1119 | Owner's Manual - Page 27
4 Stretchstiche einstellen: (rote Symbole) Taste tippen und Stichlangen-Einsteller bis zum Anschlag auf rotes Symbol stel len. Alle Stretchstiche werden durch zusätz liches Tippen der Taste G in der Breite halbiert. Selecting stretch stitches (red symbols> Push the button required and turn the - Pfaff Tipmatic 1119 | Owner's Manual - Page 28
Ende dieser Anleitung mit Nä sew an elastic blindstitch, push buttons M and F. select a stitch length between 1 and 4. Points utilitaires et élastiques combines: Les combinaisons de points possibles sont indiquées, avec des conseils et idées, sur le tableau des points a Ia fin de ce mode d'emploi - Pfaff Tipmatic 1119 | Owner's Manual - Page 29
__ 4 C 1 D Stichiage einstellen bei Geradstich: Stichiage links: Taste B tippen Stichiage Mitte: Taste G tippen Selecting the needle position for straight stitching Left needle position: push button B Central needle position: push button G Deport du point droit: Deport a gauche: appuyer sur Ia - Pfaff Tipmatic 1119 | Owner's Manual - Page 30
beträgt 15 Watt. Some safety rules a) Take care to avoid injury to your fin gers by the needle during sewing. b) Be sure to unplug the power cord whenever you leave the machine or wish to clean it, oil it or change mechanical and accessory parts. c Be sure to use only a 15 - Pfaff Tipmatic 1119 | Owner's Manual - Page 31
fancy stitch is provided with a letter. Select the fancy stitch from the table. Set the corresponding letter at mark "0" by turning thumb wheel N. For sewing utility stitches, thumb wheel N for fancy stitches must be disengaged. To do so, set the white dot at mark "0". Disque de réglage des points - Pfaff Tipmatic 1119 | Owner's Manual - Page 32
_ I 1 i i 1 ,.i I.I ii ,l Il u II l Ill I ic I ,) .0 1 l I 1 ,I ih ii h Ii,1 i ,.. l..i >< ni I ' '1I ' I I!IfIif JJq 'qiJ I Ll l 1 J1 i 1 J 11I lJ1I'1 iJ ll1 ll B'I JI 1l1 ll IJ lI 1 lhI' > -- Illhlll_ __J1IIIIIL_.Jlllli1 __JJIIIIL_Jl1lllL IilillJllliilIlIilIIiiiiillllIIiilllJiiIlliJl)ifiiIlilHJJi - Pfaff Tipmatic 1119 | Owner's Manual - Page 33
4 Unter die Nähfläche greifen und diese nach links schwenken. Reach under the work support and swing it out toward the left. Passer Ia main sous Ia bolte de rangement et faire pivoter celle-ci vers Ia gauche. Prendere ii piano variabile da sotto e spostarlo verso sinistra. 4 Q 30 - Pfaff Tipmatic 1119 | Owner's Manual - Page 34
Rei1verschlufMu1 6 Knopflochfu( 7 Lineal ) 4 Detachable work support and accessories: The work support can be lifted out (N). Open its lid and take Q shows hw to arrange sewing feet, needles and bobbins in the accessory box. 5 Zipper foot 6 Buttonhole foot 7 Edge guide 4 BoIte de rangement et - Pfaff Tipmatic 1119 | Owner's Manual - Page 35
befestigen. S ist die Nähfuf.Thalterschraube. Screws P and Q are for securing accesso ries. R is the sewing foot retaining screw. Q et R servent a fixer les accessoires. S est Ia vis de fixation du support de semelle. Q e R servono per fissare gli accessori. S è Ia vite di fissaggio del supporto per - Pfaff Tipmatic 1119 | Owner's Manual - Page 36
5 Rei1,verschlugfug 2 KlarsichtfuI 6 Knopflochfu 3 Säumer 7 Lineal Sewing feet (standard accessories) 0 Darning foot 4 Blindstitch foot 1 Standard sewing 5 Zipper foot foot 6 Buttonhole foot 2 Clear-view foot 7 Edge guide 3 Hemmer foot Pieds presseurs (accessoires standards) 0 Pied - Pfaff Tipmatic 1119 | Owner's Manual - Page 37
is then adjusted according to the needle penetra- tions. The folded edge of the material runs along guide edge S. Guide-bord (N): Glisser le guide-bord dans le trou 0, régler Ia distance souhaitée et resserrer ensuite Ia vis P. Pied a point invisible: Couture au point invisible (Q): Déplacer le - Pfaff Tipmatic 1119 | Owner's Manual - Page 38
trier P; il se pose sur Ia vis de maintien Q. Ensuite resserrer Ia vis 0. En reprisant de Ia lame, enfiler le fil de lame dans le guide S. j 4 II piedino da rammendo: Aizare l'ago. Premere Ia staffa P verso dietro e tenerla ferma. Inserire il perno del piedino nel foro N, Ia forcella R si aggan cia - Pfaff Tipmatic 1119 | Owner's Manual - Page 39
ReiBverschluIfuI: Den hinteren Steg in die Nute N einhän gen, den Fuf vorne hochdrücken und in die Nute 0 einrasten. Je nach Verarbeitung kann der ReiLver schlu1fuI nach links, Abbildung P oder rechts, Abbildung Q verschoben werden. Zipper foot: Push the rear stud into slot N. Then push the foot up - Pfaff Tipmatic 1119 | Owner's Manual - Page 40
ridge, and pull it taut so that it is hold in tab P at the front. During sewing, arrow Q runs along scale R. This is how the buttonhole length is determined. For sewing buttonholes use light sewing thread. 4 Réglage de Ia boutonniere: Appuyer sur Ia touche C. Régler Ia tension du fil d'aiguille - Pfaff Tipmatic 1119 | Owner's Manual - Page 41
Raise the needle 2 Push button B in until 4 to 6 bartack ing stitches are sewn, holding the workpiece firmly, then release the but- ton. 3 Push button A. Sew the second but tonhole seam the same length as the first. 4 Push button B in until 4 to 6 bartack ing stitches are sewn, holding the material - Pfaff Tipmatic 1119 | Owner's Manual - Page 42
Zeichnungen sind ohne NähfuR. Drawings do not include sewing foot. Les illustrations ne montrent pas Ia semelle du pied presseur. I disegni sono eseguiti senza piedino. Execution de boutonnières: Tirer Ia semelle mobile vers I' - Pfaff Tipmatic 1119 | Owner's Manual - Page 43
, nach 0 schieben = zum Nähen. Dropping the feed dog: Open free arm cover 119. Push the dropfeed control toward D (feed dog dropped) or toward 0 (sewing position). Abaissement de Ia griffe: Ouvrir le cache 119 et déplacer le curseur abaisse-griffe dans le sens P = griffe escamotée; le déplacer vers - Pfaff Tipmatic 1119 | Owner's Manual - Page 44
(0). Clean the feed dog and the parts in the sewing hook area with a soft brush. Do not oil the machine. Only apply a drop of oil in the hook d'un pinceau, nettoyer Ia griffe et le compartiment du crochet. Ne pas huiler Ia machine. Ne verser que de temps a autre une goutte d'huile dans Ia coursière - Pfaff Tipmatic 1119 | Owner's Manual - Page 45
Close the hinged top cover and swing up the carrying handle. Insert the edge guide into cutout Q, push down the lamp housing and hold it there. Turn the R Pousser l'ampoule vers le haut et Ia tourner vers 0. Enlever le guide-bord. Come sostituire Ia lampadina: Togliere Ia spina dalla presa a muro. - Pfaff Tipmatic 1119 | Owner's Manual - Page 46
Kugelspitze Grobmaschige Strickstoffe, Wirkstoffe, Lastex, Interlock, Quiana, Simplex _- mittlere Kugelspitze - gro(3e Kugelspitze Speziell für Pfaff entwickelte Stretchnadel. Besonders gut geeignet fur empfindliche Stretch- und Wirkstoffe Grobmaschige Miederwaren, Lycra, Simplex, Lastex - Pfaff Tipmatic 1119 | Owner's Manual - Page 47
Nadel-TabeNe Bezeichnung Jj 130/705 H-ZWI Stärke: 80 130/705 H-ZWI Stärke: 80 Stärke: 90 Stärke: 100 Stichlange 2,5 mm 2,5 mm 2,5 mm 2,5 mm 3,0mm Stichbreite - - - - - Nadelentternung 1,6 mm 2,0 mm 2,5 mm 3,0 mm 4,0mm Geeignet für normale Biesen normale Biesen breite Biesen extra breite Biesen - Pfaff Tipmatic 1119 | Owner's Manual - Page 48
fabrics, Lastex, double jersey fabrics, Quiana and Simplex. Medium ball point Heavy ball point Stretch-fabric needle developed especially for Pfaff. Particularly suitable for delicate stretch and knitted fabrics. Wide-meshed and Lastex. corsetry, Lycra, Simplex Acute round point Twill - Pfaff Tipmatic 1119 | Owner's Manual - Page 49
4.0 mm Suitable for Medium-wide cording Wide cording Extra wide cording Extra-wide cording Decorative designs sewn with twin needles Before you start sewing, turn the handwheel and check to make sure the needles stitch into the fabric properly. In this way, needle breakage can be largely avoided - Pfaff Tipmatic 1119 | Owner's Manual - Page 50
eau cos auwes Le choix de important et Ia pointe d'aiguWe adequate est garantit de meilleurs résultats. très Matières: légères Aiguilles: 60 70 75 Pointes d'aiguille Matières: moyennes AiguiHes: 80 90 Matières: lourdes Aiguilles: 100 110 120 Designation 130/705 H Grosseur de I'aiguille: 70, - Pfaff Tipmatic 1119 | Owner's Manual - Page 51
Tableau des aiguilles Designation 130/705 H-ZWI Grosseur: 80 130/705 H-ZWI Grosseur: 80 Grosseur: 90 Grosseur: 100 Longueur de point 2,5mm 2,5 mm 2,5 mm 2,5 mm 3,0 mm Largeur de point - - - - - Espacement des aiguilles 1,6 mm 2,0 mm Utilisations nervures normales 2,5 mm 3,0 mm 4,0 mm nervures - Pfaff Tipmatic 1119 | Owner's Manual - Page 52
di lana, velluto, cuciture ornamentali, ricami. stoffe a maglia larga, tessuti in maglia in genere, Lastex, Interlock, Quiana, Simplex. ago speciale Pfaff per punti flexi. Adatto particolarmente per stoffe delicate elastiche e in maglia. Tessuti per busti a maglia larga, Lycra, Simplex, Lastex. 130 - Pfaff Tipmatic 1119 | Owner's Manual - Page 53
labella degli aghi Denominazione tunghezza punto 130/705 H-ZWI 2,5mm Grossezza: 80 2,5 mm I 130/750 H-ZWJ Grossezza: 80 Grossezza: 90 Grossezza: 100 2,5 mm 2,5 mm 3,0 mm targhezza punto - - - - - distanza aghi 1,6mm 2,0 mm Indicato per: nervature normah nervature normali 2,5 mm 3,0 mm 4,0 - Pfaff Tipmatic 1119 | Owner's Manual - Page 54
7 Nahstörungen und ihre Beseitigung Ursache: Beseitigung: 1. Die Maschine lä1t Stiche aus Die Nadel ist nicht richtig eingesetzt. Es ist eine falsche Nadel eingesetzt. Die Nadel ist verbogen oder stumpf. Die Maschine ist nicht richtig eingefädelt. Die Nadel ist für das Garn zu fein. Nadel bis - Pfaff Tipmatic 1119 | Owner's Manual - Page 55
Ursache: Beseitigung: 5. Die Maschine transportiert nicht oder nur unregelmafig Zwischen den Transporteur-Zahnrei hen hat sich Nähstaub festgepret. Stichplatte abnehmen, Nähstaub mit Pinsel entfemen. Transporteur ist versenkt, Versenkschieber nach links stellen. Versenkschieber steht rechts. - Pfaff Tipmatic 1119 | Owner's Manual - Page 56
thread. Insert new needle and push it up as far as it will go. Insert new needle. Refer to needle table. Allow machine feed to work alone. Only guide the material lightly. When inserting the bobbin case, push it in as for as it will go. Check upper and lower tensions. Use - Pfaff Tipmatic 1119 | Owner's Manual - Page 57
runs with difficulty Thread ends in hook raceway Remove thread ends and put a drop of oil into hook raceway. 7. The machine (1147) does not sew the stitches on the push-buttons Fancy-stitch thumb-wheel is engaged Disengage thumb-wheel: set at white dot. 9. Important note: Before exchanging - Pfaff Tipmatic 1119 | Owner's Manual - Page 58
que du fit de qualite. Introduire Ia nouvelle aiguilte a fond. Remptacer l'aiguitle. Tenir compte du tableau des aiguitles. Laisser Ia machine entralner seule. Guider Iégèrement t'ouvrage. Appuyer sur ta bolte a canette a sa mise en place, jusqu'à l'emboItage perceptible. Verifier les tensions - Pfaff Tipmatic 1119 | Owner's Manual - Page 59
arrière en position droite). Placer le bouton abaisse-griffe a gauche. 6. La machine est bloquée Des bribes de fil se sont prises dans Ia coursière du de fil et mettre une goutte d'huile dans Ia coursière. 7 La machine (1147) ne coud pas les points commandos par touche. Le disque de réglage - Pfaff Tipmatic 1119 | Owner's Manual - Page 60
4 Possibili inconvenienti e come ovviarli I nconveniente Come ovviare 1. La macchina salta punti L'ago non è inserito bene. E stato inserito un ago sbagliato. L'ago ë storto o spuntato. La macchina non è infilata bene. L'ago e troppo fine per ii fib. Inserire l'ago fino aII'arresto. Con parte - Pfaff Tipmatic 1119 | Owner's Manual - Page 61
lnconveniente Come ovviare 5. La macchina non trasporta o trasporta solo irregolarmente Tra i dentini del trasporto si è pressata delta polvere di cucito. Togliere Ia placca dell'ago e pulire i dentini con un pennello. II trasporto è abbassato. II dispositivo per Spostare ii dispositivo a - Pfaff Tipmatic 1119 | Owner's Manual - Page 62
dcrzubehöc Das hch. Sonderzubehör 1st für spezielle Näharbeiten. Es 1st bei Ihrem Handler gegen Berechnung erhält 4 ubehör Bestell-Nr. Näharbeit AppIikationsfuI Bandeinfasser (NähfulThalter entfernen) 8iesenfuf 5 Rillen (Zwillingsnadein mit Nadelabstand 1,8-2,5) BiesenfuI 7 Rillen - Pfaff Tipmatic 1119 | Owner's Manual - Page 63
Inhaltsverzeichnis Anlasser Einstellrad für Zierstiche Elektrischer AnschluB Fadenabschneider Garnrolle aufschieben Glühlampe auswechseln Knopflochnä hen Nadel auswechseln Nadeltabelle Nähfüe Nähfü(e auswechseln Nähstorungen und ihre Beseitigung Nähwerk ausschalten Nähwerk einschalten Nutzstiche - Pfaff Tipmatic 1119 | Owner's Manual - Page 64
Needle size 80, for fine cording needle size 70) Fringe sewing foot 93-035 943-9 1 For sewing fringes and for basting Straight-stitch foot Needle plate with hole 98-694 803-00 98-694 8 10-00 For topstitching and sewing very delicate and soft fabrics (silk jersey, etc.) Felling foot, 4.5 mm - Pfaff Tipmatic 1119 | Owner's Manual - Page 65
the bobbin thread tension 10 Checking the needle thread tension 16 Cleaning and oiling 41 Detachable work support and accessory box 30, 31 Disengaging the sewing mechanism 5 Drawing up bobbin thread 14 Dropping the feed dog 40 Electrical connection 2 Fancy stitches and combinations - Pfaff Tipmatic 1119 | Owner's Manual - Page 66
sont en vente chez votre dépositaire Pfaff contre facturation. (cessoires Pied pour applications Bordeur (enlever support du pied) Pied a nervures, mm Pied fronçeur Pied guide-cordonnet Plaque pour broderie a jour Pied overlock Ourleur (bord roulé) 2 mm Pied guide-bord pour tricot Pied semelle - Pfaff Tipmatic 1119 | Owner's Manual - Page 67
I/I Table des matières Abaissement de Ia griffe Boltes de rangement et accessoires Branchement électrique Causes de derangements et remèdes Changement de l'ampoule Changement de Ia semelle du pied presseur Coupe-fil Couture en marche arrière Deport du point droit Disque de réglage des points d' - Pfaff Tipmatic 1119 | Owner's Manual - Page 68
Accessori fuori corredo Gli accessori fuori corredo servono per alvori di cucito speciali. Si possono acquistare nei negozi Pfdfl 4 Accessorio N. d'ordine Lavoro di cucito Piedino per applicazioni 93-035 920-91 per avon di applicazioni Piedino per bordare (nimuovere portapiedino) Piedino - Pfaff Tipmatic 1119 | Owner's Manual - Page 69
Indice RR egolatore punte i ornameno tali stato Collegamento elettrico 3, 16 28 Rasafilo 2 Inserire ii portarocchetto 17 Sostituzione delta lampadina 11 Confezionare occhielli 42 Sostituzione detl'ago 37-39 Tabella degli aghi 40 Piedini 50, 51 Sostituzione dei piedini 33 - Pfaff Tipmatic 1119 | Owner's Manual - Page 70
P:rrimabele DL TabeHe zeigt die Programmnurnmer, den dazugehörenden Stich und darunter die Einstellung der Maschine. Bei alien 01 II II II ED D G 02 / \ - % --- / - / \ a- - - - DD E F E dPerrogSrtaicmhmläenngemn-itEdinesmtelHleirnwbiesiszu,,mstretch" is Anschlag auf ,,stretch" zu - Pfaff Tipmatic 1119 | Owner's Manual - Page 71
ubrigen wählen. ist In die Stichlange derTexttabelle nach sind Wunsch Bezeich zu nung und Anwendung der einzelnen Pro gramme angegeben. 08 , -' - -\ -' Th \ 09 - - -,, ' , - \ MM EF 10 11 12 13 ,- /\/ /1/ ,,-I/ \/\ \I\ '•%\ ', /\/ \/\ /1/ \I\ % -.l./\ /\/ /1/ -I/ '- \/\ \I\ M MMSM - Pfaff Tipmatic 1119 | Owner's Manual - Page 72
a c 1 r Listed in this chart are the stitch program number, the corresponding stitch and, in the lower half, the buttons to be pressed to sew this seam pattern. For all stitch programs marked "stretch", turn the stitcl length control toward "stretch" as far as ii 04 05 06 Ill Ill %% - Pfaff Tipmatic 1119 | Owner's Manual - Page 73
MCI)4. F DC) MCI) lvi ,-4- G. :C) Stitch 11 Honeycomb stitch 1 2 Joint stitch 13 Florentine stitch, narrow 14 Florentine stitch, wide Application Sewing on elastic threads or covering seams on terry cloth. A durable ornamental joining seam. For decorating hems, e.g. on bed linen. Ornamental - Pfaff Tipmatic 1119 | Owner's Manual - Page 74
gramme, le schema du point correspon a dant et les différents réglages effectuer sur Ia machine. Pour tous les programme a pourvus de Ia mention "stretch", réglant Ia longueur du un point décoratif de 6 mm (surpiqüres) Emplois multiples: surfilage, applications, incrusta tions de dentelle, - Pfaff Tipmatic 1119 | Owner's Manual - Page 75
pai eufutortensèdtrpseruorcghIraoaimpsiomesieatisov, noIal"oslnottrnée.gtcuDhe"au.nrsPdolueurpoleinst tableau descriptif et les applications figurent les designations des différents points. 08 , -' -I\ , -.' -I \ 09 - - \ ••' , -' \ 10 11 12 13 ,- /'/ /1/ 4/ \/\ \I\ •%%\ \. /\/ /1/ -I/ ,- - Pfaff Tipmatic 1119 | Owner's Manual - Page 76
i- rornrrni La tueiid ncJica ii programma, IL relativo punto e, sotto, quail tasti occorre premere. In tutti I programmi con indicazione "flexi" occorre regolare ii regolatore del punto fino aIl'arresto su "stretch". 01 II II II CD GD G 02 / \ / /\ D - - - '- D E --..--.--- '------- -. EF 03 i - Pfaff Tipmatic 1119 | Owner's Manual - Page 77
_-- In tutti gli attn punti Si puo regolare Ia è descritto denominazione e applicazione Iunghezza del punto a volontà. Nella tabella dei singoli programmi. 08 09 - , -' - -I \ \ , , -' -s. -i .% \ MM EF 10 11 12 13 ,- /\/ /1/ -I/ \/\ \I\ ' /\/ /1/ i/ ,- \/\ \I\ >%\\ /\/ /1/ - Pfaff Tipmatic 1119 | Owner's Manual - Page 78
f t es orre data di SALVADITO a norma delle vigenti leggi antinfortunistjche. II CONCESSIONARIO PFAFF dovrà effettuare ii mon taggio delJ'accessorio prima della consegna al Cliente. P FAFF G ritznerstra(3e 11 76227 Karlsruhe Technische Anderungen vorbehalten. Gedruckt in Deutschland
-
 1
1 -
 2
2 -
 3
3 -
 4
4 -
 5
5 -
 6
6 -
 7
7 -
8
-
9
-
10
-
11
-
12
-
13
-
14
-
15
-
16
-
17
-
18
-
19
-
20
-
21
-
22
-
23
-
24
-
25
-
26
-
27
-
28
-
29
-
30
-
31
-
32
-
33
-
34
-
35
-
36
-
37
-
38
-
39
-
40
-
41
-
42
-
43
-
44
-
45
-
46
-
47
-
48
-
49
-
50
-
51
-
52
-
53
-
54
-
55
-
56
-
57
-
58
-
59
-
60
-
61
-
62
-
63
-
64
-
65
-
66
-
67
-
68
-
69
-
70
-
71
-
72
-
73
-
74
-
75
-
76
-
77
-
78
 |
 |
tipmatic
1119
Bedienungsanleitung
Instruction
Book
Mode
d’emploi
Libretto
istruzioni