Pfaff Tipmatic 1119 Owner's Manual - Page 24
Touches, Finger-tip, controls
 |
View all Pfaff Tipmatic 1119 manuals
Add to My Manuals
Save this manual to your list of manuals |
Page 24 highlights
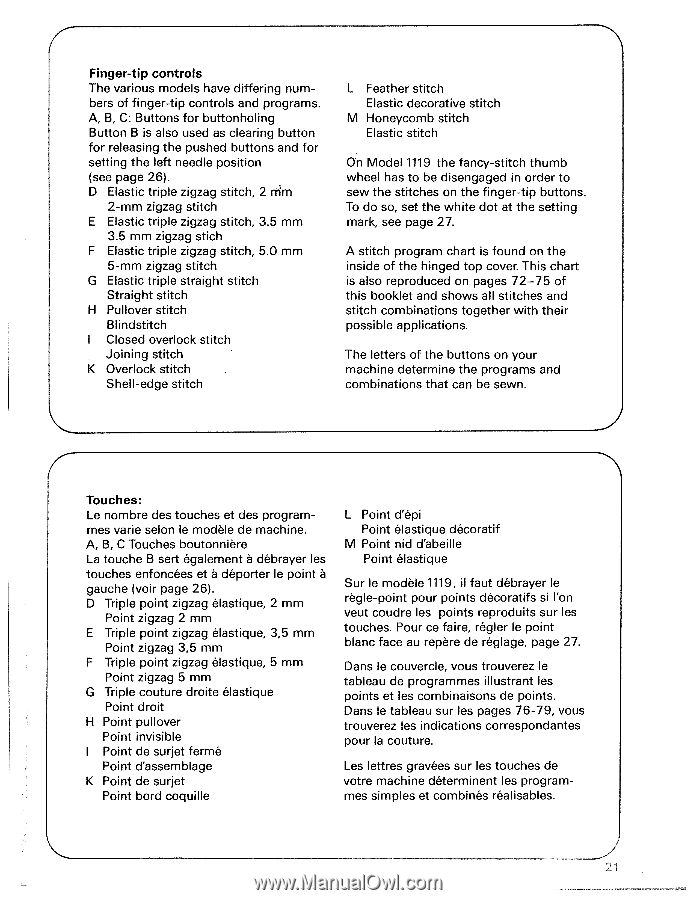
4 Finger-tip controls The various models have differing num bers of finger-tip controls and programs. A, B, C: Buttons for buttonholing Button B is also used as clearing button for releasing the pushed buttons and for setting the left needle position (see page 26). D Elastic triple zigzag stitch, 2 rrim 2-mm zigzag stitch E Elastic triple zigzag stitch, 3.5 mm 3.5 mm zigzag stich F Elastic triple zigzag stitch, 5.0 mm 5-mm zigzag stitch G Elastic triple straight stitch Straight stitch H Pullover stitch Blindstitch I Closed overlock stitch Joining stitch K Overlock stitch Shell-edge stitch L Feather stitch Elastic decorative stitch M Honeycomb stitch Elastic stitch On Model 1119 the fancy-stitch thumb wheel has to be disengaged in order to sew the stitches on the finger-tip buttons. To do so, set the white dot at the setting mark, see page 27. A stitch program chart is found on the inside of the hinged top cover. This chart is also reproduced on pages 72-75 of this booklet and shows all stitches and stitch combinations together with their possible applications. The letters of the buttons on your machine determine the programs and combinations that can be sewn. Touches: Le nombre des touches et des program mes vane selon le modèle de machine. A, B, C Touches boutonniere La touche B sert également a débrayer les touches enfoncées et a déporter le point a gauche (voir page 26). D Triple point zigzag élastique, 2 mm Point zigzag 2 mm E Triple point zigzag élastique, 3,5 mm Point zigzag 3,5 mm F Triple point zigzag élastique, 5 mm Point zigzag 5 mm G Triple couture droite élastique Point droit H Point pullover Point invisible I Point de surjet fermé Point d'assemblage K Point de surjet Point bord coquille L Point d'épi Point élastique décoratif M Point nid d'abeille Point élastique Sur le modèle 1119, il faut débrayer le regle-point pour points décoratifs si l'on veut coudre les points reproduits sur les touches. Pour ce faire, régler le point blanc face au repère de réglage, page 27. Dans le couvercie, vous trouverez le tableau de programmes illustrant les points et les combinaisons de points. Dans le tableau sur les pages 76-79, vous trouverez les indications correspondantes pour Ia couture. Les lettres gravées sur les touches de votre machine déterminent les program mes simples et combines réalisables.
-
 1
1 -
2
-
3
-
4
-
5
-
6
-
7
-
8
-
9
-
10
-
11
-
12
-
13
-
14
-
15
-
16
-
17
-
18
-
 19
19 -
 20
20 -
 21
21 -
 22
22 -
 23
23 -
 24
24 -
 25
25 -
 26
26 -
 27
27 -
 28
28 -
 29
29 -
30
-
31
-
32
-
33
-
34
-
35
-
36
-
37
-
38
-
39
-
40
-
41
-
42
-
43
-
44
-
45
-
46
-
47
-
48
-
49
-
50
-
51
-
52
-
53
-
54
-
55
-
56
-
57
-
58
-
59
-
60
-
61
-
62
-
63
-
64
-
65
-
66
-
67
-
68
-
69
-
70
-
71
-
72
-
73
-
74
-
75
-
76
-
77
-
78
 |
 |