Pfaff hobby 303 Owner's Manual - Page 36
the beginning
 |
View all Pfaff hobby 303 manuals
Add to My Manuals
Save this manual to your list of manuals |
Page 36 highlights
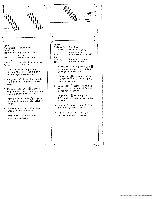
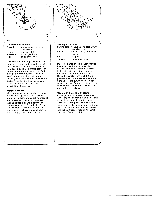
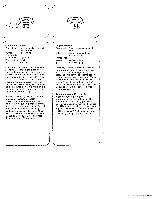
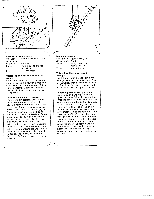
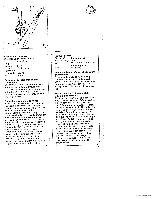
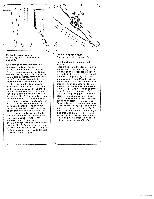
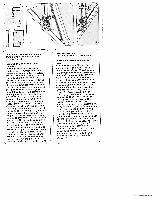
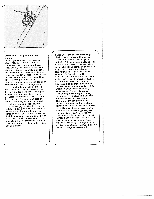
\j/ --0 ' 'T 0 \ N B/N\ A Fecho de correr invisivel: Para a regulacao da rnáquina ver pagina 30. Eis como se deverá proceder para preparar e aplicar o fecho: Passar a ferro Os bordos da abertura, Voltar o bordo esquerdo do tecido para o exterior (fig. A). Abrir o fecho e pôr no lugar o ado esquerdo, como indicado na figura D, ultrapassando os dentes urn pouco o bordo passado a ferro. Em seguida cose-se o bordo estendido. Alinhar o calcador ao meio para quo a agulha penetre exactamente no orificio central. Os dentes do fecho do correr correm pela ranhura esquerda da base do calcador (fig. C). No nicio da costura levantar urn pouco os dentes do fecho para que se introduzam na ranhura. Ter minar a costura fazendo alguns pontos de remate. Fechar o fecho de correr. Colocar urn alfinete no inicio da costura do segundo ado do fecho e abrir nova mente o fecho (fig. D). Voltar o bordo direito do tecido corn o ado direito do fecho para o exterior, mas retirar os alfinetes (fig. E). Os dentes do fecho encaixam na ranhura direita da base do calcador (fig. F). Para terrninar, costurar a os lados do fecho distancia da largura da base, deixando correr os dentes para o exterior da base (fig. 0). 4 N Seam-like zipper closure: For machine setting see page 30. How the zipper is prepared and inserted: Press the edges of the placket. Fold out the left seam allowance (Fig. A). Place the left side of the open zip in position so that its teeth protrude a little beyond the pressed edge (Fig. B). The seam is sewn along this edge. Move the zipper foot to the middle so that the needle stit ches into the middle opening. The zip teeth run into the left guiding groove in the foot (Fig. C). At the beginning of the seam lift up the teeth a little to feed them into the guiding groove. Sew the seam to the end and secure it. Close zip. Pin other side of zip to material at beginning of seam (Fig. D). Open zip. Remove the pin, turn out the right seam allowance with the zip tape, and pin the latter to the fabric, as shown in Fig. E. The zip teeth now run into the right gui ding groove in the foot (Fig. F). Finish sewing the zip. Now sew down the zip tape letting the zip teeth run along the guiding edge of the foot (Fig. 0). ) 32
-
 1
1 -
2
-
3
-
4
-
5
-
6
-
7
-
8
-
9
-
10
-
11
-
12
-
13
-
14
-
15
-
16
-
17
-
18
-
19
-
20
-
21
-
22
-
23
-
24
-
25
-
26
-
27
-
28
-
29
-
30
-
 31
31 -
 32
32 -
 33
33 -
 34
34 -
 35
35 -
 36
36 -
 37
37 -
 38
38 -
 39
39 -
 40
40 -
 41
41 -
42
-
43
-
44
-
45
-
46
-
47
-
48
-
49
-
50
-
51
-
52
-
53
-
54
-
55
-
56
-
57
-
58
-
59
-
60
-
61
-
62
-
63
-
64
-
65
-
66
-
67
 |
 |
