Philips DVDR3576H User manual - Page 10
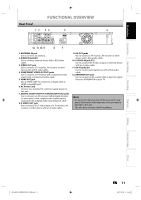
Functional Overview - remote
 |
UPC - 609585155206
View all Philips DVDR3576H manuals
Add to My Manuals
Save this manual to your list of manuals |
Page 10 highlights
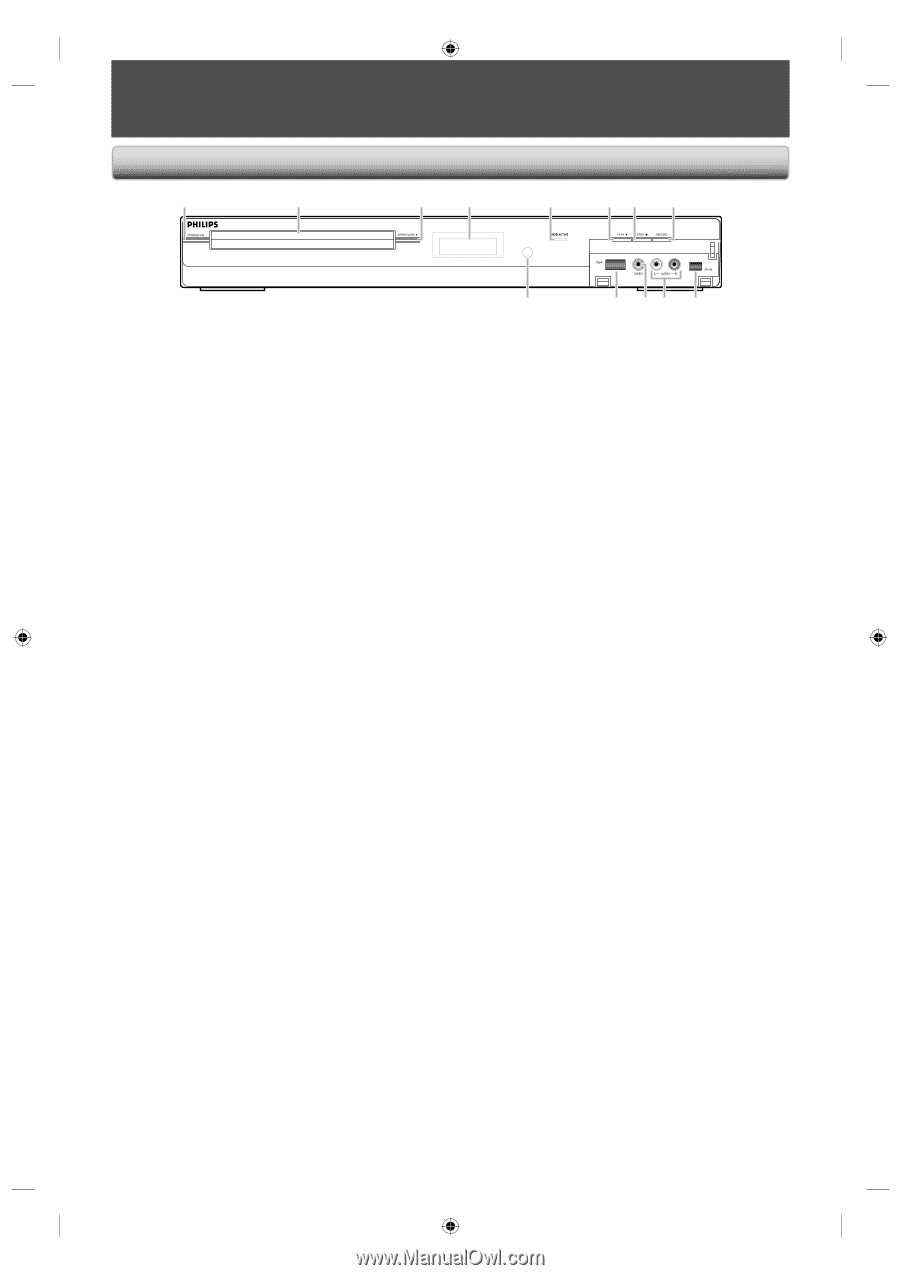
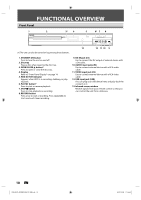
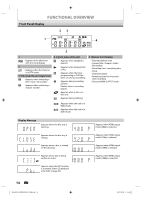
FUNCTIONAL OVERVIEW Front Panel 1 2 3* 4 5 6* 7 8 USB 13 12 11 10 9 (*) The unit can also be turned on by pressing these buttons. 1. STANDBY-ON button Press to turn the unit on and off. 2. Disc tray Place a disc when opening the disc tray. 3. OPEN/CLOSE A button* Press to open or close the disc tray. 4. Display Refer to "Front Panel Display" on page 14. 5. HDD ACTIVE indicator Appears when HDD is in recording, dubbing, or playing back. 6. PLAY B button* Press to start or resume playback. 7. STOP C button Press to stop playback or recording. 8. RECORD button Press once to start a recording. Press repeatedly to start one-touch timer recording. 9. DV-IN jack (E3) Use to connect the DV output of external device with a DV cable. 10. AUDIO input jacks (E2) Use to connect external device with a RCA audio cable. 11. VIDEO input jack (E2) Use to connect external device with a RCA video cable. 12. USB input jack (USB) You can plug your USB device here, and play back the contents in it. 13. Infrared sensor window Receive signals from your remote control so that you can control the unit from a distance. 10 EN E2H42UD_DVDR3576H-37_EN.indd 10 2007/12/28 11:14:42
-
 1
1 -
2
-
3
-
4
-
 5
5 -
 6
6 -
 7
7 -
 8
8 -
 9
9 -
 10
10 -
 11
11 -
 12
12 -
 13
13 -
 14
14 -
 15
15 -
16
-
17
-
18
-
19
-
20
-
21
-
22
-
23
-
24
-
25
-
26
-
27
-
28
-
29
-
30
-
31
-
32
-
33
-
34
-
35
-
36
-
37
-
38
-
39
-
40
-
41
-
42
-
43
-
44
-
45
-
46
-
47
-
48
-
49
-
50
-
51
-
52
-
53
-
54
-
55
-
56
-
57
-
58
-
59
-
60
-
61
-
62
-
63
-
64
-
65
-
66
-
67
-
68
-
69
-
70
-
71
-
72
-
73
-
74
-
75
-
76
-
77
-
78
-
79
-
80
-
81
-
82
-
83
-
84
-
85
-
86
-
87
-
88
-
89
-
90
-
91
-
92
-
93
-
94
-
95
-
96
-
97
-
98
-
99
-
100
-
101
-
102
-
103
-
104
-
105
-
106
-
107
-
108
-
109
-
110
-
111
-
112
-
113
-
114
-
115
-
116
-
117
-
118
-
119
-
120
-
121
-
122
-
123
-
124
 |
 |