Philips DVDR3576H User manual - Page 112
then press [OK].
 |
UPC - 609585155206
View all Philips DVDR3576H manuals
Add to My Manuals
Save this manual to your list of manuals |
Page 112 highlights
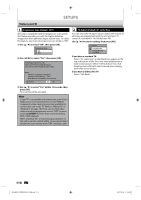
SETUPS HDMI 3 Use [K / L] to select a desired item, then press [OK]. 1 Format 2 HDMI Audio 3 RGB Range 4 Refer to 1 to 3 on this page and set the selected item. 5 When you finish with setting, press [SETUP] to exit. HDD & DVD RECORDER 1 Press [SETUP] and use [K / L] to select "General Setting", then press [OK]. "General Setting" menu will appear. 2 Use [K / L] to select "HDMI", then press [OK]. 1 Format (Default : RGB) You can select the color space for HDMI output. Set the appropriate color space for your display device. Use [K / L] to select a setting, then press [OK]. • When the connected device is not compatible with the Y/Cb/Cr, HDMI signal is output as RGB regardless of the setting. Format RGB YCbCr Your setting will be activated. 2 HDMI Audio (Default : ON) If you do not want to output the audio through HDMI (when you digitally output the audio through the DIGITAL AUDIO OUT jack to your audio system, etc.), you can set the HDMI audio output off. Use [K / L] to select a setting, then press [OK]. • Set to "OFF" when not outputting the HDMI sound. HDMI Audio ON OFF Your setting will be activated. 3 RGB Range (Default : Normal) You can adjust the RGB range to make the dark areas of the HDMI images brighter. Use [K / L] to select a setting, then press [OK]. • Select "Enhanced" if the black-white contrast is not clear. • This setting is effective only for HDMI RGB output. RGB Range Normal Enhanced Your setting will be activated. 112 EN E2H42UD_DVDR3576H-37_EN.indd 112 2007/12/28 11:16:30
-
 1
1 -
2
-
3
-
4
-
5
-
6
-
7
-
8
-
9
-
10
-
11
-
12
-
13
-
14
-
15
-
16
-
17
-
18
-
19
-
20
-
21
-
22
-
23
-
24
-
25
-
26
-
27
-
28
-
29
-
30
-
31
-
32
-
33
-
34
-
35
-
36
-
37
-
38
-
39
-
40
-
41
-
42
-
43
-
44
-
45
-
46
-
47
-
48
-
49
-
50
-
51
-
52
-
53
-
54
-
55
-
56
-
57
-
58
-
59
-
60
-
61
-
62
-
63
-
64
-
65
-
66
-
67
-
68
-
69
-
70
-
71
-
72
-
73
-
74
-
75
-
76
-
77
-
78
-
79
-
80
-
81
-
82
-
83
-
84
-
85
-
86
-
87
-
88
-
89
-
90
-
91
-
92
-
93
-
94
-
95
-
96
-
97
-
98
-
99
-
100
-
101
-
102
-
103
-
104
-
105
-
106
-
 107
107 -
 108
108 -
 109
109 -
 110
110 -
 111
111 -
 112
112 -
 113
113 -
 114
114 -
 115
115 -
 116
116 -
 117
117 -
118
-
119
-
120
-
121
-
122
-
123
-
124
 |
 |
