Philips DVDR3576H User manual - Page 53
Information on DV Dubbing
 |
UPC - 609585155206
View all Philips DVDR3576H manuals
Add to My Manuals
Save this manual to your list of manuals |
Page 53 highlights
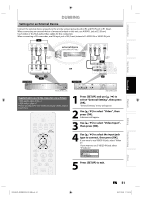
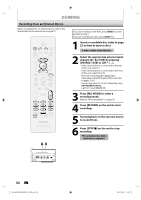
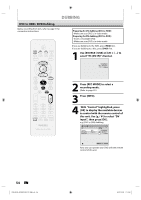
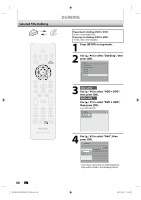
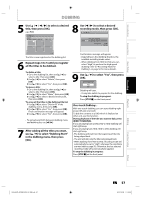
Introduction Connections Basic Setup Recording DUBBING Information on DV Dubbing This function helps you to easily dub the contents in the DVC (digital video camcorder) to HDD or DVD. You can control basic operations of the DVC from the remote control of this unit if the DVC is in video mode. Guide to DV and On-Screen Display 1) Connect your DVC to the DV-IN jack on the front panel using a DV cable. (Use the DV cable that has 4-pin input jack and is compliance with the IEEE1394 standards.) 2) Press [SOURCE / USB] repeatedly to select the appropriate external input channel for DV-IN (E3). 3) Press [INFO] to display the DVC information on the screen. When the DVC is in video mode... DVD mode 1/ 1 1/ 1 1 2 Control DV Audio Start Rec DVD Stereo1 +RW E3 (DV-IN) AB-1234 0:12:34 The menu changes according to what mode of DVC. Switch the mode on the DVC to video mode for the dubbing information. When the DVC is in camera mode... DVD mode 1/ 1 1/ 1 +RW E3 (DV-IN) 5 AB-1234 0:12:34 34 DVD SP 2h00m DVD SP 7 2h00m 6 The following instructions are described with the operations using the remote control of this unit. 1. DV icon 2. Indicator of active device • With "Control" highlighted, press [OK] to display the available devices to control with the remote control of this unit. Use [K / L] to select the device you wish to operate, then press [OK]. - Select "HDD" / "DVD" to control this unit with the remote control of this unit. - Select "DV Input" to control your DVC with the remote control of this unit. 3. Recording audio mode • "DV Audio" can be changed. With "DV Audio" selected, press [OK] to display "DV Audio" menu. Use [K / L] to select the audio you wish to output, then press [OK]. - Select "Stereo1" to dub the stereo sound. - Select "Stereo2" to dub the sound with after recording sound. - Select "Mix" to dub the stereo1 and stereo2. 4. Command menu • "Start Rec" or "Pause Rec" will appear. 5. External input channel 6. Product name of your DVC • If the unit cannot recognize the input signal from the DVC or if it is the unknown product, "No Device" or "****" will appear instead. 7. Status of the current operation and the time counter Each icon means (Available icons may vary depending on the DVC): DVC is in stop mode. DVC is in playback mode. DVC is in pause mode. DVC is fast forwarding. (standard speed) DVC is fast forwarding. (faster than above) DVC is fast forwarding. (faster than above) DVC is slow forwarding. (standard speed) DVC is slow forwarding. (faster than above) DVC is slow forwarding. (faster than above) DVC is fast forwarding. (in stop mode) DVC is fast reversing. (in stop mode) DVC is fast reversing. (standard speed) DVC is fast reversing. (faster than above) DVC is fast reversing. (faster than above) DVC is in slow reverse playback. DVC is in recording. DVC is in recording pause mode. Please also read the operating instructions of your DVC for more information. Playback Editing Function Setup Others E2H42UD_DVDR3576H-37_EN.indd 53 EN 53 2007/12/28 11:15:18
-
 1
1 -
2
-
3
-
4
-
5
-
6
-
7
-
8
-
9
-
10
-
11
-
12
-
13
-
14
-
15
-
16
-
17
-
18
-
19
-
20
-
21
-
22
-
23
-
24
-
25
-
26
-
27
-
28
-
29
-
30
-
31
-
32
-
33
-
34
-
35
-
36
-
37
-
38
-
39
-
40
-
41
-
42
-
43
-
44
-
45
-
46
-
47
-
 48
48 -
 49
49 -
 50
50 -
 51
51 -
 52
52 -
 53
53 -
 54
54 -
 55
55 -
 56
56 -
 57
57 -
 58
58 -
59
-
60
-
61
-
62
-
63
-
64
-
65
-
66
-
67
-
68
-
69
-
70
-
71
-
72
-
73
-
74
-
75
-
76
-
77
-
78
-
79
-
80
-
81
-
82
-
83
-
84
-
85
-
86
-
87
-
88
-
89
-
90
-
91
-
92
-
93
-
94
-
95
-
96
-
97
-
98
-
99
-
100
-
101
-
102
-
103
-
104
-
105
-
106
-
107
-
108
-
109
-
110
-
111
-
112
-
113
-
114
-
115
-
116
-
117
-
118
-
119
-
120
-
121
-
122
-
123
-
124
 |
 |
