Pioneer AVH-P4400BH Owner's Manual - Page 57
Introduction of menu, operations, Audio adjustments, Menu operations
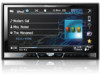 |
View all Pioneer AVH-P4400BH manuals
Add to My Manuals
Save this manual to your list of manuals |
Page 57 highlights
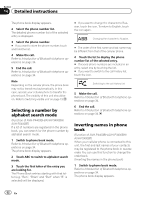
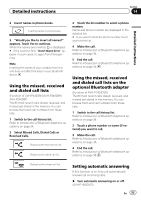
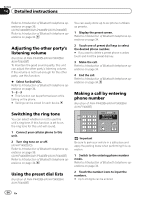
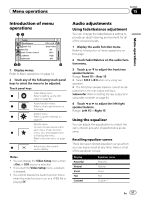
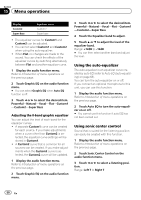
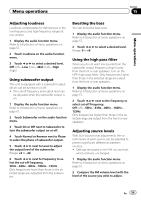
Menu operations Section 15 Menu operations Introduction of menu operations 12 Audio Fader/Balance Graphic EQ Auto EQ Sonic Center Control Loudness Subwoofer F/R 0 L/R 0 Super Bass On L/R 0 High Off 34 5 1 Display menus. Refer to Basic operations on page 14. 2 Touch any of the following touch panel keys to select the menu to be adjusted. Touch panel keys Video Setup menu 1 Refer to Setting up the DVD player on page 60. Audio function menu 2 Refer to Audio adjustments on this page. System menu 3 Refer to System settings on page 64. Favorite menu You can choose menus within each menu (Audio function 4 menu, etc.) and register them to this favorite menu. Refer to Favorite menu on page 71. 5 Returning to the current source display Notes ! You can display the Video Setup menu when a Disc or USB source is selected. ! If you start the Video Setup menu, playback is stopped. ! You cannot display the Audio function menu when the mute function is on or a JPEG file is playing. Audio adjustments Using fader/balance adjustment You can change the fader/balance setting to provide an ideal listening environment for all of the occupied seats. 1 Display the audio function menu. Refer to Introduction of menu operations on this page. 2 Touch Fader/Balance on the audio function menu. 3 Touch a or b to adjust the front/rear speaker balance. Range: Front 15 to Rear 15 # Select F/R 0 L/R 0 when only using two speakers. # The front/rear speaker balance cannot be adjusted when the rear output setting is Subwoofer. Refer to Setting the rear output and subwoofer controller on page 64. 4 Touch c or d to adjust the left/right speaker balance. Range: Left 15 to Right 15 Using the equalizer You can adjust the equalization to match the car's interior acoustic characteristics as desired. Recalling equalizer curves There are seven stored equalizer curves which you can easily recall at any time. Here is a list of the equalizer curves. Display Powerful Natural Vocal Flat Custom1 Equalizer curve Powerful Natural Vocal Flat Custom 1 En 57
-
 1
1 -
2
-
3
-
4
-
5
-
6
-
7
-
8
-
9
-
10
-
11
-
12
-
13
-
14
-
15
-
16
-
17
-
18
-
19
-
20
-
21
-
22
-
23
-
24
-
25
-
26
-
27
-
28
-
29
-
30
-
31
-
32
-
33
-
34
-
35
-
36
-
37
-
38
-
39
-
40
-
41
-
42
-
43
-
44
-
45
-
46
-
47
-
48
-
49
-
50
-
51
-
 52
52 -
 53
53 -
 54
54 -
 55
55 -
 56
56 -
 57
57 -
 58
58 -
 59
59 -
 60
60 -
 61
61 -
 62
62 -
63
-
64
-
65
-
66
-
67
-
68
-
69
-
70
-
71
-
72
-
73
-
74
-
75
-
76
-
77
-
78
-
79
-
80
-
81
-
82
-
83
-
84
-
85
-
86
-
87
-
88
-
89
-
90
-
91
-
92
-
93
-
94
-
95
-
96
-
97
-
98
-
99
-
100
-
101
-
102
-
103
-
104
-
105
-
106
-
107
-
108
-
109
-
110
-
111
-
112
 |
 |
