Pioneer DEH-P710BT Owner's Manual - Page 9
Resetting the microprocessor, About the demo mode, Before You Start, Removing the front panel
 |
UPC - 012562943534
View all Pioneer DEH-P710BT manuals
Add to My Manuals
Save this manual to your list of manuals |
Page 9 highlights
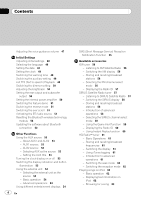
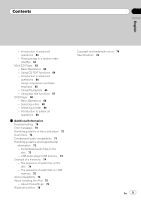
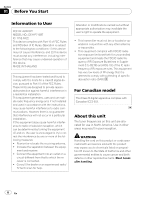
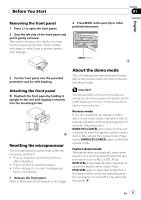
Before You Start Section 01 English Removing the front panel 1 Press to open the front panel. 2 Grip the left side of the front panel and pull it gently outward. Take care not to grip it too tightly or to drop the front panel and protect it from contact with water or other fluids to prevent permanent damage. 2 Press RESET with a pen tip or other pointed instrument. RESET button 3 Put the front panel into the provided protective case for safe keeping. Attaching the front panel % Reattach the front panel by holding it upright to the unit and clipping it securely into the mounting hooks. Resetting the microprocessor The microprocessor must be reset under the following conditions: ! Prior to using this unit for the first time after installation ! If the unit fails to operate properly ! When strange or incorrect messages ap- pear on the display 1 Remove the front panel. Refer to Removing the front panel on this page. About the demo mode This unit features two demonstration modes. One is the reverse mode, the other is the feature demo mode. Important The red lead (ACC) of this unit should be connected to a terminal coupled with ignition switch on/off operations. If this is not done, the vehicle battery may be drained. Reverse mode If you do not perform an operation within about 30 seconds, screen indications start to reverse, and then continue reversing every 10 seconds. Pressing button BAND/ESC/CANCEL when power to this unit is turned off while the ignition switch is set to ACC or ON cancels the reverse mode. Press button BAND/ESC/CANCEL again to start the reverse mode. Feature demo mode The feature demo automatically starts when power to this unit is turned off while the ignition switch is set to ACC or ON. Press DISP/SCRL during feature demo operation to cancel the feature demo mode. Press DISP/SCRL again to start. Remember that if the feature demo continues operating when the car engine is turned off, it may drain battery power. En 9
-
 1
1 -
2
-
3
-
 4
4 -
 5
5 -
 6
6 -
 7
7 -
 8
8 -
 9
9 -
 10
10 -
 11
11 -
 12
12 -
 13
13 -
 14
14 -
15
-
16
-
17
-
18
-
19
-
20
-
21
-
22
-
23
-
24
-
25
-
26
-
27
-
28
-
29
-
30
-
31
-
32
-
33
-
34
-
35
-
36
-
37
-
38
-
39
-
40
-
41
-
42
-
43
-
44
-
45
-
46
-
47
-
48
-
49
-
50
-
51
-
52
-
53
-
54
-
55
-
56
-
57
-
58
-
59
-
60
-
61
-
62
-
63
-
64
-
65
-
66
-
67
-
68
-
69
-
70
-
71
-
72
-
73
-
74
-
75
-
76
-
77
-
78
-
79
-
80
-
81
-
82
-
83
-
84
-
85
-
86
-
87
-
88
-
89
-
90
-
91
-
92
-
93
-
94
-
95
-
96
-
97
-
98
-
99
-
100
-
101
-
102
-
103
-
104
-
105
-
106
-
107
-
108
-
109
-
110
-
111
-
112
-
113
-
114
-
115
-
116
-
117
-
118
-
119
-
120
-
121
-
122
-
123
-
124
-
125
-
126
-
127
-
128
-
129
-
130
-
131
-
132
-
133
-
134
-
135
-
136
-
137
-
138
-
139
-
140
-
141
-
142
-
143
-
144
-
145
-
146
-
147
-
148
-
149
-
150
-
151
-
152
-
153
-
154
-
155
-
156
-
157
-
158
-
159
-
160
-
161
-
162
-
163
-
164
-
165
-
166
-
167
-
168
-
169
-
170
-
171
-
172
-
173
-
174
-
175
-
176
-
177
-
178
-
179
-
180
-
181
-
182
-
183
-
184
-
185
-
186
-
187
-
188
-
189
-
190
-
191
-
192
-
193
-
194
-
195
-
196
-
197
-
198
-
199
-
200
-
201
-
202
-
203
-
204
-
205
-
206
-
207
-
208
-
209
-
210
-
211
-
212
-
213
-
214
-
215
-
216
-
217
-
218
-
219
-
220
-
221
-
222
-
223
-
224
-
225
-
226
-
227
-
228
-
229
-
230
-
231
-
232
-
233
-
234
-
235
-
236
-
237
-
238
-
239
-
240
-
241
-
242
-
243
-
244
-
245
 |
 |