Samsung BD-E6500 User Manual Ver.1.0 (English) - Page 19
Settings, The Initial Settings Procedure, The Home Screen, Selecting an Option on the Home Screen - apps
 |
View all Samsung BD-E6500 manuals
Add to My Manuals
Save this manual to your list of manuals |
Page 19 highlights
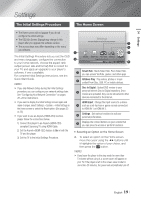
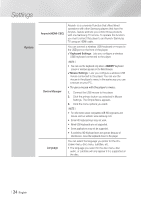
04 Settings Settings The Initial Settings Procedure The Home Screen • The Home screen will not appear if you do not configure the initial settings. • The OSD (On Screen Display) may change in this player after you upgrade the software version. • The access steps may differ depending on the menu you selected. The Initial Settings Procedure lets you set the OSD and menu languages, configure the connection to your home network, choose the aspect ratio output (screen size and format) that is correct for your TV, and apply an upgrade to your player's software, if one is available. For complete Initial Settings instructions, see the Quick Start Guide. ||NOTE | \\ If you skip Network Setup during the Initial Settings procedure, you can configure your network settings later. See "Configuring Your Network Connection" on pages 26~28 for instructions. \\ If you want to display the Initial Settings screen again and make changes, select Settings > System > Initial Settings in the Home screen or select the Reset option. (See pages 23 or 25) \\ If you want to use an Anynet+(HDMI-CEC) function, please follow the instructions below. 1) Connect the player to an Anynet+(HDMI-CEC)compliant Samsung TV using HDMI Cable. 2) Set the Anynet+(HDMI-CEC) feature to On in both the TV and the player. 3) Set the TV to the Initial Settings Procedure. 1 2 Settings Set various functions to suit your personal preferences. 3 4 Smart Hub AllShare Play Disc to Digital HDMI Input 5 6 b Disc to Digital FAQs d WPS(PBC) 1 Smart Hub : Starts Smart Hub. From Smart Hub, you can access YouTube, games, and other apps. 2 AllShare Play : Play videos, photos or music content from Disc, USB, PC or mobile devices. Disc to Digital : Upload DVD movies to your 3 personal Internet Disc to Digital repository. Once movies are uploaded, they can be streamed to other devices connected to the Internet. HDMI Input : Change the input source to a device 4 such as a set-top-box or game console connected to HDMI IN 1 or HDMI IN 2. 5 Settings : Set various functions to suit your personal preferences. 6 Displays the colored buttons on your remote that you can press to access or perform functions. `` Selecting an Option on the Home Screen 4. To select an option on the Home screen, move the cursor using the ◄► buttons until it highlights the option of your choice, and then press the v button. ||NOTE | \\ If you leave the player in the stop mode for more than 5 minutes without using it, a screen saver will appear on your TV. If the player is left in the screen saver mode for more than 20 minutes, the power will automatically turn off. English 19 |
-
 1
1 -
2
-
3
-
4
-
5
-
6
-
7
-
8
-
9
-
10
-
11
-
12
-
13
-
 14
14 -
 15
15 -
 16
16 -
 17
17 -
 18
18 -
 19
19 -
 20
20 -
 21
21 -
 22
22 -
 23
23 -
 24
24 -
25
-
26
-
27
-
28
-
29
-
30
-
31
-
32
-
33
-
34
-
35
-
36
-
37
-
38
-
39
-
40
-
41
-
42
-
43
-
44
-
45
-
46
-
47
-
48
-
49
-
50
-
51
-
52
-
53
-
54
-
55
-
56
-
57
-
58
-
59
-
60
 |
 |