Samsung BD-E6500 User Manual Ver.1.0 (English) - Page 40
Creating a Playlist from a CD, Ripping, process. The Ripping Completion Bar popup
 |
View all Samsung BD-E6500 manuals
Add to My Manuals
Save this manual to your list of manuals |
Page 40 highlights
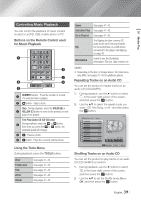
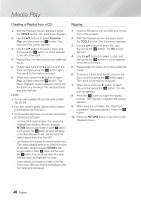
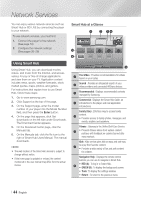
Media Play Creating a Playlist from a CD Ripping 1. With the Playback screen displayed, press the TOOLS button. The Tools menu appears. 2. Use the ▲▼ buttons to select Selection Play, and then press the v button. The Selection Play screen appears. 3. Use the ▲▼ buttons to select a track, and then press the v button. A check appears to the left of the track. 4. Repeat Step 3 to select and check additional tracks. 5. To remove a track from the list, move to the track, and then press the v button again. The check on the track is removed. 6. When done, press the ► button to select Play, and then press the v button. The Music Playback screen reappears listing only the tracks you checked. The selected tracks play automatically. ||NOTE | \\ You can create a playlist with up to 99 tracks on Audio CDs (CD-DA). \\ If you have created a playlist, Selection Play is replaced by Edit Playlist on the Tools menu. \\ On the Selection Play screen, you can also choose Select All, Deselect All, and Cancel. -- Use Select All to select all tracks. This cancels your individual track selections. When you press the RETURN button on your remote or select 6 button, and then press the v button, all tracks will appear on the Music Playback screen, and the product will begin to play all tracks from Track 001. -- Use Deselect All to deselect all selected tracks at once. Then, select individual tracks or use Select All to select all the tracks, and then press the RETURN button on your remote or select 6 button, and then press the v button. If you do not use Select All or select individual tracks, the Playlist will not change. -- Cancel cancels any changes you made on the Play Select screen. When you return to the Playback screen, the Playlist will be unchanged. 1. Insert a USB device into the USB jack on the front of the product. 2. With the Playback screen displayed, press the TOOLS button. The Tools menu appears. 3. Use the ▲▼ buttons to select Rip, and then press the v button. The Rip screen appears. 4. Use the ▲▼ buttons to select a track, and then press the v button. A check appears to the left of the track. 5. Repeat Step 3 to select and check additional tracks. 6. To remove a track from the list, move to the track, and then press the v button again. The check on the track is removed. 7. When done, press the ► button to select Rip, and then press the v button. The Rip pop-up appears. 8. Press the v button to begin the ripping process. The Ripping Completion Bar popup appears. 9. When ripping is complete, the "Ripping is completed" message appears. Press the v button. 10. Press the RETURN button to go back to the Playback screen. | 40 English
-
 1
1 -
2
-
3
-
4
-
5
-
6
-
7
-
8
-
9
-
10
-
11
-
12
-
13
-
14
-
15
-
16
-
17
-
18
-
19
-
20
-
21
-
22
-
23
-
24
-
25
-
26
-
27
-
28
-
29
-
30
-
31
-
32
-
33
-
34
-
 35
35 -
 36
36 -
 37
37 -
 38
38 -
 39
39 -
 40
40 -
 41
41 -
 42
42 -
 43
43 -
 44
44 -
 45
45 -
46
-
47
-
48
-
49
-
50
-
51
-
52
-
53
-
54
-
55
-
56
-
57
-
58
-
59
-
60
 |
 |