Samsung BD-E6500 User Manual Ver.1.0 (English) - Page 46
BD-LIVE™, Using Disc to Digital, Navigation Help, GREEN B, YELLOW C, Tools, Return - browser
 |
View all Samsung BD-E6500 manuals
Add to My Manuals
Save this manual to your list of manuals |
Page 46 highlights
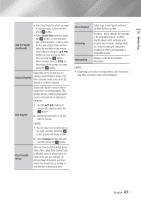
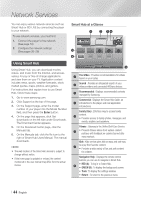
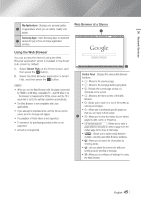
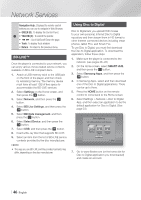
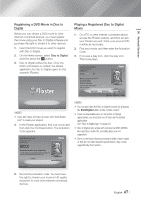
Network Services Navigation Help : Displays the remote control buttons you can use to navigate in Web Browser. • GREEN (B) : To display the Control Panel. 2 • YELLOW (C) : To switch the pointer. • ( ) : Scroll Up/Scroll Down the page. • Tools : To display Tools window. • Return : To return to the previous menu. BD-LIVE™ Once the player is connected to your network, you can enjoy various movie-related service contents available on BD-LIVE compliant discs. 1. Attach a USB memory stick to the USB jack on the front of the player, and then check its remaining memory. The memory device must have at least 1GB of free space to accommodate the BD-LIVE services. 2. Select Settings on the Home screen, and then press the v button. 3. Select Network, and then press the v button. 4. Select BD Live Settings, and then press the v button. 5. Select BD Data management, and then press the v button. 6. Select Select Device, and then press the v button. 7. Select USB, and then press the v button. 8. Insert a Blu-ray Disc that supports BD-LIVE. 9. Select an item from the list of BD-LIVE service contents provided by the disc manufacturer. ||NOTE | \\ The way you use BD-LIVE and the provided contents may differ, depending on the disc manufacturer. Using Disc to Digital Disc to Digital lets you upload DVD movies to your own personal, Internet Disc to Digital repository and then stream them in HD format to other Internet connected devices including smart phones, tablet PCs, and Smart TVs. To use Disc to Digital, you must first download the Disc to Digital application. To download the application, follow these steps. 1. Make sure the player is connected to the network. (see pages 26~28) 2. On the Home screen, select SMART HUB, and then press the v button. 3. Select Samsung Apps, and then press the v button. 4. In Samsung Apps, select and then download one of the Disc to Digital applications. There can be up to three. 5. Press the HOME button on the remote control to come back to the Home screen. 6. Select Settings > Network > Disc to Digital App, and then select an application to be the default application for Disc to Digital. (See page 23) Disc to Digital App Select a default application to use for this service. Flixster App Digital Copy Locker B Digital Copy Locker B Digital Copy Locker A Digital Copy Locker A Close ' Return 7. Go to www.flixster.com (or the home site for Disc to Digital application you downloaded) and create an account. | 46 English
-
 1
1 -
2
-
3
-
4
-
5
-
6
-
7
-
8
-
9
-
10
-
11
-
12
-
13
-
14
-
15
-
16
-
17
-
18
-
19
-
20
-
21
-
22
-
23
-
24
-
25
-
26
-
27
-
28
-
29
-
30
-
31
-
32
-
33
-
34
-
35
-
36
-
37
-
38
-
39
-
40
-
 41
41 -
 42
42 -
 43
43 -
 44
44 -
 45
45 -
 46
46 -
 47
47 -
 48
48 -
 49
49 -
 50
50 -
 51
51 -
52
-
53
-
54
-
55
-
56
-
57
-
58
-
59
-
60
 |
 |