Samsung SC-D366 User Manual (ENGLISH) - Page 88
Marking Images for Printing (Print Mark), Removing the Print Mark
 |
View all Samsung SC-D366 manuals
Add to My Manuals
Save this manual to your list of manuals |
Page 88 highlights
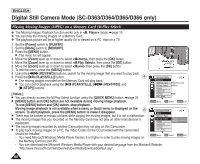
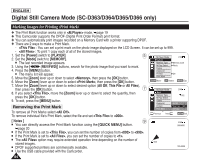
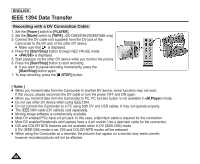
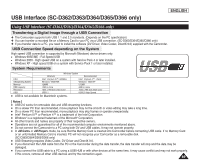
ENGLISH Digital Still Camera Mode (SC-D363/D364/D365/D366 only) Marking Images for Printing (Print Mark) ✤ The Print Mark function works only in mode. ➥page 19 ✤ This Camcorder supports the DPOF (Digital Print Order Format) print format. ✤ You can automatically print images recorded on a Memory Card with a printer supporting DPOF. ✤ There are 2 ways to make a Print Mark. - : You can set a print mark on the photo image displayed on the LCD Screen. It can be set up to 999. - : To print 1 copy each of all of the stored images. 1. Set the [Power] switch to [PLAYER]. 2. Set the [Mode] switch to [MEMORY]. 5 M.Player Mode 2/46 √Memory I The last recorded image appears. 3. Using the REV/FWD)] buttons, search for the photo image that you want to mark. 4. Press the [MENU] button. Memory Type M.Play Select Delete Delete All √Memory Card √Photo I The menu list will appear. 5. Move the [Zoom] lever up or down to select , then press the [OK] button. Protect √Off Print Mark 6. Move the [Zoom] lever up or down to select , then press the [OK] button. ZOOM Move OK Select MENU Exit 7. Move the [Zoom] lever up or down to select desired option (All Off, This File or All Files), then press the [OK] button. 7 M.Player Mode 2/46 8. If you select , move the [Zoom] lever up or down to select the quantity, then press the [OK] button. Back Memory Type 002 M.Play Select 9. To exit, press the [MENU] button. Delete Delete All All Off Removing the Print Mark Protect Print Mark This File 002 All Files † To remove all Print Marks select . To remove individual file's Print Mark, select the file and set to . † Previous Next MENU Exit √ † [ Notes ] 9 I You can directly access the Print Mark function using the [QUICK MENU] button. ➥page 20 I If the Print Mark is set to , you can set the number of copies from to . I If the Print Mark is set to , you can set the number of copies to . I The option may require extended operation time depending on the number of stored images. 002 I DPOF supported printers are commercially available. I Use the USB cable provided with the Camcorder. 2/46 800x600 100-0002 84
-
 1
1 -
2
-
3
-
4
-
5
-
6
-
7
-
8
-
9
-
10
-
11
-
12
-
13
-
14
-
15
-
16
-
17
-
18
-
19
-
20
-
21
-
22
-
23
-
24
-
25
-
26
-
27
-
28
-
29
-
30
-
31
-
32
-
33
-
34
-
35
-
36
-
37
-
38
-
39
-
40
-
41
-
42
-
43
-
44
-
45
-
46
-
47
-
48
-
49
-
50
-
51
-
52
-
53
-
54
-
55
-
56
-
57
-
58
-
59
-
60
-
61
-
62
-
63
-
64
-
65
-
66
-
67
-
68
-
69
-
70
-
71
-
72
-
73
-
74
-
75
-
76
-
77
-
78
-
79
-
80
-
81
-
82
-
 83
83 -
 84
84 -
 85
85 -
 86
86 -
 87
87 -
 88
88 -
 89
89 -
 90
90 -
 91
91 -
 92
92 -
 93
93 -
94
-
95
-
96
-
97
-
98
-
99
-
100
-
101
-
102
-
103
-
104
-
105
-
106
-
107
-
108
-
109
-
110
-
111
 |
 |
