Samsung SPH-M340 User Manual (user Manual) (ver.f5) (English) - Page 44
Start, AM/PM, Contact, Tools & Settings, Tools, Calendar, Today, Tools &, Settings, Scheduler
 |
View all Samsung SPH-M340 manuals
Add to My Manuals
Save this manual to your list of manuals |
Page 44 highlights
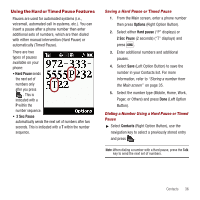
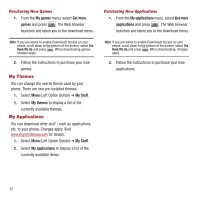
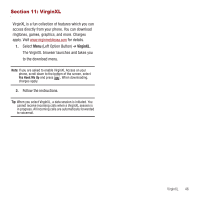
8. Select a ringtone type for the alarm by highlighting the ringtone field and pressing . • Press the navigation key up or down to select the desired ringtone and press . 9. Select a start time for the event by highlighting the Start field. • Use the keypad to enter a start time and date. Press AM/PM (Right Option Button) to toggle between AM or PM. 10. Select an end time for the event by highlighting the End field. • Use the keypad to enter an ending time and date. Press AM/PM (Right Option Button) to toggle between AM or PM. 11. Select a contact for the event by highlighting the Contact field and pressing . • Select a contact from the list and press Assign (Left Option Button). 12. Select Done (Left Option Button) to store the new scheduled event and return to the saved list. Viewing Today's Events ᮣ Select Menu (Left Option Button) ➔ Tools & Settings ➔ Tools ➔ Calendar ➔ Today. Viewing your Scheduled Events 1. Select Menu (Left Option Button) ➔ Tools & Settings ➔ Tools ➔ Calendar ➔ Scheduler. 2. Use the navigation to select the day you would like to view events for and press . (If events are scheduled for the selected day, they are listed in chronological order.) 3. Select the desired event and press to display the details. Erasing a Day's Events 1. Select Menu (Left Option Button) ➔ Tools & Settings ➔ Tools ➔ Calendar ➔ Scheduler. 2. Use the navigation to select the day you would like view and press . 3. Select Options (Right Option Button) ➔ Erase. (An alert displays notifying you of the number of events to erase.) 4. Select Yes to confirm or No to cancel, then press . 41
-
 1
1 -
2
-
3
-
4
-
5
-
6
-
7
-
8
-
9
-
10
-
11
-
12
-
13
-
14
-
15
-
16
-
17
-
18
-
19
-
20
-
21
-
22
-
23
-
24
-
25
-
26
-
27
-
28
-
29
-
30
-
31
-
32
-
33
-
34
-
35
-
36
-
37
-
38
-
 39
39 -
 40
40 -
 41
41 -
 42
42 -
 43
43 -
 44
44 -
 45
45 -
 46
46 -
 47
47 -
 48
48 -
 49
49 -
50
-
51
-
52
-
53
-
54
-
55
-
56
-
57
-
58
-
59
-
60
-
61
-
62
-
63
-
64
-
65
-
66
-
67
-
68
-
69
-
70
-
71
-
72
-
73
-
74
-
75
-
76
-
77
-
78
-
79
-
80
-
81
-
82
-
83
-
84
-
85
-
86
-
87
-
88
-
89
-
90
-
91
-
92
-
93
-
94
-
95
-
96
-
97
-
98
-
99
-
100
-
101
-
102
-
103
-
104
-
105
-
106
 |
 |