Samsung SPH-M340 User Manual (user Manual) (ver.f5) (English) - Page 51
Camera Settings, My Pictures
 |
View all Samsung SPH-M340 manuals
Add to My Manuals
Save this manual to your list of manuals |
Page 51 highlights
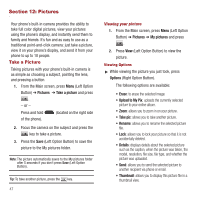
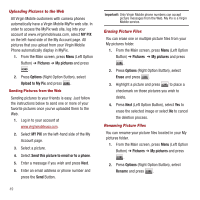
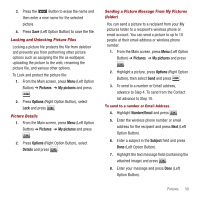
Tip: Press the camera button on the side of the phone to activate the camera. Camera Settings While your phone is in camera mode you can press the Right Option Button to display the camera options: 1. Press Options (Right Option Button) to view the following: • Shutter sound: plays a tone when the shutter opens and closes. Select from Shutter 1, Shutter 2, Shutter 3, or Say cheese. • Resolution: sets the screen resolution to High (480 x 640), Med (240 x 320), or Low (120 x 160). • Quality: sets the quality of the shot to High, Medium or Low. • Self-timer: sets a time delay before the camera takes the picture. Select Off, 5 seconds, 10 seconds, or 15 seconds. • White balance: sets the white balance options to Auto, Sunny, Cloudy, Tungsten, or Fluorescent. • Fun frames: places a frame over the picture. • Color tones: sets a custom color tone for the picture. Choose one of the following: Auto, Monochrome, Green, Sepia, or Blue. My Pictures The internal picture storage area or folder is called My pictures. When you take a picture using the camera your pictures automatically save to the My pictures folder. From this folder you can view all the pictures you take, assign the pictures as caller ID, wallpaper, or as a screensaver, upload the pictures to the web, erase them from the folder, or perform several other picture related tasks. Assigning a Picture File The Assign option allows you to use assign a picture as a Caller ID, Wallpaper, or Screensaver. 1. From the Main screen, press Menu (Left Option Button) ➔ Pictures ➔ My pictures and press . 2. Highlight one of the pictures on the display and press Options (Right Option Button) ➔ Assign and press . 3. Select Caller ID, Wallpaper, or Screensaver and press . The picture file is assigned to the selected option. Pictures 48
-
 1
1 -
2
-
3
-
4
-
5
-
6
-
7
-
8
-
9
-
10
-
11
-
12
-
13
-
14
-
15
-
16
-
17
-
18
-
19
-
20
-
21
-
22
-
23
-
24
-
25
-
26
-
27
-
28
-
29
-
30
-
31
-
32
-
33
-
34
-
35
-
36
-
37
-
38
-
39
-
40
-
41
-
42
-
43
-
44
-
45
-
 46
46 -
 47
47 -
 48
48 -
 49
49 -
 50
50 -
 51
51 -
 52
52 -
 53
53 -
 54
54 -
 55
55 -
 56
56 -
57
-
58
-
59
-
60
-
61
-
62
-
63
-
64
-
65
-
66
-
67
-
68
-
69
-
70
-
71
-
72
-
73
-
74
-
75
-
76
-
77
-
78
-
79
-
80
-
81
-
82
-
83
-
84
-
85
-
86
-
87
-
88
-
89
-
90
-
91
-
92
-
93
-
94
-
95
-
96
-
97
-
98
-
99
-
100
-
101
-
102
-
103
-
104
-
105
-
106
 |
 |