Seagate BlackArmor WS 110 BlackArmor PS User Guide - Page 101
Adding a new hard disk, 14.1 Selecting a hard disk, 14.2 Creating new partitions
 |
View all Seagate BlackArmor WS 110 manuals
Add to My Manuals
Save this manual to your list of manuals |
Page 101 highlights
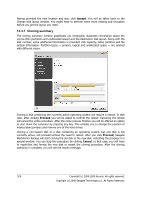
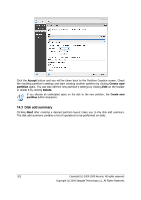
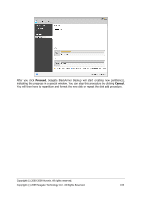
Chapter 14. Adding a new hard disk If you don't have enough space for your data, you can either replace the old disk with a new higher-capacity one (data transfers to new disks are described in the previous chapter), or add a new disk only to store data, leaving the system on the old disk. If the computer has a bay for another disk, it would be easier to add a data disk drive than to clone a system drive. To add a new disk, you must first install it in your computer. 14.1 Selecting a hard disk Select the disk that you've added to the computer. If there are any partitions on the new disk, you will be shown a warning window. For you to be able to add the disk, they must be deleted first, so click OK to continue. 14.2 Creating new partitions Next you will see the current partition layout. Initially, all disk space will be unallocated. This will change after you add new partitions. To create a partition, click Create new partition and set the new partition location and size. You can do this both by entering values in the Free space before, Partition size, Free space after fields, and by dragging partition borders or the partition itself. If the cursor turns into two vertical lines with left and right arrows, it is pointed at the partition border and you can drag it to enlarge or reduce the partition size. If the cursor turns into four arrows, it is pointed at the partition, so you can move it to the left or right (if there is unallocated space near it). Select a file system for the new partition. You may select a partition letter of your choice (or leave the default one) and input a label for the new partition in the corresponding field. Finally, select a partition type. Copyright (c) 2000-2009 Acronis. All rights reserved. Copyright (c) 2009 Seagate Technology LLC. All Rights Reserved. 101
-
 1
1 -
2
-
3
-
4
-
5
-
6
-
7
-
8
-
9
-
10
-
11
-
12
-
13
-
14
-
15
-
16
-
17
-
18
-
19
-
20
-
21
-
22
-
23
-
24
-
25
-
26
-
27
-
28
-
29
-
30
-
31
-
32
-
33
-
34
-
35
-
36
-
37
-
38
-
39
-
40
-
41
-
42
-
43
-
44
-
45
-
46
-
47
-
48
-
49
-
50
-
51
-
52
-
53
-
54
-
55
-
56
-
57
-
58
-
59
-
60
-
61
-
62
-
63
-
64
-
65
-
66
-
67
-
68
-
69
-
70
-
71
-
72
-
73
-
74
-
75
-
76
-
77
-
78
-
79
-
80
-
81
-
82
-
83
-
84
-
85
-
86
-
87
-
88
-
89
-
90
-
91
-
92
-
93
-
94
-
95
-
 96
96 -
 97
97 -
 98
98 -
 99
99 -
 100
100 -
 101
101 -
 102
102 -
 103
103 -
 104
104 -
 105
105 -
 106
106 -
107
-
108
-
109
-
110
-
111
-
112
-
113
-
114
-
115
-
116
-
117
-
118
-
119
-
120
-
121
-
122
-
123
-
124
-
125
-
126
-
127
-
128
 |
 |
