Seagate Maxtor Central Axis Maxtor Central Axis Admin User Guide - Page 87
than the other three brackets. You'll have to be careful to attach that bracket to
 |
View all Seagate Maxtor Central Axis manuals
Add to My Manuals
Save this manual to your list of manuals |
Page 87 highlights
Maxtor Central Axis Admin User Guide Note: If you're replacing the drive identified by the square, note that the right bracket is longer than the other three brackets. You'll have to be careful to attach that bracket to the corresponding side of the replacement drive. Step 6: Disconnect the cable from the disk drive and carefully lift the disk drive from the chassis: Figure 128: Disk Drive Removal Step 7: Set the disk drive on the work surface and remove the four fasteners holding the mounting brackets to the disk drive: Configuring Drives (Dual Drive Units Only) 84
-
 1
1 -
2
-
3
-
4
-
5
-
6
-
7
-
8
-
9
-
10
-
11
-
12
-
13
-
14
-
15
-
16
-
17
-
18
-
19
-
20
-
21
-
22
-
23
-
24
-
25
-
26
-
27
-
28
-
29
-
30
-
31
-
32
-
33
-
34
-
35
-
36
-
37
-
38
-
39
-
40
-
41
-
42
-
43
-
44
-
45
-
46
-
47
-
48
-
49
-
50
-
51
-
52
-
53
-
54
-
55
-
56
-
57
-
58
-
59
-
60
-
61
-
62
-
63
-
64
-
65
-
66
-
67
-
68
-
69
-
70
-
71
-
72
-
73
-
74
-
75
-
76
-
77
-
78
-
79
-
80
-
81
-
 82
82 -
 83
83 -
 84
84 -
 85
85 -
 86
86 -
 87
87 -
 88
88 -
 89
89 -
 90
90 -
 91
91 -
 92
92 -
93
-
94
-
95
-
96
-
97
-
98
-
99
-
100
-
101
-
102
-
103
-
104
-
105
-
106
-
107
-
108
-
109
-
110
-
111
-
112
-
113
-
114
-
115
-
116
-
117
-
118
-
119
-
120
-
121
-
122
 |
 |

Configuring Drives (Dual Drive Units Only)
84
Maxtor Central Axis Admin User Guide
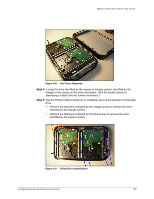
Note:
If you’re replacing the drive identified by the square, note that the right bracket is longer
than the other three brackets. You’ll have to be careful to attach that bracket to the
corresponding side of the replacement drive.
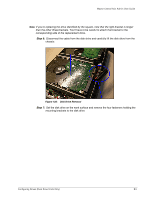
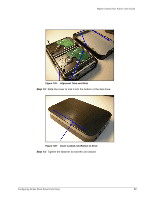
Step 6:
Disconnect the cable from the disk drive and carefully lift the disk drive from the
chassis:
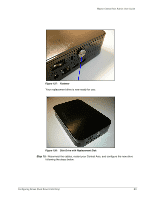
Step 7:
Set the disk drive on the work surface and remove the four fasteners holding the
mounting brackets to the disk drive:
Figure 128:
Disk Drive Removal