Sony DAV-IS10/W Operating Instructions - Page 19
Step 4: Performing the Quick Setup, appears on the TV screen.
 |
UPC - 027242724174
View all Sony DAV-IS10/W manuals
Add to My Manuals
Save this manual to your list of manuals |
Page 19 highlights
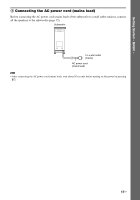
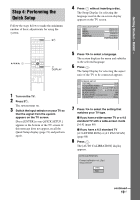
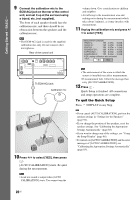
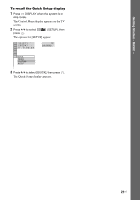
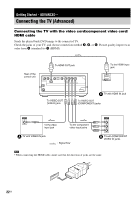
Getting Started - BASIC - Step 4: Performing the Quick Setup Follow the steps below to make the minimum number of basic adjustments for using the system. "/1 4 Press without inserting a disc. The Setup Display for selecting the language used in the on-screen display appears on the TV screen. LANGUAGE SETUP OSD: MENU: AUDIO: SUBTITLE: ENGLISH ENGLISH FRENCH SPANISH PORTUGUESE C/X/x/c, DISPLAY 1 Turn on the TV. 2 Press [/1. The system turns on. 3 Switch the input selector on your TV so that the signal from the system appears on the TV screen. [Press [ENTER] to run QUICK SETUP.] appears at the bottom of the TV screen. If this message does not appear, recall the Quick Setup display (page 21) and perform again. 5 Press X/x to select a language. The system displays the menu and subtitles in the selected language. 6 Press . The Setup Display for selecting the aspect ratio of the TV to be connected appears. SCREEN SETUP TV TYPE: 16:9 YCBCR/RGB (HDMI): 16:9 SCREEN SAVER: 4:3 LETTER BOX BACKGROUND: 4:3 PAN SCAN BLACK LEVEL: ON BLACK LEVEL (COMPONENT OUT): OFF 4:3 OUTPUT: FULL 7 Press X/x to select the setting that matches your TV type. x If you have a wide-screen TV or a 4:3 standard TV with a wide-screen mode [16:9] (page 88) x If you have a 4:3 standard TV [4:3 LETTER BOX] or [4:3 PAN SCAN] (page 88) 8 Press . The [AUTO CALIBRATION] display appears. AUTO CALIBRATION Connect calibration mic. Start measurement? YES NO continued 19US
-
 1
1 -
2
-
3
-
4
-
5
-
6
-
7
-
8
-
9
-
10
-
11
-
12
-
13
-
 14
14 -
 15
15 -
 16
16 -
 17
17 -
 18
18 -
 19
19 -
 20
20 -
 21
21 -
 22
22 -
 23
23 -
 24
24 -
25
-
26
-
27
-
28
-
29
-
30
-
31
-
32
-
33
-
34
-
35
-
36
-
37
-
38
-
39
-
40
-
41
-
42
-
43
-
44
-
45
-
46
-
47
-
48
-
49
-
50
-
51
-
52
-
53
-
54
-
55
-
56
-
57
-
58
-
59
-
60
-
61
-
62
-
63
-
64
-
65
-
66
-
67
-
68
-
69
-
70
-
71
-
72
-
73
-
74
-
75
-
76
-
77
-
78
-
79
-
80
-
81
-
82
-
83
-
84
-
85
-
86
-
87
-
88
-
89
-
90
-
91
-
92
-
93
-
94
-
95
-
96
-
97
-
98
-
99
-
100
-
101
-
102
-
103
-
104
-
105
-
106
-
107
-
108
-
109
-
110
-
111
-
112
-
113
-
114
-
115
-
116
-
117
-
118
-
119
-
120
-
121
-
122
-
123
 |
 |
