Sony DAV-IS10/W Operating Instructions - Page 20
To quit the Quick Setup, Connect the calibration mic to
 |
UPC - 027242724174
View all Sony DAV-IS10/W manuals
Add to My Manuals
Save this manual to your list of manuals |
Page 20 highlights
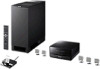
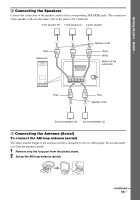
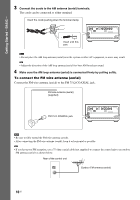
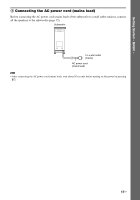
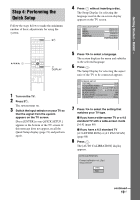
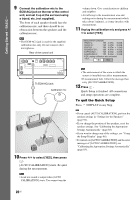
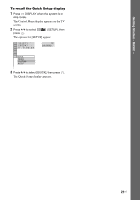
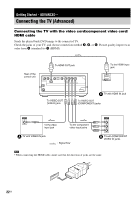
Getting Started - BASIC - 9 Connect the calibration mic to the ECM-AC2 jack on the rear of the control unit, and set it up at the ear level using a tripod, etc. (not supplied). The front of each speaker should face the calibration mic, and there should be no obstruction between the speakers and the calibration mic. Note • The ECM-AC2 jack is used for the supplied calibration mic only. Do not connect other microphones. Rear of the control unit DMPORT To ECM-AC2 jack Calibration mic 10 Press X/x to select [YES], then press . [AUTO CALIBRATION] starts. Be quiet during the measurement. Note • Loud test sound is output when [AUTO CALIBRATION] starts. You cannot turn the volume down. Give consideration to children and neighbor. • Avoid being in the measurement area and making noise during the measurement (which takes about 1 minute), as it may interfere with measurement. 11 Unplug the calibration mic and press C/ c to select [YES]. Measurement complete. FRONT L : 16ft 4.87m 0.0dB FRONT R : 16ft 4.87m 0.0dB CENTER : 16ft 4.87m + 1.0dB SUBWOOFER : 16ft 4.87m + 4.0dB SURROUND L : 10ft 3.04m - 2.0dB SURROUND R : 10ft 3.04m - 2.0dB If OK, unplug calibration mic and select "YES". YES NO Note • The environment of the room in which the system is installed may affect measurements. • If measurement fails, follow the message then retry [AUTO CALIBRATION]. 12 Press . Quick Setup is finished. All connections and setup operations are complete. To quit the Quick Setup Press DISPLAY in any Step. Tip • If you cancel [AUTO CALIBRATION], perform the speaker settings in "Settings for the Speakers" (page 92). • If you change the position of the speakers, reset the speaker settings. See "Calibrating the Appropriate Settings Automatically" (page 83). • If you want to change any of the settings, see "Using the Setup Display" (page 86). • For details on [AUTO CALIBRATION] and the error messages of [AUTO CALIBRATION], see "Calibrating the Appropriate Settings Automatically" (page 83). 20US
-
 1
1 -
2
-
3
-
4
-
5
-
6
-
7
-
8
-
9
-
10
-
11
-
12
-
13
-
14
-
 15
15 -
 16
16 -
 17
17 -
 18
18 -
 19
19 -
 20
20 -
 21
21 -
 22
22 -
 23
23 -
 24
24 -
 25
25 -
26
-
27
-
28
-
29
-
30
-
31
-
32
-
33
-
34
-
35
-
36
-
37
-
38
-
39
-
40
-
41
-
42
-
43
-
44
-
45
-
46
-
47
-
48
-
49
-
50
-
51
-
52
-
53
-
54
-
55
-
56
-
57
-
58
-
59
-
60
-
61
-
62
-
63
-
64
-
65
-
66
-
67
-
68
-
69
-
70
-
71
-
72
-
73
-
74
-
75
-
76
-
77
-
78
-
79
-
80
-
81
-
82
-
83
-
84
-
85
-
86
-
87
-
88
-
89
-
90
-
91
-
92
-
93
-
94
-
95
-
96
-
97
-
98
-
99
-
100
-
101
-
102
-
103
-
104
-
105
-
106
-
107
-
108
-
109
-
110
-
111
-
112
-
113
-
114
-
115
-
116
-
117
-
118
-
119
-
120
-
121
-
122
-
123
 |
 |