Sony DAV-IS10/W Operating Instructions - Page 28
to the appropriate speaker, terminals 1, and then push the lever down completely 2.
 |
UPC - 027242724174
View all Sony DAV-IS10/W manuals
Add to My Manuals
Save this manual to your list of manuals |
Page 28 highlights
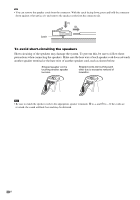
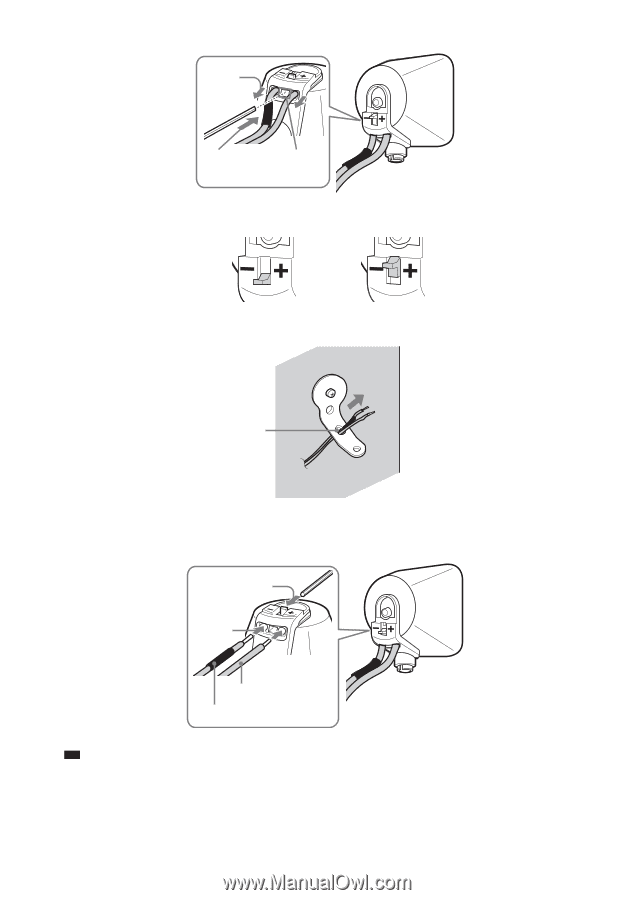
4 Push A with the supplied wrench (1), and then remove the speaker cords (2). (2) (1) A When the lever is down, the When the lever is up, the speaker cords are locked. speaker cords can be removed. 5 Thread the speaker cords through hole 3. 3 6 Reconnect the detached speaker cords, matching 3/# to the appropriate speaker terminals (1), and then push the lever down completely (2). (2) (1) 3 # Tip • If it is difficult to push the lever down, use the wrench (supplied). 28US
-
 1
1 -
2
-
3
-
4
-
5
-
6
-
7
-
8
-
9
-
10
-
11
-
12
-
13
-
14
-
15
-
16
-
17
-
18
-
19
-
20
-
21
-
22
-
 23
23 -
 24
24 -
 25
25 -
 26
26 -
 27
27 -
 28
28 -
 29
29 -
 30
30 -
 31
31 -
 32
32 -
 33
33 -
34
-
35
-
36
-
37
-
38
-
39
-
40
-
41
-
42
-
43
-
44
-
45
-
46
-
47
-
48
-
49
-
50
-
51
-
52
-
53
-
54
-
55
-
56
-
57
-
58
-
59
-
60
-
61
-
62
-
63
-
64
-
65
-
66
-
67
-
68
-
69
-
70
-
71
-
72
-
73
-
74
-
75
-
76
-
77
-
78
-
79
-
80
-
81
-
82
-
83
-
84
-
85
-
86
-
87
-
88
-
89
-
90
-
91
-
92
-
93
-
94
-
95
-
96
-
97
-
98
-
99
-
100
-
101
-
102
-
103
-
104
-
105
-
106
-
107
-
108
-
109
-
110
-
111
-
112
-
113
-
114
-
115
-
116
-
117
-
118
-
119
-
120
-
121
-
122
-
123
 |
 |
28
US
4
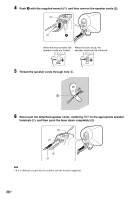
Push
A
with the supplied wrench (1), and then remove the speaker cords (2).
5
Thread the speaker cords through hole
3
.
6
Reconnect the detached speaker cords, matching
3
/
#
to the appropriate speaker
terminals (1), and then push the lever down completely (2).
Tip
• If it is difficult to push the lever down, use the wrench (supplied).
(1)
When the lever is down, the
speaker cords are locked.
When the lever is up, the
speaker cords can be removed.
(2)
A
3
#
3
(1)
(2)