Sony DAV-IS10/W Operating Instructions - Page 22
Getting Started - ADVANCED -, Connecting the TV (Advanced) - connections
 |
UPC - 027242724174
View all Sony DAV-IS10/W manuals
Add to My Manuals
Save this manual to your list of manuals |
Page 22 highlights
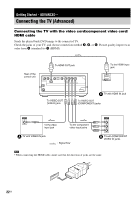
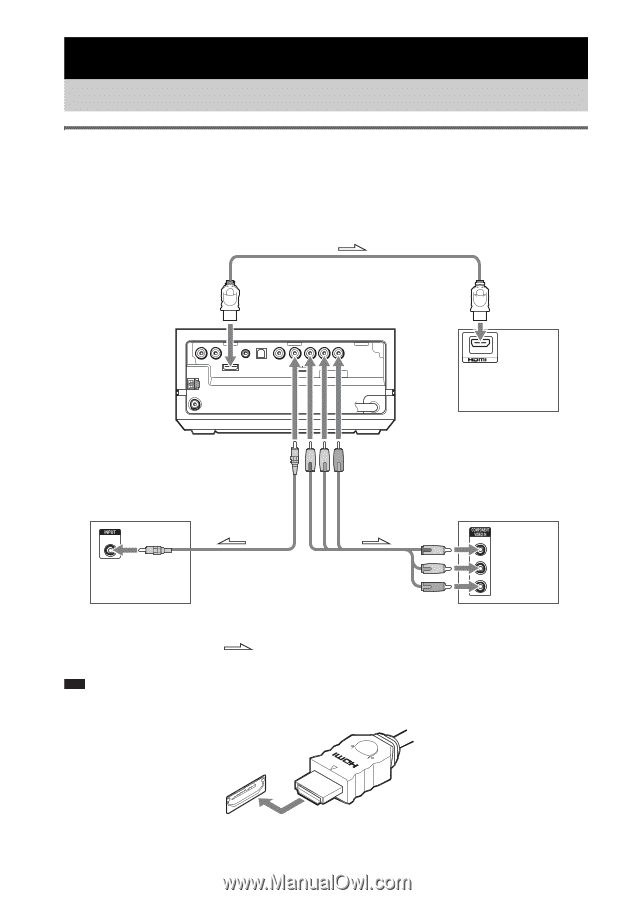
Getting Started - ADVANCED - Connecting the TV (Advanced) Connecting the TV with the video cord/component video cord/ HDMI cable Sends the played back DVD image to the connected TV. Check the jacks of your TV, and choose connection method A, B, or C. Picture quality improves in order from A (standard) to C (HDMI). Rear of the control unit To HDMI OUT jack To the HDMI input jack IN DMPORT To VIDEO OUT (VIDEO) jack C TV with HDMI IN jack To VIDEO OUT (COMPONENT) jacks VIDEO IN To the video input jack To the component video input jacks A TV with VIDEO IN jack : Signal flow Y PB/CB PR/CR B TV with COMPONENT VIDEO IN jacks Note • When connecting the HDMI cable, make sure that the direction of jacks are the same. . 22US
-
 1
1 -
2
-
3
-
4
-
5
-
6
-
7
-
8
-
9
-
10
-
11
-
12
-
13
-
14
-
15
-
16
-
 17
17 -
 18
18 -
 19
19 -
 20
20 -
 21
21 -
 22
22 -
 23
23 -
 24
24 -
 25
25 -
 26
26 -
 27
27 -
28
-
29
-
30
-
31
-
32
-
33
-
34
-
35
-
36
-
37
-
38
-
39
-
40
-
41
-
42
-
43
-
44
-
45
-
46
-
47
-
48
-
49
-
50
-
51
-
52
-
53
-
54
-
55
-
56
-
57
-
58
-
59
-
60
-
61
-
62
-
63
-
64
-
65
-
66
-
67
-
68
-
69
-
70
-
71
-
72
-
73
-
74
-
75
-
76
-
77
-
78
-
79
-
80
-
81
-
82
-
83
-
84
-
85
-
86
-
87
-
88
-
89
-
90
-
91
-
92
-
93
-
94
-
95
-
96
-
97
-
98
-
99
-
100
-
101
-
102
-
103
-
104
-
105
-
106
-
107
-
108
-
109
-
110
-
111
-
112
-
113
-
114
-
115
-
116
-
117
-
118
-
119
-
120
-
121
-
122
-
123
 |
 |
22
US
Connecting the TV with the video cord/component video cord/
HDMI cable
Sends the played back DVD image to the connected TV.
Check the jacks of your TV, and choose connection method
A
,
B
, or
C
. Picture quality improves in
order from
A
(standard) to
C
(HDMI).
Note
• When connecting the HDMI cable, make sure that the direction of jacks are the same.
.
Getting Started – ADVANCED –
Connecting the TV (Advanced)
Y
P
B
/C
B
P
R
/C
R
VIDEO
IN
IN
DMPORT
TV with COMPONENT
VIDEO IN jacks
TV with HDMI IN jack
A
B
C
To the component
video input jacks
To the video
input jack
TV with VIDEO IN jack
Rear of the
control unit
: Signal flow
To HDMI OUT jack
To VIDEO OUT
(VIDEO) jack
To VIDEO OUT
(COMPONENT) jacks
To the HDMI input
jack