Sony UWPV6/4244 Operating Instructions - Page 37
Attachment and Installation Procedures, Attaching the supplied accessories to the body- pack
 |
View all Sony UWPV6/4244 manuals
Add to My Manuals
Save this manual to your list of manuals |
Page 37 highlights
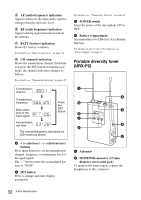
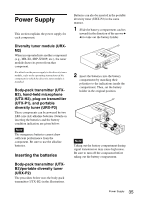
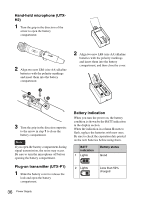
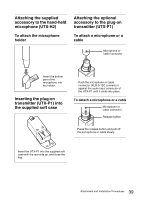
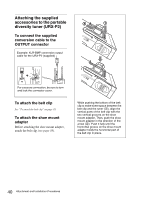
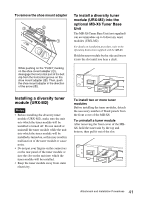
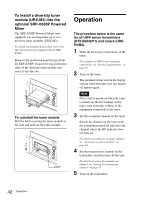
BATT indication 3 Lights Battery status Less than 20% charged 4 Flashes Almost drained Attachment and Installation Procedures Note The indicated battery condition may not be correct if the batteries were not new when installed. If you plan to use the component for a long period, it is recommended that you replace the batteries with brand new ones. Notes on battery Batteries may leak or explode if mistreated. Be sure to follow these instructions. • Be sure to install the batteries with the correct polarity. • Always replace the two batteries together. • Do not use different types of batteries or old and new one together. • The batteries are not rechargeable. • When not using the component for a long period of time, remove the batteries to avoid leakage. If the batteries do leak, clean all leakage from the battery compartment and the component. Leakage left in the compartment and the component may cause poor battery contact. If there seems to be poor battery contact, consult your Sony dealer. This section describes the procedures for attaching the supplied accessories to the components and the installation of the diversity tuner module (URX-M2) into the MB-X6 Tuner Base Unit or SRP-X500P Powered Mixer. Attaching the supplied accessories to the bodypack transmitter (UTX-B2) To attach the microphone Microphone (supplied) For a secure connection, be sure to turn and lock the connector cover. Note Be sure to attach or remove the microphone after turning off the transmitter. 37 Attachment and Installation Procedures
-
 1
1 -
2
-
3
-
4
-
5
-
6
-
7
-
8
-
9
-
10
-
11
-
12
-
13
-
14
-
15
-
16
-
17
-
18
-
19
-
20
-
21
-
22
-
23
-
24
-
25
-
26
-
27
-
28
-
29
-
30
-
31
-
 32
32 -
 33
33 -
 34
34 -
 35
35 -
 36
36 -
 37
37 -
 38
38 -
 39
39 -
 40
40 -
 41
41 -
 42
42 -
43
-
44
-
45
-
46
-
47
-
48
-
49
-
50
-
51
-
52
-
53
-
54
-
55
-
56
-
57
-
58
-
59
-
60
-
61
-
62
-
63
 |
 |
