TEAC TN-5BB Owners Manual English Francais Espanol Deutsch Italiano Nederlands - Page 10
Adjusting the tonearm lifter, Troubleshooting, Checking the tonearm lifter height
 |
View all TEAC TN-5BB manuals
Add to My Manuals
Save this manual to your list of manuals |
Page 10 highlights
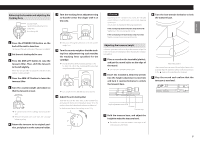
Adjusting the tonearm lifter The height of the tonearm lifter on this unit is calibrated for the included cartridge. If the cartridge is replaced with another, the stylus might not touch the record when the tonearm lifter is lowered or the stylus might not lift far enough from the record when the tonearm lifter is raised. In such cases, adjust the height of the tonearm lifter. Changing the height of the tonearm lifter The height of the tonearm lifter is fixed using the screw at the position shown in the illustration below. Checking the tonearm lifter height Check the following conditions at the inner and outer edges of the record. Space occurs between the tonearm and the tonearm lifter when the tonearm lifter is lowered. oo If the tonearm contacts the tonearm lifter, lower the height of the tonearm lifter. The stylus tip is separated from the record when the tonearm lifter is raised. Height adjustment screw hole 1 Insert the included 1.5mm hex wrench into the height adjustment screw hole and turn it counterclockwise to loosen the screw. 2 After adjusting the height of the tone- arm lifter, insert the hex wrench into the height adjustment screw hole and turn it clockwise to secure the position of the tonearm lifter. oo The vertical movement range of the tonearm lifter cannot be adjusted. 3 After adjusting the height of the tonearm lifter, follow the previous instructions to check the height again. oo If the cartridge stylus contacts the record, raise the height of the tonearm lifter. Troubleshooting If you experience a problem with this unit, please check the following items before requesting service. Something other than this unit could also be the cause of the problem. Please also check that the connected devices are also being used properly. If it still does not operate correctly, contact the retailer where you purchased the unit. The unit does not turn on. ee Confirm that the AC adapter is plugged into an outlet. Then, press the STANDBY/ON button to turn the unit on (page 6). Volume is low. ee Confirm the connections (page 6). Connect to the appropriate PHONO input connectors according to the type of installed cartridge (MM or MC). The PHONO input connectors of some equipment might be settable for use with either MM or MC type input. For details, refer to the operation manual of that equipment. Playback is not possible; there is noise. ee Remove the protective cover from the cartridge. ee Clean the stylus (page 8). ee If the stylus is worn-out, replace it. ee Place the unit as far away as possible from TVs, microwave ovens and other devices that emit electromagnetic waves. Noise occurs when a record is playing. ee Noise could occur if the tracking force is higher than cartridge's specified value. Readjust the tracking force so that it is the specified value (page 5). The pitch is wrong. ee Set the rotation speed (RPM) to match the record (page 7). The sound is skipping. ee Vibrations will cause skipping. Place this unit in a stable location. ee If the record is dirty, wipe it clean. ee Do not use scratched records. ee Balance the tonearm and readjust the tracking force (page 5). If the tracking force is lower than the value designated by the cartridge, skipping is more likely to occur. ee Confirm that the tonearm is not contacting the tonearm lifter (page 10). 10
-
 1
1 -
2
-
3
-
4
-
 5
5 -
 6
6 -
 7
7 -
 8
8 -
 9
9 -
 10
10 -
 11
11 -
 12
12 -
 13
13 -
 14
14 -
 15
15 -
16
-
17
-
18
-
19
-
20
-
21
-
22
-
23
-
24
-
25
-
26
-
27
-
28
-
29
-
30
-
31
-
32
-
33
-
34
-
35
-
36
-
37
-
38
-
39
-
40
-
41
-
42
-
43
-
44
-
45
-
46
-
47
-
48
-
49
-
50
-
51
-
52
-
53
-
54
-
55
-
56
-
57
-
58
-
59
-
60
-
61
-
62
-
63
-
64
-
65
-
66
-
67
-
68
-
69
-
70
-
71
-
72
-
73
-
74
-
75
-
76
-
77
-
78
-
79
-
80
-
81
-
82
-
83
-
84
 |
 |
