TEAC TN-5BB Owners Manual English Francais Espanol Deutsch Italiano Nederlands - Page 4
Preparing the record player, Loosen, Tighten - - turntable
 |
View all TEAC TN-5BB manuals
Add to My Manuals
Save this manual to your list of manuals |
Page 4 highlights
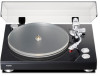
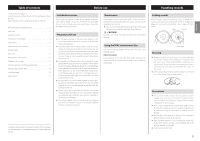
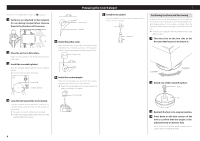
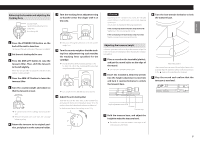
Keep the unit in standby while setting it up ( D on page 6). 1 Cushions are attached to the tonearm for use during transportation. Remove them in the directions of the arrows. Cushion for transportation Cushion for transportation 2 Place the unit on a flat surface. Place it on a flat surface so that the record can be accurately traced. 3 Install the turntable (platter). Align the turntable (platter) with the center shaft and install it. oo Place the large side of the hole down. Center shaft Turntable (platter) 4 Loop the belt around the motor pulley. Loop the included flat belt around the outside of the turntable (platter), and then loop the belt around the motor pulley. oo Be careful not to let the rubber become twisted. oo Rotate the turntable (platter) several times to make sure that the flat belt is secure. Preparing the record player Motor pulley Flat belt 7 Install the headshell. Insert the headshell on the end of the tonearm and turn the nut to secure it in place. Nut 5 Install the pulley cover. Align the small cutout in the pulley cover with the small protuberance on the pulley, as shown in the illustration below. If these are not aligned, the pulley cover will slant. Pulley cover Headshell Confirming levelness and fine-tuning In order to confirm the level placement of the turntable, we recommend using, for example, a commercially-available turntable leveling device. If the turntable is not level, follow the procedures below to adjust the heights of the feet to level the unit. oo If the slant is too great, the following method might not be able to correct it. 1 Turn the foot on the low side in the direction that loosens it to remove it. 6 Install the counterweight. Place the counterweight over the end of the tonearm, and press it gently as you turn it right to attach it. oo When the counterweight can be moved toward the bearing, installation is complete. Counterweight Loosen Tighten 2 Attach one of the included washers. Washer Foot 3 Reattach the foot in its original position. 4 Press down on the four corners of the unit to confirm that the weight is distributed evenly on the four feet. If one of the feet is wobbly, attach a washer to it as explained above and adjust its height. 4
-
 1
1 -
 2
2 -
 3
3 -
 4
4 -
 5
5 -
 6
6 -
 7
7 -
 8
8 -
 9
9 -
 10
10 -
11
-
12
-
13
-
14
-
15
-
16
-
17
-
18
-
19
-
20
-
21
-
22
-
23
-
24
-
25
-
26
-
27
-
28
-
29
-
30
-
31
-
32
-
33
-
34
-
35
-
36
-
37
-
38
-
39
-
40
-
41
-
42
-
43
-
44
-
45
-
46
-
47
-
48
-
49
-
50
-
51
-
52
-
53
-
54
-
55
-
56
-
57
-
58
-
59
-
60
-
61
-
62
-
63
-
64
-
65
-
66
-
67
-
68
-
69
-
70
-
71
-
72
-
73
-
74
-
75
-
76
-
77
-
78
-
79
-
80
-
81
-
82
-
83
-
84
 |
 |
