TP-Link TL-WA500G User Guide - Page 29
Survey, TL-WA500G, Survey, BSSID, Signal, Channel, Security, Choose, Connect - extended range
 |
UPC - 845973051105
View all TP-Link TL-WA500G manuals
Add to My Manuals
Save this manual to your list of manuals |
Page 29 highlights
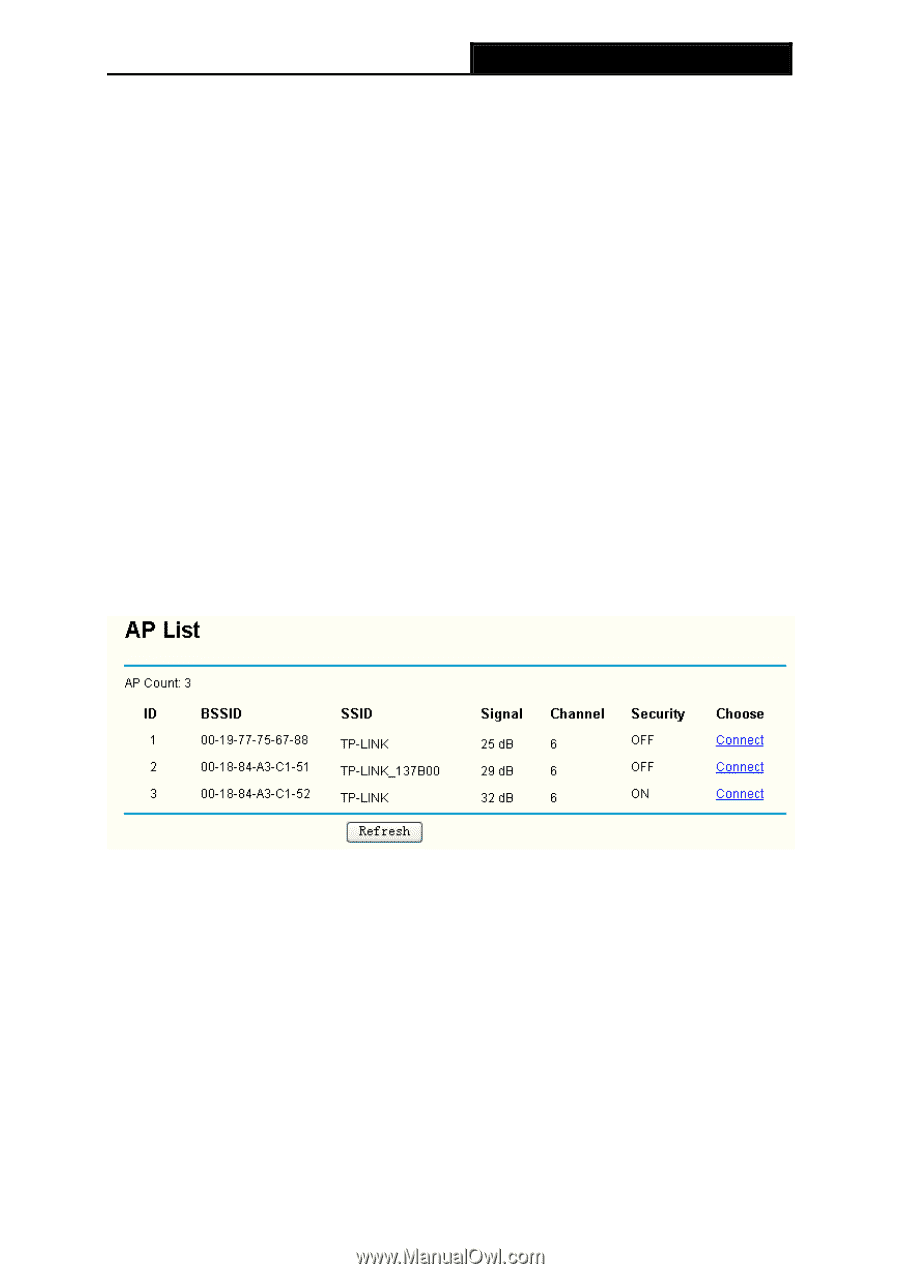
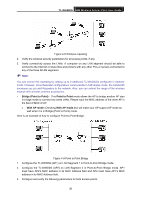
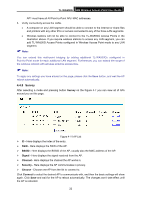
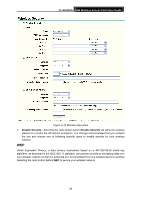
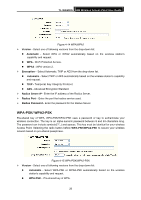
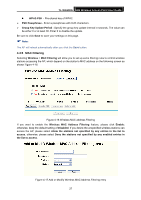
TL-WA500G 54M Wireless Access Point User Guide AP1 must have all All Point-to-Point APs' MAC addresses. 3. Verify connectivity across the LANs. • A computer on any LAN segment should be able to connect to the Internet or share files and printers with any other PCs or servers connected to any of the three LAN segments. • Wireless stations will not be able to connect to the TL-WA500G Access Points in the illustration above. If you require wireless stations to access any LAN segment, you can add TL-WA500G Access Points configured in Wireless Access Point mode to any LAN segment. ) Note: You can extend this multi-point bridging by adding additional TL-WA500Gs configured in Point-to-Point mode for each additional LAN segment. Furthermore, you can extend the range of the wireless network with wireless antenna accessories. ) Note: To apply any settings you have altered on the page, please click the Save button, and wait the AP reboot automatically. 4.4.3 Survey After selecting a mode and pressing button Survey on the Figure 4-7 you can view all of APs around you on this page. Figure 4-11 AP List ¾ ID - Here displays the index of the entry. ¾ SSID - Here displays the SSID of the AP. ¾ BSSID - Here displays the BSSID of the AP, usually also the MAC address of the AP. ¾ Signal - Here displays the signal received from the AP. ¾ Channel - Here displays the channel the AP works in. ¾ Security - Here displays the AP communicates in privacy. ¾ Choose - Choose one AP from the list to connect to. Click Connect to select the desired AP to communicate with, and then the basic settings will show again. Click Save and wait for the AP to reboot automatically. The changes won't take effect until the AP is rebooted. 22
-
 1
1 -
2
-
3
-
4
-
5
-
6
-
7
-
8
-
9
-
10
-
11
-
12
-
13
-
14
-
15
-
16
-
17
-
18
-
19
-
20
-
21
-
22
-
23
-
 24
24 -
 25
25 -
 26
26 -
 27
27 -
 28
28 -
 29
29 -
 30
30 -
 31
31 -
 32
32 -
 33
33 -
 34
34 -
35
-
36
-
37
-
38
-
39
-
40
-
41
-
42
-
43
-
44
-
45
-
46
-
47
-
48
-
49
-
50
-
51
-
52
-
53
 |
 |