Toshiba 42TL515U Owners Manual - Page 63
Setting up the Network, WirelessSetup
 |
View all Toshiba 42TL515U manuals
Add to My Manuals
Save this manual to your list of manuals |
Page 63 highlights
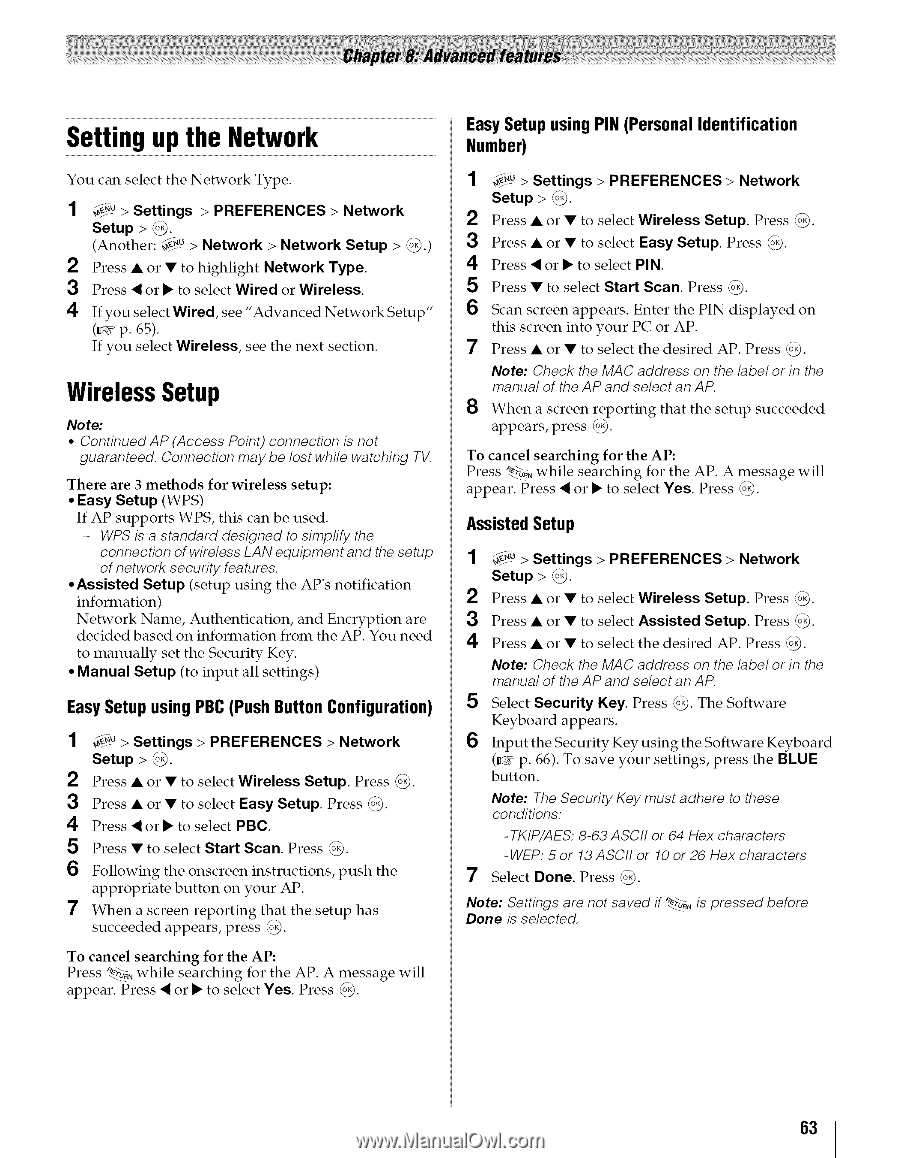
Setting up the Network You can select the Network Type. _u > Settings > PREFERENCES > Network Setup > _. (Another: _u > Network > Network Setup > _.) 2 Press • or • to highlight Network Type. 3 Press < or • to select Wired or Wireless. 4 If you select Wired, see "Advanced Network Setup" (_#r' p. 65). If you select Wireless, see the next section. WirelessSetup Note: • ContinuedAP (Access Point) connection is not guaranteed. Connection may be lost while watching TV. There are 3 methods for wireless setup: • Easy Setup (WPS) If AP supports WPS, this can be used. - WPS is a standard designed to simplify the connection of wireless LAN equipment and the setup of network security features. • Assisted Setup (setup using the AP's notification information) Network Name, Authentication, and Encryption are decided based on information from the AP. You need to manually set the Security Key. • Manual Setup (to input all settings) Easy Setupusing PBC(Push ButtonConfiguration) 1 _,"0> Settings > PREFERENCES > Network Setup > _. 2 Press • or • to select Wireless Setup. Press _Fo_. 3 Press • or • to select Easy Setup. Press _o_. 4 Press < or • to select PBC. 5 Press • to select Start Scan. Press ,_. 6 Following the onscreen instructions, appropriate button on your AP. push the 7 When a screen reporting that the setup has succeeded appears, press _. To cancel searching for the AP: Press *_>o_w, hile searching for the AP. A message will appear. Press < or • to select Yes. Press _. EasySetup using PIN (Personal Identification Number) 1 4¢._> Settings > PREFERENCES > Network Setup > _. 2 Press • or • to select Wireless Setup. Press '_. 3 Press • or • to select Easy Setup. Press _. 4 Press < or • to select PIN. 5 Press • to select Start Scan. Press _. 6 Scan screen appears. Enter the PIN displayed on this screen into your PC or AP. 7 Press • or • to select the desired AP. Press _. Note: Check the MAC address on the label or in the manual of the AP and select an AP. 8 When a screen reporting that the setup succeeded appears, press _. To cancel searching for the AP: Press _,, while searching for the AP. A message will appear. Press < or • to select Yes. Press _). AssistedSetup 1 _€"_> Settings > PREFERENCES > Network Setup > _. 2 Press • or • to select Wireless Setup. Press '_. 3 Press • or • to select Assisted Setup. Press _. 4 Press • or • to select the desired AP. Press _. Note: Check the MAC address on the label or in the manual of the AP and select an AP. 5 Select Security Key. Press _. The Software Keyboard appears. 6 Input the Security Key using the Software Keyboard (_#r' p. 66). To save your settings, press the BLUE button. Note: The Security Key must adhere to these conditions: -TKIP/AES: 8-63 ASCII or 64 Hex characters - WEP: 5 or 13 ASCII or 10 or 26 Hex characters 7 Select Done. Press @. Note: Settings are not saved if _. is pressed before Done is selected. 63
-
 1
1 -
2
-
3
-
4
-
5
-
6
-
7
-
8
-
9
-
10
-
11
-
12
-
13
-
14
-
15
-
16
-
17
-
18
-
19
-
20
-
21
-
22
-
23
-
24
-
25
-
26
-
27
-
28
-
29
-
30
-
31
-
32
-
33
-
34
-
35
-
36
-
37
-
38
-
39
-
40
-
41
-
42
-
43
-
44
-
45
-
46
-
47
-
48
-
49
-
50
-
51
-
52
-
53
-
54
-
55
-
56
-
57
-
 58
58 -
 59
59 -
 60
60 -
 61
61 -
 62
62 -
 63
63 -
 64
64 -
 65
65 -
 66
66 -
 67
67 -
 68
68 -
69
-
70
-
71
-
72
-
73
-
74
-
75
-
76
-
77
-
78
-
79
-
80
-
81
-
82
-
83
-
84
-
85
-
86
-
87
-
88
-
89
-
90
-
91
-
92
-
93
-
94
-
95
-
96
-
97
-
98
-
99
-
100
-
101
-
102
 |
 |