Yamaha CLP-380 Owner's Manual - Page 11

AUX IN [L/L+R] [R] jacks - piano

Page 11 highlights

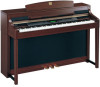
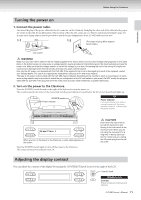
Panel Controls and Terminals Introduction 1 [POWER] switch page 15 2 [MASTER VOLUME] dial page 16 Adjust the volume level using this dial. 3 [SONG BALANCE] slider page 38 This lets you adjust the volume balance between the song playback and the sound you are playing on the keyboard. 4 [DEMO] button page 17 Demonstration playback is available for each voice. 5 [REPEAT] button page 22 For repeatedly playing back a single song or specifying a range (in beats) within a song for repeated playback. 6 [RIGHT], [LEFT], [EXTRA PARTS] buttons pages 21, 31, 35 For turning the left- and right-hand parts on or off as required so you can practice the corresponding part (the part that is turned off) on the keyboard. 7 [REC] button page 32 For recording your keyboard performance. 8 [PLAY/PAUSE], [STOP] buttons pages 20, 49, 71 For playing back the preset songs, your recorded material, commercially available music data, or songs from the Internet, etc. 9 [SONG SELECT] button pages 19, 48 For selecting a song to play back or edit. ) [FILE/SONG SETTING] button........pages 39, 82 For saving recorded songs and managing song files. Also lets you make detailed settings for song recording and playback. ! METRONOME [ON/OFF], METRONOME [SETTING] buttons pages 30, 77, 85 For using the metronome functions. @ TEMPO [UP] [DOWN] buttons page 30 For changing the tempo (speed) of the song and metronome. # A - D [-] [+] buttons, Display page 12 $ [CONTRAST] knob page 15 For adjusting the display contrast. % [EXIT] button page 13 Pressing this button returns to the main operation display (the one shown when the power is turned on). ^ Voice group buttons page 23 For choosing voice groups. Sixteen groups of voices, including grand piano, are available. You can also combine two voices and use them together. & [VOICE SETTING] button pages 78, 86 For making detailed changes to the voice sound and effects. * [SPLIT] button page 28 For playing different voices on the left- and right-hand sections of the keyboard. ( [REVERB], [CHORUS] buttons page 26 For adding reverb and chorus effects to the sound. º BRILLIANCE [MELLOW] [BRIGHT] buttons page 25 For adjusting the brightness of the sound. ¡ [iAFC SETTING] button pages 78, 92 When iAFC is engaged, the Clavinova will sound deeper, more resonant, and more similar to the sound of an actual acoustic instrument. You can turn the iAFC function on or off or make detailed settings for the iAFC. In order to obtain the optimal results from iAFC, we recommend that you do the following. • Position the Clavinova so that its rear panel is at least 10 cm away from the wall. • Perform the automatic adjustment after you turn on the power of the Clavinova for the first time, and after each time you move the Clavinova (page 93). ™ [FUNCTION] button pages 79, 94 This lets you make detailed settings, such as adjusting the keyboard touch, making fine adjustments to the pitch or MIDI settings. £ USB [TO DEVICE] terminals page 72 For connecting the instrument to a USB storage device, allowing saving/loading of data to and from the connected device. The instrument has two [TO DEVICE] terminals, A (on the left of the keyboard) and B (on the connector panel at the bottom), which can be specified using the [SELECT] switch. ¢ Soft pedal (left), Sostenuto pedal (center), Damper pedal (right page 24 For producing a range of expressive effects similar to those produced by the pedals on an acoustic piano. These pedals can also be assigned to various functions. ∞ [PHONES] jacks page 16 For connecting a set of standard stereo headphones, allowing private practice. § USB [TO HOST] terminal page 72 For connecting the instrument to your computer, allowing you to transfer MIDI data between the Clavinova and the computer. ¶ MIDI [IN] [OUT] [THRU] terminals........ page 72 For connecting external MIDI devices, allowing the use of various MIDI functions. • [AUX PEDAL] jack page 72 For connecting an optional pedal, allowing convenient foot control over one of a variety of assignable functions. ª AUX IN [L/L+R] [R] jacks page 73 For connecting an external tone generator, allowing you to play the sound of that device via the Clavinova's internal sound system and speakers. , AUX OUT [L/L+R] [R] jacks page 73 For outputting the sound of the Clavinova to external powered speaker systems, for playing in large venues at higher volumes. ⁄ [LAN] port page 74 By directly connecting the CLP-380 to the Internet, you can use the special service on the Yamaha website that enables you to automatically play back a wide variety of songs (song data) in various musical genres as background music directly on your instrument. ¤ [AC IN] connector page 15 For connection of the power cord. CLP-380 Owner's Manual 11

  • 1
  • 2
  • 3
  • 4
  • 5
  • 6
  • 7
  • 8
  • 9
  • 10
  • 11
  • 12
  • 13
  • 14
  • 15
  • 16
  • 17
  • 18
  • 19
  • 20
  • 21
  • 22
  • 23
  • 24
  • 25
  • 26
  • 27
  • 28
  • 29
  • 30
  • 31
  • 32
  • 33
  • 34
  • 35
  • 36
  • 37
  • 38
  • 39
  • 40
  • 41
  • 42
  • 43
  • 44
  • 45
  • 46
  • 47
  • 48
  • 49
  • 50
  • 51
  • 52
  • 53
  • 54
  • 55
  • 56
  • 57
  • 58
  • 59
  • 60
  • 61
  • 62
  • 63
  • 64
  • 65
  • 66
  • 67
  • 68
  • 69
  • 70
  • 71
  • 72
  • 73
  • 74
  • 75
  • 76
  • 77
  • 78
  • 79
  • 80
  • 81
  • 82
  • 83
  • 84
  • 85
  • 86
  • 87
  • 88
  • 89
  • 90
  • 91
  • 92
  • 93
  • 94
  • 95
  • 96
  • 97
  • 98
  • 99
  • 100
  • 101
  • 102
  • 103
  • 104
  • 105
  • 106
  • 107
  • 108
  • 109
  • 110
  • 111
  • 112
  • 113
  • 114
  • 115
  • 116
  • 117
  • 118
  • 119
  • 120
  • 121
  • 122
  • 123
  • 124
  • 125
  • 126
  • 127
  • 128
  • 129
  • 130
  • 131
  • 132
  • 133
  • 134
  • 135
  • 136

Panel Controls and Terminals
CLP-380 Owner’s Manual
11
Introduction
1
[POWER] switch
....................................
page 15
2
[MASTER VOLUME] dial
.......................
page 16
Adjust the volume level using this dial.
3
[SONG BALANCE] slider
.......................
page 38
This lets you adjust the volume balance between the song
playback and the sound you are playing on the keyboard.
4
[DEMO] button
.....................................
page 17
Demonstration playback is available for each voice.
5
[REPEAT] button
...................................
page 22
For repeatedly playing back a single song or specifying a range
(in beats) within a song for repeated playback.
6
[RIGHT], [LEFT], [EXTRA PARTS] buttons
..................................................
pages 21, 31, 35
For turning the left- and right-hand parts on or off as required
so you can practice the corresponding part (the part that is
turned off) on the keyboard.
7
[REC] button
..........................................
page 32
For recording your keyboard performance.
8
[PLAY/PAUSE], [STOP] buttons
..................................................
pages 20, 49, 71
For playing back the preset songs, your recorded material,
commercially available music data, or songs from the Internet,
etc.
9
[SONG SELECT] button
..................
pages 19, 48
For selecting a song to play back or edit.
)
[FILE/SONG SETTING] button
........
pages 39, 82
For saving recorded songs and managing song files. Also lets you
make detailed settings for song recording and playback.
!
METRONOME [ON/OFF], METRONOME
[SETTING] buttons
...................
pages 30, 77, 85
For using the metronome functions.
@
TEMPO [UP] [DOWN] buttons
..............
page 30
For changing the tempo (speed) of the song and metronome.
#
A – D [–] [+] buttons, Display
...............
page 12
$
[CONTRAST] knob
.................................
page 15
For adjusting the display contrast.
%
[EXIT] button
.........................................
page 13
Pressing this button returns to the main operation display (the
one shown when the power is turned on).
^
Voice group buttons
.............................
page 23
For choosing voice groups. Sixteen groups of voices, including
grand piano, are available. You can also combine two voices and
use them together.
&
[VOICE SETTING] button
...............
pages 78, 86
For making detailed changes to the voice sound and effects.
*
[SPLIT] button
.......................................
page 28
For playing different voices on the left- and right-hand sections
of the keyboard.
(
[REVERB], [CHORUS] buttons
...............
page 26
For adding reverb and chorus effects to the sound.
º
BRILLIANCE [MELLOW] [BRIGHT] buttons
...............................................................
page 25
For adjusting the brightness of the sound.
¡
[iAFC SETTING] button
.................
pages 78, 92
When iAFC is engaged, the Clavinova will sound deeper, more
resonant, and more similar to the sound of an actual acoustic
instrument. You can turn the iAFC function on or off or make
detailed settings for the iAFC.
[FUNCTION] button
.......................
pages 79, 94
This lets you make detailed settings, such as adjusting the
keyboard touch, making fine adjustments to the pitch or MIDI
settings.
£
USB [TO DEVICE] terminals
.................
page 72
For connecting the instrument to a USB storage device, allowing
saving/loading of data to and from the connected device. The
instrument has two [TO DEVICE] terminals, A (on the left of
the keyboard) and B (on the connector panel at the bottom),
which can be specified using the [SELECT] switch.
¢
Soft pedal (left), Sostenuto pedal (center),
Damper pedal (right)
............................
page 24
For producing a range of expressive effects similar to those
produced by the pedals on an acoustic piano. These pedals can
also be assigned to various functions.
[PHONES] jacks
......................................
page 16
For connecting a set of standard stereo headphones, allowing
private practice.
§
USB [TO HOST] terminal
.......................
page 72
For connecting the instrument to your computer, allowing you
to transfer MIDI data between the Clavinova and the computer.
MIDI [IN] [OUT] [THRU] terminals
........
page 72
For connecting external MIDI devices, allowing the use of
various MIDI functions.
[AUX PEDAL] jack
..................................
page 72
For connecting an optional pedal, allowing convenient foot
control over one of a variety of assignable functions.
ª
AUX IN [L/L+R] [R] jacks
.......................
page 73
For connecting an external tone generator, allowing you to play
the sound of that device via the Clavinova’s internal sound
system and speakers.
AUX OUT [L/L+R] [R] jacks
....................
page 73
For outputting the sound of the Clavinova to external powered
speaker systems, for playing in large venues at higher volumes.
[LAN] port
.............................................
page 74
By directly connecting the CLP-380 to the Internet, you can use
the special service on the Yamaha website that enables you to
automatically play back a wide variety of songs (song data) in
various musical genres as background music directly on your
instrument.
¤
[AC IN] connector
..................................
page 15
For connection of the power cord.
In order to obtain the optimal results from iAFC, we
recommend that you do the following.
Position the Clavinova so that its rear panel is at least 10 cm
away from the wall.
Perform the automatic adjustment after you turn on the
power of the Clavinova for the first time, and after each
time you move the Clavinova (page 93).