Yamaha CLP-380 Owner's Manual - Page 42
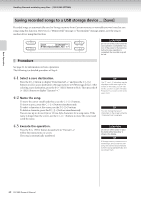
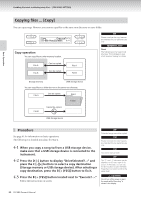
Saving recorded songs to a USB storage device ... [Save], Select a save destination., Name the song.
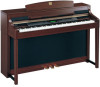 |
View all Yamaha CLP-380 manuals
Add to My Manuals
Save this manual to your list of manuals |
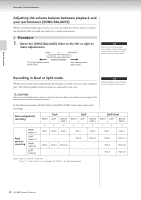
Page 42 highlights
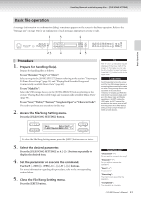
→ Basic Operation Handling files such as deleting song files ... [FILE/SONG SETTING] Saving recorded songs to a USB storage device ... [Save] Recorded songs are automatically saved to Storage memory from Current memory, so normally you won't need to save songs using this function. However, if a "MemoryFull" message or "SystemLimit" message appear, save the song to another device using this function. A B Save Selected?--> M-001:NewSong001.MID /- NO YES C D CAUTION Do not turn off the power before the save operation is completed. If you turn off the power to the Clavinova before the save operation is completed, the recorded song will be lost. Procedure See page 41 for information on basic operations. The following is a detailed procedure of Step 4. 4-1 Select a save destination. Press the D [-] button to display "DriveSelected?→" and press the C [-][+] buttons to select a save destination (Storage memory or USB storage device). After selecting a save destination, press the B [+ (YES)] button to fix it. Then press the B [+ (YES)] button to display "Execute?→." 4-2 Name the song. To move the cursor (small underline), use the C [-][+] buttons. To insert a space, press the C [-][+] buttons simultaneously. To select a character at the cursor, use the D [-][+] buttons. To delete a character, press the D [-][+] buttons simultaneously. You can use up to 46 one-byte or 23 two-byte characters for a song name. If the name is longer than the screen, use the C [-][+] buttons to move the cursor and scroll the name. → TIP The " " and " " indicators may be displayed in the lower right of the screen. In this case, you can use the D [+] button to open the folder. Press the D [-] button to shift to the upper level. TIP You can change the type of characters on the screen using the "CharacterCode" parameter. 4-3 Execute the operation. Press the B [+ (YES)] button located next to "Execute?→." Follow the instructions on screen. The song is automatically numbered. CAUTION Do not turn off the power or eject the media while "Executing" is shown in the display. TIP If Storage memory contains one or more songs, and you save a new song, the Clavinova automatically sorts the songs alphabetically and renumbers them. 42 CLP-380 Owner's Manual
-
 1
1 -
2
-
3
-
4
-
5
-
6
-
7
-
8
-
9
-
10
-
11
-
12
-
13
-
14
-
15
-
16
-
17
-
18
-
19
-
20
-
21
-
22
-
23
-
24
-
25
-
26
-
27
-
28
-
29
-
30
-
31
-
32
-
33
-
34
-
35
-
36
-
 37
37 -
 38
38 -
 39
39 -
 40
40 -
 41
41 -
 42
42 -
 43
43 -
 44
44 -
 45
45 -
 46
46 -
 47
47 -
48
-
49
-
50
-
51
-
52
-
53
-
54
-
55
-
56
-
57
-
58
-
59
-
60
-
61
-
62
-
63
-
64
-
65
-
66
-
67
-
68
-
69
-
70
-
71
-
72
-
73
-
74
-
75
-
76
-
77
-
78
-
79
-
80
-
81
-
82
-
83
-
84
-
85
-
86
-
87
-
88
-
89
-
90
-
91
-
92
-
93
-
94
-
95
-
96
-
97
-
98
-
99
-
100
-
101
-
102
-
103
-
104
-
105
-
106
-
107
-
108
-
109
-
110
-
111
-
112
-
113
-
114
-
115
-
116
-
117
-
118
-
119
-
120
-
121
-
122
-
123
-
124
-
125
-
126
-
127
-
128
-
129
-
130
-
131
-
132
-
133
-
134
-
135
-
136
 |
 |
