Yamaha CLP-380 Owner's Manual - Page 35
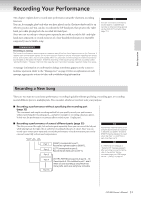
Recording a performance of several different parts
 |
View all Yamaha CLP-380 manuals
Add to My Manuals
Save this manual to your list of manuals |
Page 35 highlights
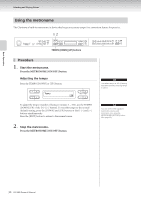
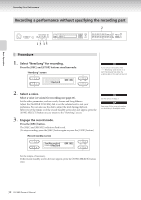
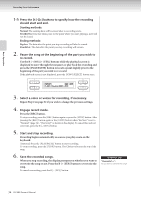
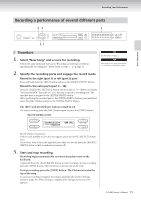
Recording Your Performance Recording a performance of several different parts 22 1 Basic Operation 13 Procedure 1. Select "New Song" and a voice for recording. Follow the same operation steps as in "Recording a performance without specifying the recording part" above. Refer to steps 1 - 2 on page 32. TIP Set the tempo in Step 2. TIP See page 38 for more information on recording in Dual/Split mode. 2. Specify the recording parts and engage the record mode. Record to the right (part 1) or left (part 2) part: Press and hold down the [REC] button and press the [RIGHT]/[LEFT] button. Record to the extra parts (part 3 - 16): Press the [FILE/SONG SETTING] button and press the A [-][+] button to display "RecExtraPartsCh." Press the D [-][+] buttons to specify a recording part. The specified part is assigned to the [EXTRA PARTS] button. After specifying the recorded part to the [EXTRA PARTS] button, press and hold down the [REC] button and press the [EXTRA PARTS] button. The [REC] and specified part indicators flash in red. (To stop recording, press the [REC] button again or press the [STOP] button.) Record standby screen A B SongRecording BAR 001 -----:NewSong NO YES C D Set the tempo, if necessary. If this record standby screen does not appear, press the [SONG SELECT] button once. If you don't want to hear the right/left part while you record, press the [RIGHT]/ [LEFT] button so that its indicator is turned off. 3. Start and stop recording. Recording begins automatically as soon as you play a note on the keyboard. (Optional) Press the [PLAY/PAUSE] button to start recording. To stop recording, press the [STOP] button. The Clavinova locates the top of the song. To stop recording, press the [STOP] button. The Clavinova locates the top of the song. As soon as recording is stopped, the song is automatically saved to Storage memory (page 39). When saving is completed, the Storage memory screen appears. CLP-380 Owner's Manual 35
-
 1
1 -
2
-
3
-
4
-
5
-
6
-
7
-
8
-
9
-
10
-
11
-
12
-
13
-
14
-
15
-
16
-
17
-
18
-
19
-
20
-
21
-
22
-
23
-
24
-
25
-
26
-
27
-
28
-
29
-
 30
30 -
 31
31 -
 32
32 -
 33
33 -
 34
34 -
 35
35 -
 36
36 -
 37
37 -
 38
38 -
 39
39 -
 40
40 -
41
-
42
-
43
-
44
-
45
-
46
-
47
-
48
-
49
-
50
-
51
-
52
-
53
-
54
-
55
-
56
-
57
-
58
-
59
-
60
-
61
-
62
-
63
-
64
-
65
-
66
-
67
-
68
-
69
-
70
-
71
-
72
-
73
-
74
-
75
-
76
-
77
-
78
-
79
-
80
-
81
-
82
-
83
-
84
-
85
-
86
-
87
-
88
-
89
-
90
-
91
-
92
-
93
-
94
-
95
-
96
-
97
-
98
-
99
-
100
-
101
-
102
-
103
-
104
-
105
-
106
-
107
-
108
-
109
-
110
-
111
-
112
-
113
-
114
-
115
-
116
-
117
-
118
-
119
-
120
-
121
-
122
-
123
-
124
-
125
-
126
-
127
-
128
-
129
-
130
-
131
-
132
-
133
-
134
-
135
-
136
 |
 |
