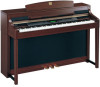
Yamaha CLP-380 Owner's Manual - Page 37
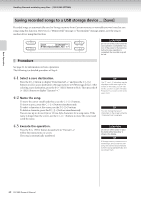
Changing a voice or tempo after recording, Procedure, Select a song you wish to change
 |
View all Yamaha CLP-380 manuals
Add to My Manuals
Save this manual to your list of manuals |
Page 37 highlights
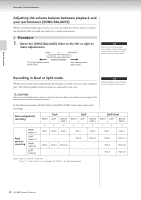
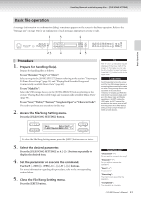
Basic Operation Recording Your Performance Changing a voice or tempo after recording You can change the voice and tempo after recording to change a song's feel or to set a more suitable tempo. You can also change these elements in the middle of a song. Procedure 1. Select a song you wish to change (page 36). 2. To change the voice or tempo in the middle of the song, specify the measure to change by using the B [- (NO)] [+ (YES)] buttons while the playback screen is displayed or by pressing the [PLAY/PAUSE] button to locate a point slightly prior to the beginning of the part you wish to rerecord. 3. Change the settings (voice, reverb, etc.). For example, if you wish to change the recorded E.Piano1 voice to E.Piano2, use the voice group buttons and the A [-][+] buttons to select E.Piano2. When the setting is complete, press the [SONG SELECT] button once to return to the song select screen. 4. Press and hold down the [REC] button and select the part to change. The indicator for the selected part lights up in red. Change the tempo setting now, if necessary. At this point, do not play the keyboard or press the [PLAY/PAUSE] button. Otherwise, recording will start, erasing the recorded data. TIP Before changing a voice or tempo, set the starting method to "Normal" (page 33). When the starting method is set to "FirstKeyOn," you cannot change a voice or tempo. TIP Refer to "What type of data is recorded?" on page 108 for information on the settings that can be changed here. TIP Change the tempo in Step 4. CAUTION The panel settings on Step 3 will be saved in memory and you will not be able to restore the previous settings. Proceed with caution. 5. Press the [STOP] or [REC] button to exit record mode. When you exit record mode, the display prompts you whether you want to overwrite the song or not. Press the B [+ (YES)] button to overwrite the song. CLP-380 Owner's Manual 37
-
 1
1 -
2
-
3
-
4
-
5
-
6
-
7
-
8
-
9
-
10
-
11
-
12
-
13
-
14
-
15
-
16
-
17
-
18
-
19
-
20
-
21
-
22
-
23
-
24
-
25
-
26
-
27
-
28
-
29
-
30
-
31
-
 32
32 -
 33
33 -
 34
34 -
 35
35 -
 36
36 -
 37
37 -
 38
38 -
 39
39 -
 40
40 -
 41
41 -
 42
42 -
43
-
44
-
45
-
46
-
47
-
48
-
49
-
50
-
51
-
52
-
53
-
54
-
55
-
56
-
57
-
58
-
59
-
60
-
61
-
62
-
63
-
64
-
65
-
66
-
67
-
68
-
69
-
70
-
71
-
72
-
73
-
74
-
75
-
76
-
77
-
78
-
79
-
80
-
81
-
82
-
83
-
84
-
85
-
86
-
87
-
88
-
89
-
90
-
91
-
92
-
93
-
94
-
95
-
96
-
97
-
98
-
99
-
100
-
101
-
102
-
103
-
104
-
105
-
106
-
107
-
108
-
109
-
110
-
111
-
112
-
113
-
114
-
115
-
116
-
117
-
118
-
119
-
120
-
121
-
122
-
123
-
124
-
125
-
126
-
127
-
128
-
129
-
130
-
131
-
132
-
133
-
134
-
135
-
136
 |
 |
