Yamaha CLP-380 Owner's Manual - Page 45
Moving files ... [Move], Making folders in the USB storage device ... [MakeDir]
 |
View all Yamaha CLP-380 manuals
Add to My Manuals
Save this manual to your list of manuals |
Page 45 highlights
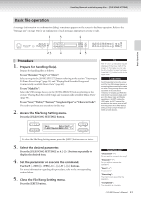
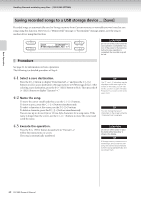
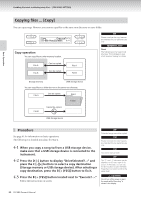
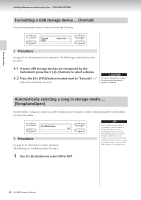
Handling files such as deleting song files ... [FILE/SONG SETTING] Moving files ... [Move] You can move (cut and paste) songs. A B Move Execute?--> U1-001:NewSong001 /- NO YES C D Procedure See page 41 for information on basic operations. The following is a detailed procedure for step 4. 4-1 When you move a song to/from a USB storage device, make sure that a USB storage device is connected to the instrument. Press the D [-] button to display "DriveSelected?→" and press the C [-][+] buttons to select a move destination (Storage memory or USB storage device). After selecting a move destination, press the B [+ (YES)] button to fix it. 4-2 Press the B [+ (YES)] button located next to "Execute?→." Follow the instructions on screen. → TIP Preset songs and some protected songs cannot be moved. TIP You cannot move a folder. TIP The " " and " " indicators may be displayed in the lower right of the screen. In this case, you can use the D [+] button to open the folder. Press the D [-] button to shift to the upper level. CAUTION Do not turn off the power or eject the media while "Executing" is shown in the display. → Basic Operation Making folders in the USB storage device ... [MakeDir] You can create folders (directories) on the USB storage device to organize songs. This instrument enables you to create folders only in the USB storage device-not in the Preset song memory and Storage memory. A MakeDir Execute?--> U1 :NewDir_ C Procedure See page 41 for information on basic operations. The following is a detailed procedure for step 4. B NO YES D 4-1 Follow the steps "Saving recorded songs to a USB storage device" on page 42 to name the folder. 4-2 Press the B [+ (YES)] button located next to "Execute?→." Follow the instructions on screen. The folder is created in the root directory in the USB1 (indicated by "U1" in this display) device. TIP To make a folder for the selected drive or level To make a folder for the selected drive or level, select "MakeDir" then select "USB" by pressing the [SONG SELECT] button. In this display, press the A [-][+] button to select another drive. Press the D [-][+] button to select another level. After that, select "MakeDir" again and make a folder, following step 4 at left. CAUTION Do not turn off the power or eject the media while "Executing" is shown in the display. TERMINOLOGY Root: The highest level of a hierarchical structure. This indicates an area which does not belong to a folder. CLP-380 Owner's Manual 45
-
 1
1 -
2
-
3
-
4
-
5
-
6
-
7
-
8
-
9
-
10
-
11
-
12
-
13
-
14
-
15
-
16
-
17
-
18
-
19
-
20
-
21
-
22
-
23
-
24
-
25
-
26
-
27
-
28
-
29
-
30
-
31
-
32
-
33
-
34
-
35
-
36
-
37
-
38
-
39
-
 40
40 -
 41
41 -
 42
42 -
 43
43 -
 44
44 -
 45
45 -
 46
46 -
 47
47 -
 48
48 -
 49
49 -
 50
50 -
51
-
52
-
53
-
54
-
55
-
56
-
57
-
58
-
59
-
60
-
61
-
62
-
63
-
64
-
65
-
66
-
67
-
68
-
69
-
70
-
71
-
72
-
73
-
74
-
75
-
76
-
77
-
78
-
79
-
80
-
81
-
82
-
83
-
84
-
85
-
86
-
87
-
88
-
89
-
90
-
91
-
92
-
93
-
94
-
95
-
96
-
97
-
98
-
99
-
100
-
101
-
102
-
103
-
104
-
105
-
106
-
107
-
108
-
109
-
110
-
111
-
112
-
113
-
114
-
115
-
116
-
117
-
118
-
119
-
120
-
121
-
122
-
123
-
124
-
125
-
126
-
127
-
128
-
129
-
130
-
131
-
132
-
133
-
134
-
135
-
136
 |
 |