Yamaha PSR-620 Owner's Manual - Page 43
Using Auto Accompaniment, Changing the Accompaniment Split Point
 |
View all Yamaha PSR-620 manuals
Add to My Manuals
Save this manual to your list of manuals |
Page 43 highlights
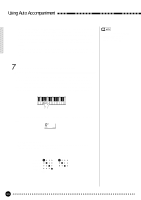
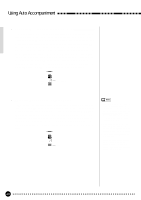
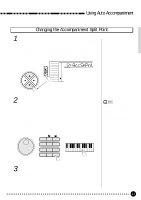
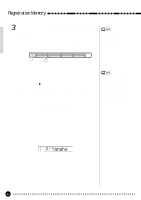
Using Auto Accompaniment Changing the Accompaniment Split Point 1 Select the Accompaniment Split Point Function Press the [FUNCTION] button to the left of the display as many times as necessary until the arrowhead in the display appears next to "OVERALL" in the function list to the left of the display. Then use the cursor [v] and [w] buttons to select the "AccSpPnt" function from within the OVERALL function list. FUNCTION CURSOR VOICE STYLE SONG REGIST MEMORY MULTI PAD DUAL VOICE SPLIT VOICE HARM/ ECHO OVERALL DIGITAL EFFECT 054 AccSpPnt 2 Set As Required ...Simply press the key you want to assign as the split point. The key number of the key you press will appear to the left of "AccSpPnt" on the top line of the display. You can also use the [-/NO] and [+/YES] buttons, the number buttons or the data dial to enter the split point key number. The lowest key on the keyboard (C1) is key number "36", middle C (C3) is "60", and the highest key (C6) is "96". The split point can be set at any key number from 00 through 127, allowing the split point to be set outside the range of the PSR-620 keyboard for MIDI applications. 1*- - * * 1 2 3 4 5 6 7 8 9 0 -/NO +/YES • The split point key becomes the highest key in the Auto Accompaniment section of the keyboard. • The default split point (54) can be instantly recalled by pressing the [-/NO] and [+/YES] buttons at the same time. 3 Exit ...Press the [VOICE] button or select a different function to exit from the OVERALL functions. 41
-
 1
1 -
2
-
3
-
4
-
5
-
6
-
7
-
8
-
9
-
10
-
11
-
12
-
13
-
14
-
15
-
16
-
17
-
18
-
19
-
20
-
21
-
22
-
23
-
24
-
25
-
26
-
27
-
28
-
29
-
30
-
31
-
32
-
33
-
34
-
35
-
36
-
37
-
 38
38 -
 39
39 -
 40
40 -
 41
41 -
 42
42 -
 43
43 -
 44
44 -
 45
45 -
 46
46 -
 47
47 -
 48
48 -
49
-
50
-
51
-
52
-
53
-
54
-
55
-
56
-
57
-
58
-
59
-
60
-
61
-
62
-
63
-
64
-
65
-
66
-
67
-
68
-
69
-
70
-
71
-
72
-
73
-
74
-
75
-
76
-
77
-
78
-
79
-
80
-
81
-
82
-
83
-
84
-
85
-
86
-
87
-
88
-
89
-
90
-
91
-
92
-
93
-
94
-
95
-
96
-
97
-
98
-
99
-
100
-
101
-
102
-
103
-
104
-
105
-
106
-
107
-
108
-
109
-
110
-
111
 |
 |
