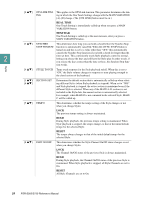
Yamaha PSR-S950 Reference Manual - Page 25
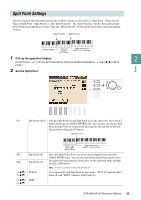
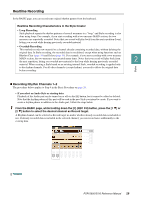
Split Point Settings, Call up the operation display., Set the Split Point.
 |
View all Yamaha PSR-S950 manuals
Add to My Manuals
Save this manual to your list of manuals |
Page 25 highlights
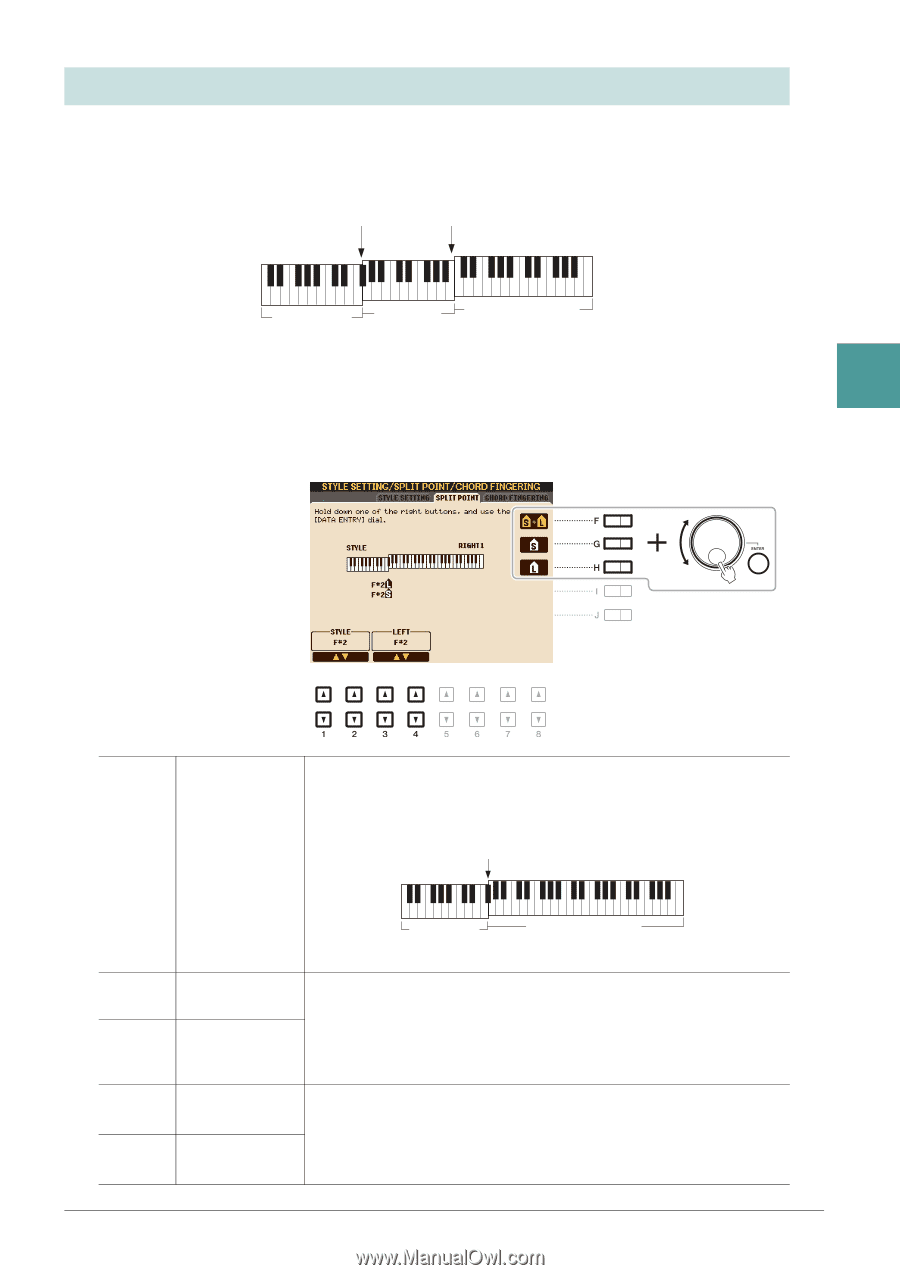
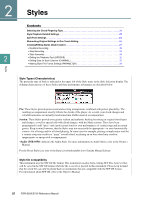
Split Point Settings The key which divides the keyboard into two or three sections is referred to as "Split Point." There are two types of Split Point: "Split Point (L)" and "Split Point (S)." The "Split Point (L)" divides the keyboard into the left-hand and right-hand sections while the "Split Point (S)" divides the keyboard into chord and melody sections. Split Point (S) Split Point (L) Chord section Left-hand section (LEFT Voice) Right-hand section (RIGHT 1 and 2 Voices) 1 Call up the operation display. 2 [FUNCTION] [C] STYLE SETTING/SPLIT POINT/CHORD FINGERING TAB [E][F] SPLIT POINT Styles 2 Set the Split Point. [F] Split Point (S+L) Sets the Split Point (S) and Split Point (L) to the same note. Press the [F] button and rotate the [DATA ENTRY] dial. You can also specify the Split Point directly from the keyboard by pressing the desired key on the key- board while holding the [F] button. Split Point (S+L) [G] Split Point (S) [H] Split Point (L) [1 ]/ [2 ] [3 ]/ [4 ] STYLE LEFT Chord + Lefthand (LEFT Voice) section Right-hand section (RIGHT 1 and 2 Voices) Sets each Split Point. Press one of the desired buttons and rotate the [DATA ENTRY] dial. You can also specify the Split Point directly from the keyboard by pressing the desired key on the keyboard while holding the [G] or [H] button. NOTE Split Point (L) cannot be set lower than Split Point (S). You can specify each Split Point by note name. "STYLE" indicates Split Point (S) and "LEFT" indicates Split Point (L). PSR-S950/S750 Reference Manual 25
-
 1
1 -
2
-
3
-
4
-
5
-
6
-
7
-
8
-
9
-
10
-
11
-
12
-
13
-
14
-
15
-
16
-
17
-
18
-
19
-
 20
20 -
 21
21 -
 22
22 -
 23
23 -
 24
24 -
 25
25 -
 26
26 -
 27
27 -
 28
28 -
 29
29 -
 30
30 -
31
-
32
-
33
-
34
-
35
-
36
-
37
-
38
-
39
-
40
-
41
-
42
-
43
-
44
-
45
-
46
-
47
-
48
-
49
-
50
-
51
-
52
-
53
-
54
-
55
-
56
-
57
-
58
-
59
-
60
-
61
-
62
-
63
-
64
-
65
-
66
-
67
-
68
-
69
-
70
-
71
-
72
-
73
-
74
-
75
-
76
-
77
-
78
-
79
-
80
-
81
-
82
-
83
-
84
-
85
-
86
-
87
-
88
-
89
-
90
-
91
-
92
-
93
-
94
-
95
-
96
-
97
-
98
-
99
-
100
-
101
-
102
-
103
-
104
-
105
-
106
-
107
-
108
-
109
-
110
-
111
-
112
-
113
-
114
-
115
-
116
-
117
-
118
 |
 |