Yamaha PSR-S950 Reference Manual - Page 57
Example of Step Recording-Chord detailed instructions of Step 5 on,
 |
View all Yamaha PSR-S950 manuals
Add to My Manuals
Save this manual to your list of manuals |
Page 57 highlights
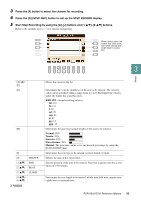
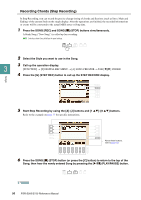
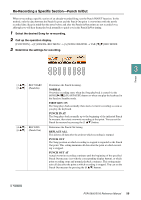
7 Press the [EXIT] button to exit from the Step Recording display. 8 Press the [F] (EXPAND) button to convert the recorded data to the actual MIDI notes (Song data). 9 Press the [I] (SAVE) button to execute the Save operation. NOTICE The recorded Song data will be lost if you select another Song or turn the power to the instrument off without executing the Save operation. Example of Step Recording-Chord (detailed instructions of Step 5 on page 56) NOTE This example uses a Style in 4/4 time. 1 2 3 MAIN A BREAK MAIN B 3 Songs CF G F G7 C * The numbers shown in the illustration correspond to the following operation step numbers. Before executing the instructions below, make sure that [AUTO FILL IN] button is turned off since no Fill in is included in the notation example above. 1 Enter the chords for the Main A section. 1-1 Press the STYLE CONTROL [MAIN A] button. 1-2 Press the [5 ] button to select the half-note length. 1-3 Play the chords C, F and G in the chord section of the keyboard. 1-3 C 1-1 F G 1-2 PSR-S950/S750 Reference Manual 57
-
 1
1 -
2
-
3
-
4
-
5
-
6
-
7
-
8
-
9
-
10
-
11
-
12
-
13
-
14
-
15
-
16
-
17
-
18
-
19
-
20
-
21
-
22
-
23
-
24
-
25
-
26
-
27
-
28
-
29
-
30
-
31
-
32
-
33
-
34
-
35
-
36
-
37
-
38
-
39
-
40
-
41
-
42
-
43
-
44
-
45
-
46
-
47
-
48
-
49
-
50
-
51
-
 52
52 -
 53
53 -
 54
54 -
 55
55 -
 56
56 -
 57
57 -
 58
58 -
 59
59 -
 60
60 -
 61
61 -
 62
62 -
63
-
64
-
65
-
66
-
67
-
68
-
69
-
70
-
71
-
72
-
73
-
74
-
75
-
76
-
77
-
78
-
79
-
80
-
81
-
82
-
83
-
84
-
85
-
86
-
87
-
88
-
89
-
90
-
91
-
92
-
93
-
94
-
95
-
96
-
97
-
98
-
99
-
100
-
101
-
102
-
103
-
104
-
105
-
106
-
107
-
108
-
109
-
110
-
111
-
112
-
113
-
114
-
115
-
116
-
117
-
118
 |
 |
