Yamaha PocketrakCX Reference Manual
Yamaha PocketrakCX - POCKETRAK CX 2 GB Digital Player Manual
 |
UPC - 086792893440
View all Yamaha PocketrakCX manuals
Add to My Manuals
Save this manual to your list of manuals |
Yamaha PocketrakCX manual content summary:
- Yamaha PocketrakCX | Reference Manual - Page 1
POCKET RECORDER POCKETRAK CX Reference Manual EN - Yamaha PocketrakCX | Reference Manual - Page 2
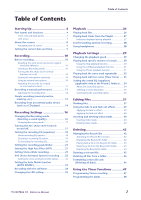
44 Deleting a selected file 45 Deleting all files from a folder 46 Formatting a microSD card (Deleting all data 46 Using the Timer Functions 47 Programming Timer recording 47 Programming the alarm 48 POCKETRAK CX Reference Manual 2 - Yamaha PocketrakCX | Reference Manual - Page 3
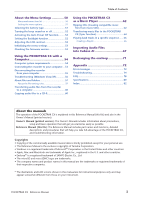
will get you started as easily as possible. Reference Manual (this file): The Reference Manual includes part names and functions, detailed descriptions and procedures that will help you take full advantage of the POCKETRAK CX, and troubleshooting information. Copyrights • Copying of the commercially - Yamaha PocketrakCX | Reference Manual - Page 4
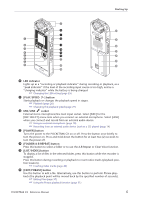
or while the list screen is displayed, press this button once to confirm the item selection or the operation. 9 Built-in stereo microphone The recorder features a high-performance X-Y stereo microphone. POCKETRAK CX Reference Manual 4 - Yamaha PocketrakCX | Reference Manual - Page 5
record from an external audio device. ☞ Using an external microphone (page 10) ☞ Recording from an external audio device (such as a CD player) (page 14) e [POWER] button Turns the power to the POCKETRAK CX (page 37) ☞ Using the Phrase playback function (page 31) POCKETRAK CX Reference Manual 5 - Yamaha PocketrakCX | Reference Manual - Page 6
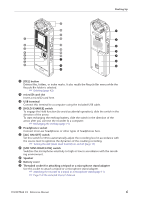
g Battery cover h Threaded socket for attaching a tripod or a microphone stand adapter Use this socket to attach a tripod or a microphone stand adapter. ☞ Attaching the recorder to a tripod or a microphone stand (page 11) ☞ Page 9 of the included Owner's Manual POCKETRAK CX Reference Manual 6 - Yamaha PocketrakCX | Reference Manual - Page 7
are digitally-recorded unprocessed audio, and are supposed to be of the highest sound quality. "WAVE" format is used to import these PCM recording files into a computer. The WAVE file extension is ".WAV". MP3 and WMA format files are created by compressing the LPCM data. POCKETRAK CX Reference Manual - Yamaha PocketrakCX | Reference Manual - Page 8
repeatedly to scroll through the folders. Hint: · For more information on the folders, refer to "Folder structure" on page 59. 3. Press the [PLAY/SPEED ] button. The recorder starts to play the file. 4. Press the [STOP/ESC ] button. The recorder stops playback. POCKETRAK CX Reference Manual 8 - Yamaha PocketrakCX | Reference Manual - Page 9
the current date and time After you set the date and time, the POCKETRAK CX will automatically record the recording date and time with each file. 1. Press the [MENU/ENTER] button ] button. 5. Press the [STOP/ESC ] button twice. The recorder displays the main screen. POCKETRAK CX Reference Manual 9 - Yamaha PocketrakCX | Reference Manual - Page 10
wind screen attached to the microphones. Also, to further minimize the noise level, Yamaha recommends that you turn on the High Pass Filter via menu item [HPF] (see page 21). Selecting a Recording mode The POCKETRAK CX records audio in the MP3 or PCM (WAV) format. As a rule of thumb, select "PCM - Yamaha PocketrakCX | Reference Manual - Page 11
. Select a folder from folders A-D. 2. Press the [REC/PAUSE ] button. The unit enters recording [STANDBY] mode. (Recording has not yet started.) Level meter Note: · The level meter will move left or right in response to the sound level from the micro- phone. POCKETRAK CX Reference Manual 11 - Yamaha PocketrakCX | Reference Manual - Page 12
recording LED turns off. The indicator appears on the screen. Press the [ ] button to lower the recording level. 4. Press the [REC/PAUSE ] button again. The LED lights up in red and recording begins. HIGH LOW MIC SENS PAUSE ESC SPEED REC STOP PLAY MENU ENTER POCKETRAK CX Reference Manual - Yamaha PocketrakCX | Reference Manual - Page 13
button located on the side panel repeatedly to select a folder into which to record. FOLDER PAUSE ESC SPEED REC STOP PLAY MENU ENTER Hint: · Pressing the [FOLDER/A-B REPEAT] button repeatedly will scroll through the folders. Select a folder from folders A-D. POCKETRAK CX Reference Manual 13 - Yamaha PocketrakCX | Reference Manual - Page 14
[LINE], then press the [MENU/ENTER] button. VOL MENU ENTER Note: · Please note that you cannot adjust the recording level on the unit if [LINE] has been selected. 3. Connect the recorder's [MIC/LINE] socket to the audio output connector on the external device. POCKETRAK CX Reference Manual 14 - Yamaha PocketrakCX | Reference Manual - Page 15
are recording audio through the line input from the connected external device, no audio will be heard from the speaker. Use the headphones to listen to the audio being recorded. 7. Press the [STOP/ESC ] button to stop recording. Stop playback on the external device. POCKETRAK CX Reference Manual - Yamaha PocketrakCX | Reference Manual - Page 16
) The POCKETRAK CX enables you to record audio in MP3 or PCM (WAV) format. In PCM mode, non-compressed audio data will be recorded. In MP3 mode, compressed audio data will be recorded. With the better sound quality, the data size will be larger and available recording time will be shorter. Refer to - Yamaha PocketrakCX | Reference Manual - Page 17
of the unit) to "OFF." You can change the recording level in increments (see page 12). ALC OFF (The recording level will be displayed.) Note: · You cannot adjust the recording level when you are recording audio from a connected external device (see page 14). POCKETRAK CX Reference Manual 17 - Yamaha PocketrakCX | Reference Manual - Page 18
mildly boosts the higher frequency range. This preset significantly boosts the higher frequency range. Note: · You cannot change the parameters of these eight recording EQ presets. Select the USER recording EQ option if you wish to customize the recording EQ. POCKETRAK CX Reference Manual 18 - Yamaha PocketrakCX | Reference Manual - Page 19
EQ" on page 20. 6. Press the [MENU/ENTER] button. The selection of the recording EQ is confirmed. Adjust the recording level, then press the [REC/PAUSE ] button again to start recording (see page 12). Note: · To cancel the operation, press the [STOP/ESC ] button. POCKETRAK CX Reference Manual 19 - Yamaha PocketrakCX | Reference Manual - Page 20
the [REC/PAUSE ] button again to start recording (see page 12). Note: · The USER recording EQ setting is retained when you turn the power off or change the battery. However, the setting will be lost if you change the battery without first turning the power off. POCKETRAK CX Reference Manual 20 - Yamaha PocketrakCX | Reference Manual - Page 21
image of the recorded sound. Procedure: Press the [MENU/ENTER] button for at least two (2) seconds while the main screen is displayed, select [REC MENU] → [STEREO WIDE] → [ON], then press the [MENU/ENTER] button. To cancel the stereo wide setting, select [OFF]. POCKETRAK CX Reference Manual 21 - Yamaha PocketrakCX | Reference Manual - Page 22
the voice sensing level, press the [ ]/[ while recording with the VAS function turned on. ] buttons VAS value Note: · If the High Pass Filter is turned on, the filter will cut the low range, and recording may not start. In this case, set the VAS function to Off. POCKETRAK CX Reference Manual 22 - Yamaha PocketrakCX | Reference Manual - Page 23
recorder does not detect a silence of two seconds between tracks on a live CD or similar source. In this case, use the Divide File function (see page 37) to manually divide the files. · If the unit detects silence for 15 seconds or more, recording stops automatically. POCKETRAK CX Reference Manual - Yamaha PocketrakCX | Reference Manual - Page 24
button again. 6. After the time specified in step 2 expires, recording begins. Note: · Once self timer recording begins, the self timer recording setting turns off automatically. Hint: · To cancel self timer recording, press the [STOP/ESC ] button during countdown. POCKETRAK CX Reference Manual 24 - Yamaha PocketrakCX | Reference Manual - Page 25
recording peaks. The LED indicator lights up in red during excessive recording peaks. The LED indicator is off during normal recording. The LED indicator lights up in green during playback. 3. Press the [STOP/ESC ] button twice. The recorder displays the main screen. POCKETRAK CX Reference Manual - Yamaha PocketrakCX | Reference Manual - Page 26
Press the [PLAY/SPEED ] button. The recorder starts playing back the file. File number/ Total number of files Elapsed playback time Total playback time 4. Press the [VOL +/-] buttons to set the proper playback volume level. The level can be set in 21 steps (0-20). POCKETRAK CX Reference Manual 26 - Yamaha PocketrakCX | Reference Manual - Page 27
Playlist, then press the [MENU/ENTER] button. 3. Press the [PLAY/SPEED ] button. The recorder starts playing the tracks in the sequence specified in the Playlist. Playlist indicator To resume normal Elapsed playback time Status indicator Skip play Repeat play POCKETRAK CX Reference Manual 27 - Yamaha PocketrakCX | Reference Manual - Page 28
button once briefly to locate the previous index mark. Hint: · For information on inserting index marks, refer to page 40. Using headphones Use headphones if you do not want sound to be output from the EQ function is effective only for playback through headphones. POCKETRAK CX Reference Manual 28 - Yamaha PocketrakCX | Reference Manual - Page 29
This is useful if you want to listen carefully to complex musical parts or to skip quickly through unimportant parts of a recorded meeting. 1. During playback, press the [PLAY/SPEED ] button. Some files may not play correctly when the playback speed is changed. POCKETRAK CX Reference Manual 29 - Yamaha PocketrakCX | Reference Manual - Page 30
skip unimportant parts during playback or to repeat playback of a particular portion of the file. The POCKETRAK CX features three than the distance between the current point and the skip point, the recorder will locate the index mark or the beginning of the next file. POCKETRAK CX Reference Manual 30 - Yamaha PocketrakCX | Reference Manual - Page 31
point is set, and the unit starts playing back the part between A and B repeatedly until you cancel the A-B Repeat audio. 1. During playback, press the [EDIT/PHRASE] button. The playback point will move back by the specified number of seconds and playback will resume. POCKETRAK CX Reference Manual - Yamaha PocketrakCX | Reference Manual - Page 32
15 seconds), then press the [MENU/ENTER] button. 3. Press the [STOP/ESC ] button twice. The recorder displays the main screen. Hint: · You can specify the amount of time for Phrase playback by displaying . (The unit will not perform Random playback across folders.) POCKETRAK CX Reference Manual 32 - Yamaha PocketrakCX | Reference Manual - Page 33
for at least two (2) seconds to turn off the function. Note: · This function is especially effective on the playback of files recorded in PCM 48/44.1kHz or MP3 320/192/128kbps mode. · Depending on how the audio was originally recorded, the noise may not be reduced. POCKETRAK CX Reference Manual 33 - Yamaha PocketrakCX | Reference Manual - Page 34
files in the LINE (L) or MUSIC (M) folder through the headphones. About the sound EQ options The POCKETRAK CX offers six sound EQ presets and one USER EQ option (which enables you to cut and boost five bands you wish to adjust the sound EQ to suit your preference. POCKETRAK CX Reference Manual 34 - Yamaha PocketrakCX | Reference Manual - Page 35
option" on page 36. 3. Press the [MENU/ENTER] button. The selection of the sound EQ option is confirmed. 4. Press the [STOP/ESC ] button. The recorder displays the main screen. Hint: · You can select a sound EQ option by displaying the menu screen during playback. POCKETRAK CX Reference Manual 35 - Yamaha PocketrakCX | Reference Manual - Page 36
enables you to adjust the level of five EQ bands. 1. Select "USER" as the sound EQ. Refer to steps 1 and 2 in the "Selecting a sound EQ option" section on page 35. 2. Press now customized. 6. Press the [STOP/ESC ] button twice. The recorder displays the main screen. POCKETRAK CX Reference Manual 36 - Yamaha PocketrakCX | Reference Manual - Page 37
or LINE (L) folder into two pieces. This feature enables you to remove an unwanted part of a recording while retaining the part you wish to keep. IMPORTANT Once a file is divided in two, the pieces index marks (see page 40), the index marks will be deleted. POCKETRAK CX Reference Manual 37 - Yamaha PocketrakCX | Reference Manual - Page 38
below. To be divided successfully, a file must be twice the overlap time or longer in duration. Recording mode 32 kbps 64 kbps MP3 128 kbps 192 kbps 320 kbps 44.1 kbps PCM 48 kbps Overlap time seconds or longer About 4 seconds or longer About 2 seconds or longer POCKETRAK CX Reference Manual 38 - Yamaha PocketrakCX | Reference Manual - Page 39
displays the message "FADE IN EXECUTING...". Note: · If you have selected any file other than a PCM file recorded on the unit, or if you have selected a file of four seconds or less, the unit will display the effect.) [CANCEL] The fade in effect will not be applied. POCKETRAK CX Reference Manual 39 - Yamaha PocketrakCX | Reference Manual - Page 40
. The unit displays the message "INDEX SETTING..." and the index mark is inserted. Note: · Recording or playback continues after you insert an index mark. Repeat the same steps to continue inserting more to select [INDEX], then press the [MENU/ENTER] button. POCKETRAK CX Reference Manual 40 - Yamaha PocketrakCX | Reference Manual - Page 41
message "DELETING..." and the index marks are deleted. Note: · Deleting index marks will not delete the audio recording. · You cannot delete index marks individually. All index marks in a file will be deleted. · If folder, no index marks will be left in the file. POCKETRAK CX Reference Manual 41 - Yamaha PocketrakCX | Reference Manual - Page 42
increase the available recording time. Displaying the Recycle Bin folder While the main screen is displayed, press the [FOLDER/A-B REPEAT] button located on the side panel repeatedly to select the Recycle Bin ( ) folder. • The Recycle Bin folder contains no files. POCKETRAK CX Reference Manual 42 - Yamaha PocketrakCX | Reference Manual - Page 43
Press the [VOL +/-] buttons to select [YES], then press the [MENU/ENTER] button. The recorder will display the message "RESTORING...", then "RESTORED TO THE BOTTOM OF " (if the file previously belonged to folder A), and the file will move back to its original folder. POCKETRAK CX Reference Manual 43 - Yamaha PocketrakCX | Reference Manual - Page 44
], then press the [MENU/ENTER] button. The recorder displays the message "EMPTYING...", then "NO DATA!", and the Recycle Bin is emptied. Note: · If the Recycle Bin folder contains many files, the recorder's operation may slow down. Empty the Recycle Bin regularly. POCKETRAK CX Reference Manual 44 - Yamaha PocketrakCX | Reference Manual - Page 45
to the Recycle Bin. When the recorder displays "MOVED TO RECYCLE BIN," select [OK], then press the [MENU/ENTER] button. Note: · If the recorder displays the message "RECYCLE BIN FULL!," the Recycle Bin folder is full. Empty the Recycle Bin, then delete the file. POCKETRAK CX Reference Manual 45 - Yamaha PocketrakCX | Reference Manual - Page 46
not to execute the operation, select [CANCEL], then press the [MENU/ ENTER] button. · You cannot cancel the formatting operation if the recorder has already started the oper- ation. 3. Press the [STOP/ESC ] button twice. The recorder displays the main screen. POCKETRAK CX Reference Manual 46 - Yamaha PocketrakCX | Reference Manual - Page 47
time, the recorder automatically starts to record, and a new file is created in the specified folder. (The timer indicator ( ) will flash during Timer recording. Note: · You cannot select the LINE (L), MUSIC (M) or Recycle Bin ( ) folders for Timer recording. POCKETRAK CX Reference Manual 47 - Yamaha PocketrakCX | Reference Manual - Page 48
select [COMMON MENU] → [TIMER & ALARM], then press the [MENU/ENTER] button. 2. Press the [VOL +/-] buttons to select [ALARM], then press the [MENU/ENTER] button. The recorder displays the alarm indicator. Alarm indicator POCKETRAK CX Reference Manual 48 - Yamaha PocketrakCX | Reference Manual - Page 49
. · You cannot program Timer recording if the alarm has already been programmed, and vice versa. ■ Canceling the alarm Select [CANCEL] in step 2 of the "Programming the alarm" procedure, then press the [MENU/ENTER] button. The alarm indicator ( ) disappears. POCKETRAK CX Reference Manual 49 - Yamaha PocketrakCX | Reference Manual - Page 50
a certain period of silence during recording. Sets the time for the Self Timer recording. Turns the VAS (Voice activated system) on or off. Reference page 16 21 21 21 14 Indicates the firmware version information. Reference page 52 25 9 47 51 52 52 53 42 46 53 53 POCKETRAK CX Reference Manual 50 - Yamaha PocketrakCX | Reference Manual - Page 51
to set the menu items. The example here explains how to select "MP3 128kbps" for the Recording mode. 1. Press and hold down the [MENU/ENTER] button for at least two (2) seconds [MENU/ENTER] button. [eneloop] [ALKALINE] Eneloop battery (included) Alkaline battery POCKETRAK CX Reference Manual 51 - Yamaha PocketrakCX | Reference Manual - Page 52
turned on and you leave the recorder turned on for about 15 minutes without using it, the recorder will automatically turn off (except during recording, VAS recording standby mode, or playback). Procedure power is insufficient, the backlight will not light up. POCKETRAK CX Reference Manual 52 - Yamaha PocketrakCX | Reference Manual - Page 53
settings, select [CANCEL]. Checking the firmware version You can check the version number of the recorder's firmware by following the procedure below. Procedure: Press the [MENU/ENTER] button for at press the [MENU/ENTER] button. The firmware version will be displayed. POCKETRAK CX Reference Manual 53 - Yamaha PocketrakCX | Reference Manual - Page 54
"Cubase AI" DAW software. You can also transfer audio files from a computer to the recorder for playback. Computer system requirements ■ Windows Computer: Windows with the recorder. The use of an improper cable may damage the terminal and result in a malfunction. POCKETRAK CX Reference Manual 54 - Yamaha PocketrakCX | Reference Manual - Page 55
computer displays the message shown on the right, remove the USB cable. ■ Macintosh: 1. Drag and drop the drive icon ("NO NAME") of the recorder on the desktop to the Trash Can. 2. After the drive icon ("NO NAME") disappears from the desktop, remove the USB cable. POCKETRAK CX Reference Manual 55 - Yamaha PocketrakCX | Reference Manual - Page 56
POCKETRAK CX with a Computer Troubleshooting (Windows Vista/XP) If the recorder is not recognized by the computer, refer to the information below: ■ Windows Vista While the recorder Serial Bus controllers." "Disk drives" must include "Yamaha Pocketrak USB Device" and the "Universal Serial Bus - Yamaha PocketrakCX | Reference Manual - Page 57
recorded on the unit) on the computer, then move the file back to the VOICE (A-D) folder, you will be unable to play the file on the unit. To play the file, first rename the file following the file naming rules, or move the file to the MUSIC (M) folder (see page 59). POCKETRAK CX Reference Manual - Yamaha PocketrakCX | Reference Manual - Page 58
that if the MUSIC (M) folder contains a file with the same name as that of the audio file you are transferring from the computer, the file in the MUSIC folder will be overwritten by the connected computer. The recorder will not dis- play this folder on its screen. POCKETRAK CX Reference Manual 58 - Yamaha PocketrakCX | Reference Manual - Page 59
POCKETRAK CX Using the POCKETRAK CX with a Computer VOICE (A-D) folders: Store audio files recorded on the unit. Each folder accommodates up to 199 files. LINE (L) folder: Stores files recorded format. MP3 for an MP3 recording file, and WAV for a PCM recording file.) POCKETRAK CX Reference Manual 59 - Yamaha PocketrakCX | Reference Manual - Page 60
uses Windows XP and Widows Media Player 11 as examples. · To copy audio files to a CD-R disc, you must have a CD writer, such as a CD-R/RW drive. 1. From the [Start] menu, select [All Programs], then click [Windows Media Player] to start Windows Media Player. POCKETRAK CX Reference Manual 60 - Yamaha PocketrakCX | Reference Manual - Page 61
player. Right-click Burn List Click 3. Insert a new CD-R/RW disc into the CD-R/RW drive. 4. Drag and drop the audio files you wish to copy to the Burn List pane in the Windows Media Player panel. 5. Click [Start Burn] to start copying the files to the CD-R/RW disc. POCKETRAK CX Reference Manual 61 - Yamaha PocketrakCX | Reference Manual - Page 62
- sonal use. · Yamaha makes no representations or warranties POCKETRAK CX. 1. From the [Start] menu, select [All Programs], then click [Windows Media Player] to start Windows Media Player. 2. Right-click [Rip] in the menu bar, then select [Format] → [mp3]. Right-click POCKETRAK CX Reference Manual - Yamaha PocketrakCX | Reference Manual - Page 63
3. Click [Rip] in the menu bar. Click Using the POCKETRAK CX as a Music Player Check Click 4. Insert a music CD into the computer's CD-ROM drive. Note: · : · You can also set Windows Media Player so that inserting a music CD will automatically start ripping. POCKETRAK CX Reference Manual 63 - Yamaha PocketrakCX | Reference Manual - Page 64
music files to the POCKETRAK CX (Sync function) You can transfer audio files (ripped from a music CD to a computer) to the recorder for playback. For information on how to rip a music CD, refer to the "Ripping CDs box, then check the box again, and then click [OK]. POCKETRAK CX Reference Manual 64 - Yamaha PocketrakCX | Reference Manual - Page 65
the POCKETRAK CX as a Music Player 6. Drag and drop the desired music files from the Library pane in the left col- umn of the window to the Sync List pane in the right column of the window. 7. Click [Start Sync]. The files will be transferred to the POCKETRAK CX. Click POCKETRAK CX Reference Manual - Yamaha PocketrakCX | Reference Manual - Page 66
You must place the Playlist file at the root level of the MUSIC (M) folder, NOT in any sub-folder inside the MUSIC folder. 5. Disconnect the recorder from the computer (see page 55). Hint: · For information on how to play tracks from the Playlist, refer to page 27. POCKETRAK CX Reference Manual 66 - Yamaha PocketrakCX | Reference Manual - Page 67
registration procedure of Cubase AI, refer to the web site below. Step 2. Connecting the recorder to your computer Connect the recorder directly to your computer using the included USB cable. POCKETRAK CX Reference Manual 67 - Yamaha PocketrakCX | Reference Manual - Page 68
Files into Cubase AI Step 3. Importing audio data into Cubase AI 1. Launch Cubase AI. Windows: Click [Start] → [All . For this example select [CAI4 - 4 Stereo 8 Mono Audio Track Recorder] and click [OK]. Note: · Recorded Cubase AI data is stored as a "project file." POCKETRAK CX Reference Manual 68 - Yamaha PocketrakCX | Reference Manual - Page 69
panel 4. Click in the track list (the area in which the track names are displayed) to select a track into which to import audio data. Various settings for the selected track are available in the Inspector on the left side of the display. Inspector Track list POCKETRAK CX Reference Manual 69 - Yamaha PocketrakCX | Reference Manual - Page 70
→ "Remov- able Disk", then click [Open]. 6. Select an audio file to import from the folder, then click [Open]. Note: in case a problem occurs. Hint: · For further instructions such as adding effects or mixing, refer to the PDF manual provided with the software. POCKETRAK CX Reference Manual 70 - Yamaha PocketrakCX | Reference Manual - Page 71
eneloop battery during data transfer. However, the battery may be exhausted more quickly. 5. Disconnect the recorder from your computer. Note: · The battery may become warm during recharge, but this is normal a while, then connect the unit to the computer again.) POCKETRAK CX Reference Manual 71 - Yamaha PocketrakCX | Reference Manual - Page 72
when the corresponding folder contains the maximum number of files allowed. The microSD card does not have sufficient free space to divide a file. The recording is too short in duration to divide. You cannot divide the file at the current point. POCKETRAK CX Reference Manual 72 - Yamaha PocketrakCX | Reference Manual - Page 73
record or play back a file with no microSD card inserted inserted. Insert a microSD card. The recorder did not recognize the inserted microSD card, or the card is broken. Try inserting the card again. PCM recording was incomplete or the data was not written correctly. POCKETRAK CX Reference Manual - Yamaha PocketrakCX | Reference Manual - Page 74
Troubleshooting Appendix The unit does not operate. Possible cause Battery is not inserted properly Corrective action The microSD card was formatted on a computer or device other than the recorder. Use the POCKETRAK CX to format the microSD card (see page 46). POCKETRAK CX Reference Manual 74 - Yamaha PocketrakCX | Reference Manual - Page 75
Possible cause Corrective action The audio file is not in the type of PCM (WAV) format that is supported by the unit. The unit will not play back a WAV file that was not recorded on the unit. Possible cause Windows Media Player to transfer the files (see page 64). POCKETRAK CX Reference Manual 75 - Yamaha PocketrakCX | Reference Manual - Page 76
the recorder. If the computer does not recognize the unit, try connecting it again. If you connect the unit to any computer other than those supported by the unit, Yamaha will not computer. Corrective action Connect the unit to a USB2.0 High Speed terminal. POCKETRAK CX Reference Manual 76 - Yamaha PocketrakCX | Reference Manual - Page 77
Disconnect the unit from the computer, then reconnect it. The recorded audio sounds noisy. Possible cause Wind noise has been recorded. Corrective action The built-in stereo microphone is highly sensitive Corrective action Empty the Recycle Bin (see page 44). POCKETRAK CX Reference Manual 77 - Yamaha PocketrakCX | Reference Manual - Page 78
battery, but Yamaha will not recording without changing the recording mode, and assumes that no recorded files exist on the microSD card. Therefore, if you record one file until the microSD card is full, you cannot record further even if you change the file or folder. POCKETRAK CX Reference Manual - Yamaha PocketrakCX | Reference Manual - Page 79
Appendix Q: I cannot play a recorded file that was stored on the computer and transferred back to the unit. A: You may have changed the file name on the the VOICE or LINE folder. However, you will be able to play the file if you transfer it into the MUSIC folder. POCKETRAK CX Reference Manual 79 - Yamaha PocketrakCX | Reference Manual - Page 80
input) 3.5-mm mini, microSD card slot +5˚C - +35˚C (+41˚F - +95˚F) 10mW + 10mW (at 16Ω load) Eneloop AA Ni-MH rechargeable battery (1) Or, "AA/LR6" alkaline battery (1) POCKETRAK CX Reference Manual 80 - Yamaha PocketrakCX | Reference Manual - Page 81
off, no recording monitoring, FLAT Yamaha Corp. reserves the right to change or modify products or specifications at any time without prior notice. Since specifications, equipment or options may not be the same in every locale, please check with your Yamaha dealer. POCKETRAK CX Reference Manual - Yamaha PocketrakCX | Reference Manual - Page 82
messages 72 External audio device 14 External recording..... 13 Initializing the menu settings 53 L LCD screen 4, 7 LED 5, 25 Level meter 11, 13 Linear PCM 7 List screen 8 LIST/INDEX button 5, 8 Locating the file to play back 28 Locating the index 28 POCKETRAK CX Reference Manual - Yamaha PocketrakCX | Reference Manual - Page 83
recording 47 Tripod 11 Troubleshooting 56, 74 U USB terminal 6, 55 USER 20, 36 V VAS (Voice Activated System 22 Version 53 Voice sensing level (VAS value 22 VOL + / - button 4 Volume 4 W Wind screen 10 Windows Media Player 60 POCKETRAK CX Reference Manual 83 U.R.G., Pro Audio & Digital
-
 1
1 -
 2
2 -
 3
3 -
 4
4 -
 5
5 -
 6
6 -
 7
7 -
8
-
9
-
10
-
11
-
12
-
13
-
14
-
15
-
16
-
17
-
18
-
19
-
20
-
21
-
22
-
23
-
24
-
25
-
26
-
27
-
28
-
29
-
30
-
31
-
32
-
33
-
34
-
35
-
36
-
37
-
38
-
39
-
40
-
41
-
42
-
43
-
44
-
45
-
46
-
47
-
48
-
49
-
50
-
51
-
52
-
53
-
54
-
55
-
56
-
57
-
58
-
59
-
60
-
61
-
62
-
63
-
64
-
65
-
66
-
67
-
68
-
69
-
70
-
71
-
72
-
73
-
74
-
75
-
76
-
77
-
78
-
79
-
80
-
81
-
82
-
83
 |
 |

EN
POCKET RECORDER
POCKETRAK CX
Reference Manual