Yamaha PocketrakCX Reference Manual - Page 11
Attaching the recorder to a tripod or a microphone stand, Recording a musical performance
 |
UPC - 086792893440
View all Yamaha PocketrakCX manuals
Add to My Manuals
Save this manual to your list of manuals |
Page 11 highlights
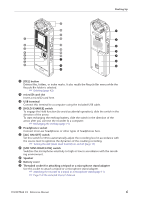
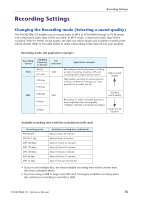
Recording Attaching the recorder to a tripod or a microphone stand You can attach the recorder to a commercially-available camera or camcorder tripod using the threaded socket on the unit. You can also attach the recorder to a microphone stand using the included microphone stand adapter. In this way, you can set up the recorder in the optimum position. This can be useful for recording musical performances. (Please refer to page 9 of the included Owner's Manual.) Recording a musical performance Before recording, set the [ALC] switch to [OFF] and the [MIC SENS] (microphone sensitivity) switch to [LOW]. ON OFF HIGH LOW ALC MIC SENS PAUSE ESC SPEED REC STOP PLAY MENU ENTER VOL 1. Press the [FOLDER/A-B REPEAT] button located on the side panel repeatedly to select a folder into which to record. FOLDER PAUSE ESC SPEED REC STOP PLAY MENU ENTER Hint: · Pressing the [FOLDER/A-B REPEAT] button repeatedly will scroll through the folders. Select a folder from folders A-D. 2. Press the [REC/PAUSE ] button. The unit enters recording [STANDBY] mode. (Recording has not yet started.) Level meter Note: · The level meter will move left or right in response to the sound level from the micro- phone. POCKETRAK CX Reference Manual 11
-
 1
1 -
2
-
3
-
4
-
5
-
 6
6 -
 7
7 -
 8
8 -
 9
9 -
 10
10 -
 11
11 -
 12
12 -
 13
13 -
 14
14 -
 15
15 -
 16
16 -
17
-
18
-
19
-
20
-
21
-
22
-
23
-
24
-
25
-
26
-
27
-
28
-
29
-
30
-
31
-
32
-
33
-
34
-
35
-
36
-
37
-
38
-
39
-
40
-
41
-
42
-
43
-
44
-
45
-
46
-
47
-
48
-
49
-
50
-
51
-
52
-
53
-
54
-
55
-
56
-
57
-
58
-
59
-
60
-
61
-
62
-
63
-
64
-
65
-
66
-
67
-
68
-
69
-
70
-
71
-
72
-
73
-
74
-
75
-
76
-
77
-
78
-
79
-
80
-
81
-
82
-
83
 |
 |
