Yamaha PocketrakCX Reference Manual - Page 24
Recording with the self timer
 |
UPC - 086792893440
View all Yamaha PocketrakCX manuals
Add to My Manuals
Save this manual to your list of manuals |
Page 24 highlights
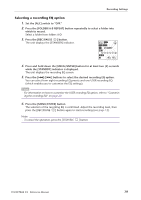
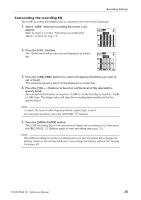
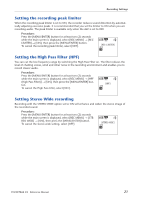
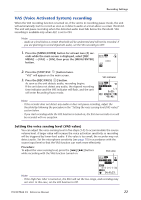
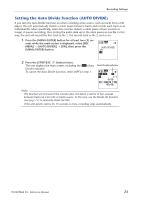
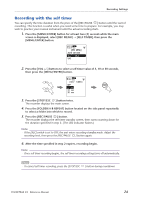
Recording Settings Recording with the self timer You can specify the time duration from the press of the [REC/PAUSE ] button until the start of recording. This function is useful when you need some time to prepare. For example, you may wish to practice your musical instrument until the actual recording starts. 1. Press the [MENU/ENTER] button for at least two (2) seconds while the main screen is displayed, select [REC MENU] → [SELF TIMER], then press the [MENU/ENTER] button. 2. Press the [VOL +/-] buttons to select a self timer value of 5, 10 or 30 seconds, then press the [MENU/ENTER] button. VOL MENU ENTER 3. Press the [STOP/ESC ] button twice. The recorder displays the main screen. 4. Press the [FOLDER/A-B REPEAT] button located on the side panel repeatedly to select a folder into which to record. 5. Press the [REC/PAUSE ] button. The recorder displays the self timer standby screen, then starts counting down for the duration specified in step 2. (The LED indicator flashes.) Note: · If the [ALC] switch is set to OFF, the unit enters recording standby mode. Adjust the recording level, then press the [REC/PAUSE ] button again. 6. After the time specified in step 2 expires, recording begins. Note: · Once self timer recording begins, the self timer recording setting turns off automatically. Hint: · To cancel self timer recording, press the [STOP/ESC ] button during countdown. POCKETRAK CX Reference Manual 24
-
 1
1 -
2
-
3
-
4
-
5
-
6
-
7
-
8
-
9
-
10
-
11
-
12
-
13
-
14
-
15
-
16
-
17
-
18
-
 19
19 -
 20
20 -
 21
21 -
 22
22 -
 23
23 -
 24
24 -
 25
25 -
 26
26 -
 27
27 -
 28
28 -
 29
29 -
30
-
31
-
32
-
33
-
34
-
35
-
36
-
37
-
38
-
39
-
40
-
41
-
42
-
43
-
44
-
45
-
46
-
47
-
48
-
49
-
50
-
51
-
52
-
53
-
54
-
55
-
56
-
57
-
58
-
59
-
60
-
61
-
62
-
63
-
64
-
65
-
66
-
67
-
68
-
69
-
70
-
71
-
72
-
73
-
74
-
75
-
76
-
77
-
78
-
79
-
80
-
81
-
82
-
83
 |
 |
