Yamaha PocketrakCX Reference Manual - Page 47
Using the Timer Functions, Programming Timer recording
 |
UPC - 086792893440
View all Yamaha PocketrakCX manuals
Add to My Manuals
Save this manual to your list of manuals |
Page 47 highlights
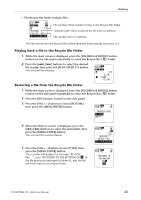
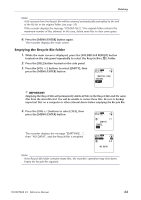
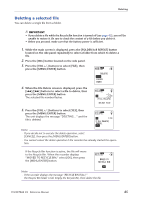
Using the Timer Functions Using the Timer Functions Programming Timer recording Timer recording enables you to set the recorder so that it will start recording at the specified time. Before you proceed, make sure that the current date and time on the unit have been set correctly (see page 9). 1. Press the [MENU/ENTER] button for at least two (2) seconds while the main screen is displayed, press the [VOL +/-] buttons to select [COMMON MENU] → [TIMER & ALARM], then press the [MENU/ENTER] button. 2. Press the [VOL +/-] buttons to select [TIMER REC], then press the [MENU/ENTER] button. The recorder displays the timer indicator. Timer indicator 3. Specify the recording start time ([START TIME]). Press the [ ]/[ ] buttons to select the hour or minute, use the [VOL +/-] buttons to set the value, then press the [MENU/ENTER] button. Note: · You can program the time up to 24 hours ahead. 4. Specify the recording time duration ([REC TIME]). Press the [ ]/[ ] buttons to select the desired recording time duration from "30m," "1h," "2h" or "MAX" (recording continues until the available space used up). Then press the [MENU/ENTER] button. Recording time 5. When the unit displays [SELECT FOLDER], press the [ ]/[ ] buttons to select the desired folder into which to record, then press the [MENU/ENTER] button. Timer recording is now programmed. At the programmed time, the recorder automatically starts to record, and a new file is created in the specified folder. (The timer indicator ( ) will flash during Timer recording. Note: · You cannot select the LINE (L), MUSIC (M) or Recycle Bin ( ) folders for Timer recording. POCKETRAK CX Reference Manual 47
-
 1
1 -
2
-
3
-
4
-
5
-
6
-
7
-
8
-
9
-
10
-
11
-
12
-
13
-
14
-
15
-
16
-
17
-
18
-
19
-
20
-
21
-
22
-
23
-
24
-
25
-
26
-
27
-
28
-
29
-
30
-
31
-
32
-
33
-
34
-
35
-
36
-
37
-
38
-
39
-
40
-
41
-
 42
42 -
 43
43 -
 44
44 -
 45
45 -
 46
46 -
 47
47 -
 48
48 -
 49
49 -
 50
50 -
 51
51 -
 52
52 -
53
-
54
-
55
-
56
-
57
-
58
-
59
-
60
-
61
-
62
-
63
-
64
-
65
-
66
-
67
-
68
-
69
-
70
-
71
-
72
-
73
-
74
-
75
-
76
-
77
-
78
-
79
-
80
-
81
-
82
-
83
 |
 |
